
Web Editor
Turn on suggestions
Auto-suggest helps you quickly narrow down your search results by suggesting possible matches as you type.
Showing results for
- Alfresco Hub
- :
- ACS - Hub Docs
- :
- Web Editor
Web Editor
- Subscribe to RSS Feed
- Mark as New
- Mark as Read
- Bookmark
- Subscribe
- Printer Friendly Page
- Report Inappropriate Content
6 Jun 2015
0:40 AM
Obsolete Pages{{Obsolete}}
The official documentation is at: http://docs.alfresco.com
Table of Contents
Introduction
The Alfresco Web Editor (AWE) is a Spring Surf based web application that utilises the Forms Service to provide in-context editing capabilities to Alfresco repository content (non AVM).
This page provides details on deploying and configuring AWE using the distributed artifacts, alternatively, to get up and running quickly using the latest code in HEAD you may prefer this Getting Started guide.
Documentation about the client side framework can be found at the Web_Editor_Framework page.
Deployment
The distribution of AWE consists of a single zip file named alfresco-community-webeditor-<version>.zip (at the time of writing only available from the nightly build).
WAR File Deployment
The simplest and quickest way to deploy AWE is to use the pre-built WAR (awe.war) file and deploy it in the same application server instance of your web application.
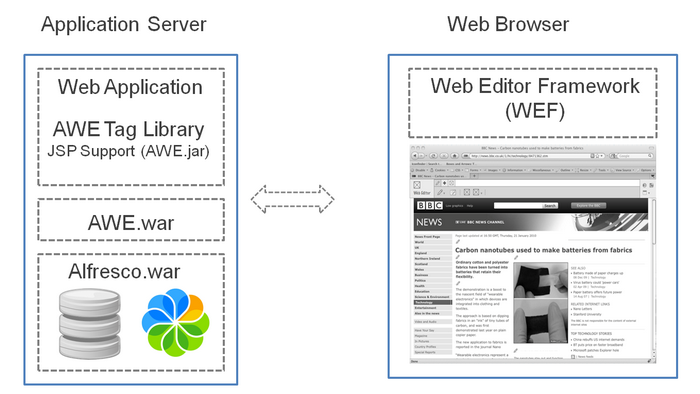
Being a Spring Surf based application AWE does not have to be deployed in the same application server instance as the Alfresco repository, however, this section presumes that it is. The diagram below depicts this.
The 'Web Application' box represents your web application. The AWE tag library provides the ability to mark areas of the page as editable. The areas marked can represent any property or content from the Alfresco repository. The file named 'alfresco-webeditor-taglib-<version>.jar' needs to be copied to the WEB-INF/lib folder of your application. To include the tag library in your application simply add the following tag library declaration to your JSP page:
Once the tag library is declared the 'startTemplate', 'endTemplate' and 'markContent' tags can be used within your application. Full documentation on the tag libraries can be found below. An example application (customer.war) is also available demonstrating how to integrate and use the AWE tag library, full details of the customer sample can also be found below.
Marking content using the 'markContent' tag result in an edit icon appearing in your application, clicking this icon results in a form being displayed to allow the content and/or properties to be edited. It's highly unlikely that the default form configuration provided out of the box will be sufficient, a configuration file hook is therefore provided by the awe.war to allow custom form configuration to be provided. Presuming your Tomcat instance is set up to allow for shared classes a file named 'awe-config-custom.xml' can be placed in the shared/classes/alfresco/web-extension folder which can contain your custom form configuration.
This custom configuration file can also be used to tell the AWE where to find the repository. By default it will assume a location of http://localhost:8080/alfresco/s/. In order to change this default put the following in to the AWE config file with the appropriate values for 'MYSERVER' and 'MYPORT':
<alfresco-config>
   <plug-ins>
      <element-readers>
         <element-reader element-name='remote' class='org.springframework.extensions.config.RemoteConfigElementReader' />
      </element-readers>
   </plug-ins>

   <config evaluator='string-compare' condition='Remote'>
      <remote>
         <endpoint>
            <id>alfresco</id>
            <name>Alfresco - user access</name>
            <description>Access to Alfresco Repository WebScripts that require user authentication</description>
            <connector-id>alfresco</connector-id>
            <endpoint-url>http://MYSERVER:MYPORT/alfresco/s
            </endpoint-url>
            <identity>user</identity>
         </endpoint>
      </remote>
   </config>
</alfresco-config>
Spring Surf Application Deployment
The AWE distribution also includes all the files required to provide the AWE functionality within an existing Spring Surf application, to do so copy the following files to your application's WEB-INF/lib folder:
- yui-2.7.0.jar
- spring-webeditor-1.0.0.CI-SNAPSHOT.jar
- alfresco-forms-client-3.3.jar
- alfresco-webeditor-plugin-3.3.jar
The YUI and spring-webeditor JAR files represent the Web Editor Framework (WEF) which AWE is built upon. Details of the WEF can be found here. The remaining 2 JAR files provide the AWE functionality. If you plan to use AWE within the app (as opposed to the application just being a host for the AWE services) you will also require the following 2 files to be copied into WEB-INF/lib:
- spring-webeditor-client-jsp-1.0.0.CI-SNAPSHOT.jar
- alfresco-webeditor-taglib-3.3.jar
If you do use these files a servlet filter has to be defined in your application's web.xml file. If the filter is not provided the tags will be ignored. The following filter configuration is required:
<filter>
    <filter-name>Alfresco Web Editor Filter</filter-name>
    <description>Enables support for the Alfresco Web Editor</description>
    <filter-class>org.alfresco.web.awe.filter.WebEditorFilter</filter-class>
    <init-param>
       <param-name>contextPath</param-name>
       <param-value>/your-context-path</param-value>
    </init-param>
</filter>

<filter-mapping>
   <filter-name>Alfresco Web Editor Filter</filter-name>
   <url-pattern>/*</url-pattern>
</filter-mapping>
Please note that the 'contextPath' parameter has to be set accordingly, if this is not provided a default contextPath of '/awe' will be presumed.
No further configuration is required, all the necessary Spring context files and Alfresco configuration files are contained within the JAR files. However, this does mean there is no default hook point for custom form configuration but as you have control over the application any necessary configuration can be located anywhere you desire.
The 'customer' sample can still be used as an example, simply deploy the customer.war file and once exploded edit the web.xml to point the AWE servlet filter to your application.
Configuration
There are 3 main areas of configuration: the tag library (mainly the 'markContent' tag used to define what is actually editable); the AWE servlet filter; and the form configuration. Each is described in the following sections.
Tag Library
The tag library is made up of 3 tags, 'startTemplate', 'markContent' and 'endTemplate'.
startTemplate
The startTemplate tag bootstrap's the WEF via a 'script' element that executes a webscript, this tag should therefore be placed in the 'head' section of your page.
The startTemplate tag has only one optional attribute.
toolbarLocation
- The toolbarLocation attribute controls the initial location of the toolbar, valid values are 'top', 'left' and 'right', the default is 'top'.
An example use of the startTemplate tag is shown below.
<awe:startTemplate toolbarLocation='top' />
The startTemplate tag renders the following HTML (presuming the default contextPath is being used).
<script type='text/javascript' src='/awe/service/wef/bootstrap'></script>
markContent
The markContent tag indicates an editable area of the page. The tag renders an edit icon that when clicked displays a form for editing the corresponding Alfresco content and/or properties.
The markContent tag has two mandatory attributes and two optional attributes.
id
- The mandatory id attribute specifies the NodeRef of the Alfresco node to be edited.
title
- The mandatory title attribute defines a descriptive title for the editable area being marked. The title used will be used in the quick edit drop down menu of editable items, as the title of form edit popup/dialog and the 'alt' text and tooltip text of the edit icon.
formId
- The optional formId attribute specifies which form will be used when the marked area is edited. See the Form Configuration section below for more details.
nestedMarker
- The optional nestedMarker attribute defines whether the editable area is nested within another HTML tag that represents the content being edited. If set to 'true' the whole parent element is highlighted when the area is selected in the quick edit drop down menu. If set to 'false' only the edit icon is highlighted.
An example use of the markContent tag is shown below.
The markContent tag renders the following HTML for each bit of content marked on the page.
<a href='/awe/page/metadata?nodeRef=[nodeRef]&js=off&title=[title]&redirect=[redirect]'></a>
The [nodeRef] and [title] placeholders are replaced with the values from the tag's attributes. The [markerId] is an id generated to uniquely identify the span representing the marked content.
endTemplate
The endTemplate tag is responsible for initializing AWE with details of all the marked content areas on the page. It also renders a 'script' element that executes the WEF resources webscript which starts the process of downloading all the assets required to render and display the toolbar and all configured plugins, this tag should therefore be placed just before the closing body element.
The endTemplate tag does not have any attributes.
An example use of the endTemplate tag is shown below.
<awe:endTemplate />
The endTemplate tag renders the following HTML (presuming the default contextPath is being used).
<script type='text/javascript'>
WEF.ConfigRegistry.registerConfig('org.springframework.extensions.webeditor.ui.ribbon',
{
   position: 'top'
});

WEF.ConfigRegistry.registerConfig('org.alfresco.awe',
{
   id: 'awe',
   name: 'awe',
   editables: [
   {
      id: '[markerId]',
      nodeRef: '[nodeRef]',
      title: '[title]',
      nested: false,
      redirectUrl: window.location.href
   }]
});

</script>
<script type='text/javascript' src='/awe/service/wef/resources'></script>
The 'editables' property is an array of objects representing each piece of marked content on the page, only one is shown here for brevity.
Filter
The startTemplate, markContent and endTemplate tags will only render their output if they detect the presence of the AWE servlet filter. This means the tags can remain in the JSP page in production and have no effect (presuming the servlet filter configuration is removed from web.xml).
To enable the tags the following servlet filter configuration needs to be added to the web application's web.xml.
<filter>
   <filter-name>Alfresco Web Editor Filter</filter-name>
   <description>Enables support for the Alfresco Web Editor</description>
   <filter-class>org.alfresco.web.awe.filter.WebEditorFilter</filter-class>
</filter>

<filter-mapping>
   <filter-name>Alfresco Web Editor Filter</filter-name>
   <url-pattern>/*</url-pattern>
</filter-mapping>
Two optional parameters are also available, they control the contextPath used when URLs to AWE are generated and the debug mode of AWE.
<init-param>
   <param-name>contextPath</param-name>
   <param-value>/quickstart</param-value>
</init-param>

<init-param>
   <param-name>debug</param-name>
   <param-value>true</param-value>
</init-param>
Forms
AWE uses a form to edit the node referenced by a 'markContent' tag, be default the form displayed will contain the 'cm:title', 'cm:description' and 'cm:content' fields. An alternative form can be used by providing the 'markContent' tag with a 'formId' attribute. Out of the box only two other forms are configured, a form with an id of 'title' and one with an id of 'description'. As the id's indicate the forms just display a single property, 'cm:title' and 'cm:description', respectively.
Furthermore, the node type is presumed to be 'cm:content'.
If you have custom types or wish to specify other properties the usual forms configuration techniques can be used. When starting up, the AWE looks for a configuration file on the classpath named 'alfresco/web-extension/awe-config-custom.xml'. Place any custom form definitions in this file.
Sample
An unsupported 'customer' WAR file is available in the AWE distribution, it shows how a customer may use AWE in a very simple JSP based web application.
A 'customer' tag library is provided, which includes two tags, 'content' and 'property', as their name suggest, they allow content and properties to be pulled from an Alfresco repository and output to a JSP page. These are included purely as a demonstration sample and should NEVER be used in a production environment.
The 'content' tag requires one mandatory attribute called 'nodeRef'. The 'property' tag requires two mandatory attributes, 'nodeRef' and 'property'. An example use of both tags is shown below.
The sample 'customer' application consists of several simple JSP pages that display the content and properties of two nodes from the repository, the /includes/noderefs.jsp page should be updated to provide the NodeRef's of two nodes in your repository.
By default the sample will pull content from the Alfresco repository located at 'http://localhost:8080/alfresco' using a username and password of 'admin/admin'. These values can be provided via 'context-param' values in web.xml. An example is shown below.
   <context-param>
      <param-name>org.customer.alfresco.host</param-name>
      <param-value>localhost</param-value>
   </context-param>

   <context-param>
      <param-name>org.customer.alfresco.port</param-name>
      <param-value>8080</param-value>
   </context-param>

   <context-param>
      <param-name>org.customer.alfresco.context</param-name>
      <param-value>alfresco</param-value>
   </context-param>

   <context-param>
      <param-name>org.customer.alfresco.username</param-name>
      <param-value>admin</param-value>
   </context-param>

   <context-param>
      <param-name>org.customer.alfresco.password</param-name>
      <param-value>admin</param-value>
   </context-param>
You must be a registered user to add a comment. If you've already registered, sign in. Otherwise, register and sign in.
Alfresco Content Services Hub Docs
Ask for and offer help to other Alfresco Content Services Users and members of the Alfresco team.
Related links:
Latest Articles
- Alfresco Community Edition 201911 GA Release Notes
- Alfresco Community Edition 201910 EA Release Notes
- Deconstructing SOLR Indexes
- Alfresco Community Edition 201901 GA Release Notes
- Alfresco Community Edition 201808 EA file list
- php_upload.docx
- Alfresco Community Edition 201808 EA Release Notes
- Alfresco_6.0_docker deployment.pdf
- Alfresco Community Edition 201806 GA file list
- alfresco.log
- Alfresco Addons *Incomplete list*
- Alfresco Community Edition 201806 GA Release Notes
- AGS Benchmark Driver Documentation
- Default memory allocation issue in Alfresco CE 201...
- Alfresco Community Edition 201804 EA file list
We use cookies on this site to enhance your user experience
By using this site, you are agreeing to allow us to collect and use cookies as outlined in Alfresco’s Cookie Statement and Terms of Use (and you have a legitimate interest in Alfresco and our products, authorizing us to contact you in such methods). If you are not ok with these terms, please do not use this website.