
Getting Started with Alfresco Process Services
Turn on suggestions
Auto-suggest helps you quickly narrow down your search results by suggesting possible matches as you type.
Showing results for
- Alfresco Hub
- :
- APS & Activiti - Hub Docs
- :
- Getting Started with Alfresco Process Services
Getting Started with Alfresco Process Services
- Subscribe to RSS Feed
- Mark as New
- Mark as Read
- Bookmark
- Subscribe
- Printer Friendly Page
- Report Inappropriate Content
31 Mar 2017
2:23 PM
Introduction
As you may know, Alfresco has two main products, the Alfresco Content Services and the Alfresco Process Services (powered by Activiti). Both of these products come in a Community version that is free to use, and a paid for Enterprise version. The Enterprise version comes with the usual support packages, guarantees, extra functionality for scalability, management, modelling and so on that you have come to expect and need for most production installations.
What is Activiti?
Activiti is an open source BPMN process engine implemented in Java that can be used to design, implement, deploy, and run workflows. These workflows are usually used to manage and automate business processes in an organization.
Activiti was created in 2010 by Tom Baeyens and Joram Barrez, both coming from JBoss where they were developing the jBPM workflow engine. The problem with jBPM was however that it was not using an Apache license and it did not support the new workflow definition standard called BPMN 2.0. The Alfresco ECM product had at that time been supporting workflow for quite some time by embedding the jBPM engine. So it made sense when Alfresco decided to employ both Tom and Joram to build Alfresco Activiti open source workflow engine.
As with all successful open source projects there comes a point when the adoption from larger organizations starts to demand support, major features around scalability, management, reporting, advanced design tools etc. This is how Alfresco Alfresco Process Services was born in 2014.
The core workflow engine in Alfresco Process Services is the Apache licensed open source product that runs BPMN 2.0 workflow definitions. Here are some (there are more and also new ones released frequently) of the extra features you get with the Alfresco Process Services product:
- User Task Management - group task lists, dynamic form attachments, MS Office document preview, localized UI
- Form Design - forms library, multi-tab forms, rich form controls, data driven controls (REST), support for conditional visibility
- Process Designer - step based process designer for the end-user, DMN compliant decision tables, sharing of applications, models, stencil sets, export/import of applications, forms, models, and stencil sets, auto document generation
- Process Analytics (not supported at all in community) - process heat maps, process summary reports, task performance reports, SLA reports
- System Administration - Admin UI for process engine configuration and cluster farm configuration, LDAP and AD sync, multi-tenant support
- Application Integration - Alfresco One ECM, Box and Google Drive, SharePoint
As you can see, there are loads of useful/needed features here if you are just about to embark on a major business process project. Not to mention commercial support and controlled release program.
What is BPMN 2.0?
The Business Process Model and Notation version 2.0 is a standard for defining workflows that is managed by Object Management Group (OMG). It covers both the graphical representation (shapes and XML serialization of diagram) and the process definition (XML serialization) used to execute the process. The visual representation of the process is very useful as it can be discussed around by anyone involved in the project, from end-users to the developer implementing the process.
BPMN Graphical Modelling Elements
The five basic categories of BPMN elements are flow objects, data, connecting objects, swimlanes, and artifacts.
The flow objects are the main graphical elements used to define the behaviour of the business process:
- Events -
- Activities -
- Gateways -


The data is represented with the four elements:
- Data Objects
- Data Inputs
- Data Outputs
- Data Stores

There are four ways of connecting the flow objects to each other or other information. There are four connecting objects:
- Sequence Flows -
- Message Flows -
- Associations -
- Data Associations -


The artifacts are used to provide additional information about the process:
- Group -
- Text Annotation -


Here is a graphical model example of a process:
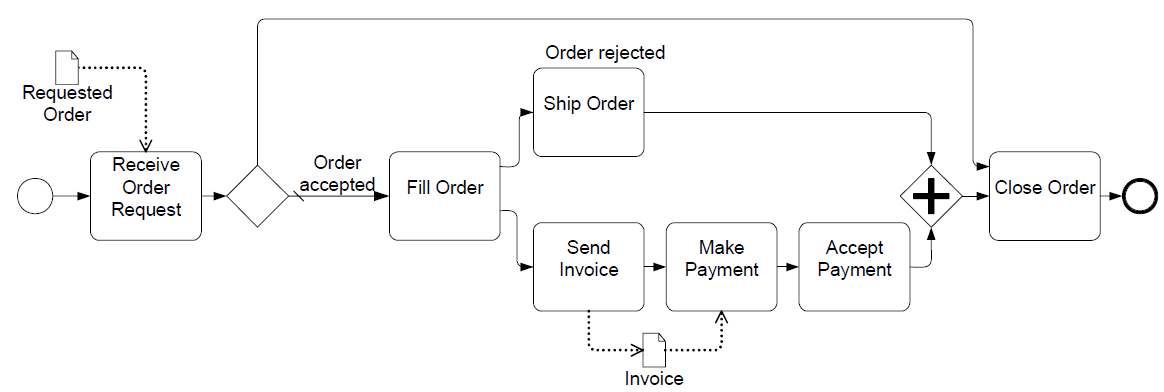
You start interpreting/reading the process model from the left (or more specifically you look for the start object, which is the 
If the order is accepted, then it will be filled and the flow will be split up into parallel execution so you can ship the order and do the invoicing at the same time. There is then a parallel gateway 
So as we can see, this graphical representation of the process is very useful as it can be understood by anyone involved in the project. It is also cheap to make changes in the graphical model compared to making changes in XML, deploying to the engine, discover problems, then start over and so on. The graphical modelling tool usually has a process validation feature, so you can immediately see if something does not add up. The graphical modelling tool will usually also provide the XML representation of the process so you can keep working with it if you like.
BPMN Process XML Serialization
Now when we know how to model a process with graphical symbols we need to dig into how that is actually translated into a representation that the process engine can execute, in the case of BPMN this is XML. It is worth mentioning though, that when you later on use the BPMN Graphical Editor, the details of the XML discussed here will be transparent to you. It will be easier and less error prone to work with the graphical view than hand-coding the XML. However, in some cases, such as when writing scripts, it might be easier to work directly in the XML.
If you are coming from a background where you have been with Alfresco for a while and done loads of jPDL (XML) process design and implementations with jBPM. Then it would make sense to also have a look at the differences between the two process definition languages, jPDL and BPMN 2.0.
For every BPMN 2.0 syntax that we look at we will also look at the corresponding jPDL syntax, if available, which might speed up the move to BPMN 2.0 if you know jPDL. This will also be useful in the way that it will give you an idea of how to convert your old jBPM workflows to run in the new Activiti engine.
Namespace, resource, collaboration definitions
This is the syntax at the start of the file defining the XML namespaces etc.
BPMN 2.0


jPDL

Start of Process Definition
This is the syntax that defines the start of the actual process definition.
BPMN 2.0

jPDL

Start Event
This is the first event in the process.
Symbol:

Note: there are more than one kind of start event, the one above is called the None start event, and it is used when we don’t know what will trigger the process, it could be an end user manually starting the process, a script starting the process, etc. But we also got for example a message start event, which is used when the process is triggered by an incoming message. A timer start event where the process is triggered when a timer expires. And there are event more start events that we don’t cover here in this introduction.
BPMN 2.0

jPDL

Connector Object
These are the transitions that have been set up between the different nodes in the workflow, setting out what routes that can be taken in the process.
Symbol:

Note: The order of the elements in the process XML definition does not matter. The sequence flow elements and the task elements can be disordered, which means that the sequence flow elements needs to be self sufficient and specify explicitly from which step (sourceRef) to which step (targetRef) they act as the connector, and not trust any order.
BPMN 2.0

jPDL

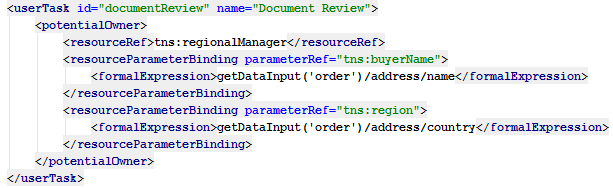
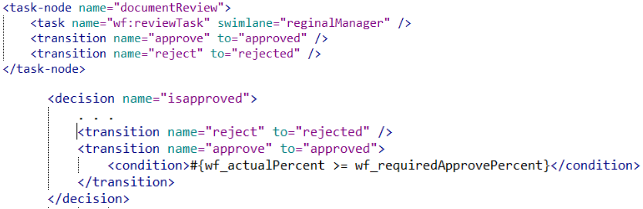
User Task definition
These are activities where an actual person/user has to do something before the process will continue.
Symbol:

BPMN 2.0
jPDL

Exclusive Gateway
These are decision nodes in the process where the flow only takes one of the available transitions.
Symbol:

BPMN 2.0

jPDL
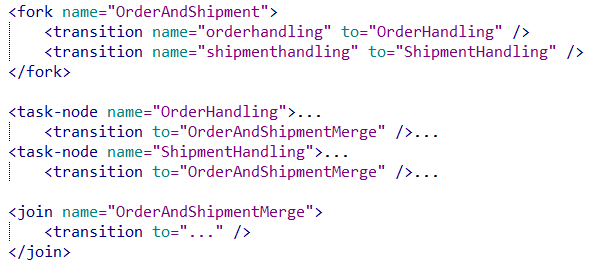
Parallel Gateway
These are nodes where the process either forks into multiple parallel execution paths or joins multiple parallel execution paths into one.
Symbol:

BPMN 2.0

jPDL
Inclusive Gateway
These are nodes where the process acts as a combination of an exclusive gateway and a parallel gateway.
Like an exclusive gateway we can define conditions on outgoing sequence flows and the inclusive gateway will evaluate them, and for each one that evaluates to ‘true’ the flows are followed in parallel, creating one concurrent execution for each sequence flow.
During a join of the parallel sequence flows the inclusive gateway will then behave in the same way as a parallel gateway and wait for each of the incoming sequence flows. However, the main difference from a parallel gateway is that the inclusive gateway will not wait for all parallel execution paths, only those that evaluated to true and were taken.
Symbol:

BPMN 2.0

jPDL
Not supported.
Service Task
These are nodes where the system is supposed to do some processing without the involvement of a user. This can be a call to an external application to fetch some data, storing something in a database, emailing etc.
Symbol:

BPMN 2.0
jPDL

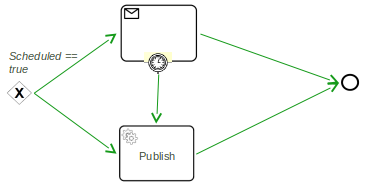
Timer
These are process nodes where the execution waits for a certain time and then continues execution.
Symbol:

Sample where we can have a decision to wait a bit before we publish something:
BPMN 2.0

jPDL

Multi Instance
These are nodes where multiple activities can be spawned off either in parallel or sequential.
Symbol:

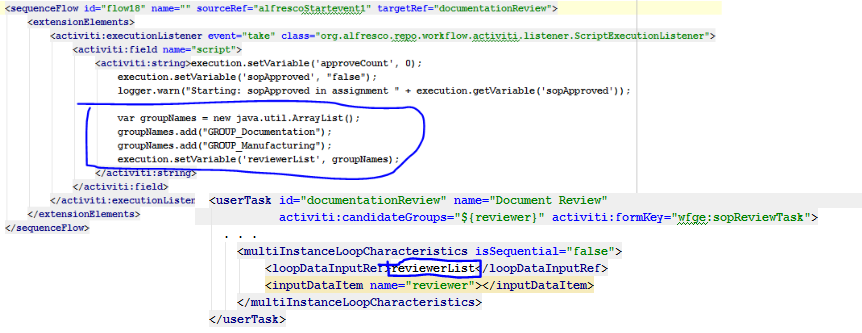
Note: the idea with multi instance nodes is to avoid having to define loop behavior manually with the help of multiple elements, such as with a decision gateway and sending the flow backwards to an earlier point in the process. Instead we are defining loop characteristics on the activity, such as a User Task, and the process engine then knows how many times to invoke the activiti (i.e. the size of the passed in collection) and when it is considered completed.
BPMN 2.0
In the following sample multi instance definition we kick off a user task for each user contained in the reviewerList variable.
jPDL
You can achieve similar multi instance behavior in jPDL with the foreach element:

Activiti BPMN Extensions
As with any standard there are situations when you might want to deviate a bit from the standard to be able to implement some cool new feature, make life easier for the user etc. Obviously when you deviate from the standard your process definition will no longer run in another BPMN 2.0 compliant engine.
A standard is usually a compromise between different companies so there is always something you which you could do differently. Sometimes when reading the BPMN 2.0 specification the constructs actually look a bit cumbersome. To make things as easy as possible Activiti introduced the Activiti BPMN Extensions. These extensions are new constructs or ways to simplify constructs that are not part of the BPMN 2.0 specification.
The Activiti Extensions are defined in such as way that they could be incorporated in future versions of the BPMN standard as a cleaner and more straightforward way to define certain elements of the process. The BPMN 2 standard actually expects these kinds of extensions to be necessary for a final system implementation since the standard does not cover the Application Programming Interface (API), rules modelling, data modelling etc.
These Activiti extensions are clearly indicated with the activiti: namespace. Some of these extensions can easily be converted to standard BPMN 2.0. The Activiti namespace is added as follows in the process definition file:

User Assignments
To assign users to tasks is something that is done over and over again. So you want it to be really straight forward and easy to interpret.
The Activiti extension uses the following new constructs:
- activiti:assignee - assign a single user to a task
- activiti:candidateUsers - assign a user from a pool of users
- activiti:candidateGroups - assign a group from a pool of groups
An example would look like this:

With standard BPMN 2.0 syntax this would look like this:

Service Task Implementation
This Activiti extension is used to link a specific service task with a piece of code to execute.
The Activiti extension uses the following new constructs:
- activiti:class - execute the code the class points to
Example:

Task and Execution Listeners
This Activiti extension allows you to very easily execute code when a task is executed or a transition happens.
The Activiti extension uses the following new constructs:
- activiti:taskListener - execute code when task is created, assigned, or completed
- activiti:executionListener - execute code when a transition is taken
Task listener example:

Execution listener example:

Expressions
Enable calling JavaDelegates implemented as Spring beans. Support Unified Expression Language (UEL) expressions to enable the process definition to communicate with backing Spring beans.
The Activiti extension uses the following new constructs:
- activiti:delegateExpression - find matching spring bean ID and execute a JavaDelegate
- activiti:expression - evaluate UEL expression and call Spring bean method
Delegate example:

UEL Expression example:

Forms
Link together a user task with a specific form definition.
The Activiti extension uses the following new constructs:
- activiti:formKey - points to a form definition
Example:

Example with Alfresco One embedded Activiti:

Summary
The Activiti BPMN extensions are used all over the place, so it’s good to get up to speed on what they mean. What we went through here covers only the main extensions, there are loads of others that you can read more about here.
Download, Install, and Start Alfresco Process Services
This article is written for the Alfresco Alfresco Process Services edition, which mean you need the Enterprise product downloaded and an Enterprise license to get going. You can request a license when downloading the Alfresco Process Services Trial.
Note. if you are already an Alfresco Process Services customer it is possible to follow along with this article without downloading and installing the trial as described in this section. You can use the new SDK 3.0 beta with the new Activiti Project template, see this article for more info.
Downloading the installer and getting a Trial license
Navigate to the https://www.alfresco.com/products/business-process-management page and click on the following download link:

This will take you to a page where you can request a 30-day trial:

After clicking START TRIAL NOW you will receive an email such as this one:
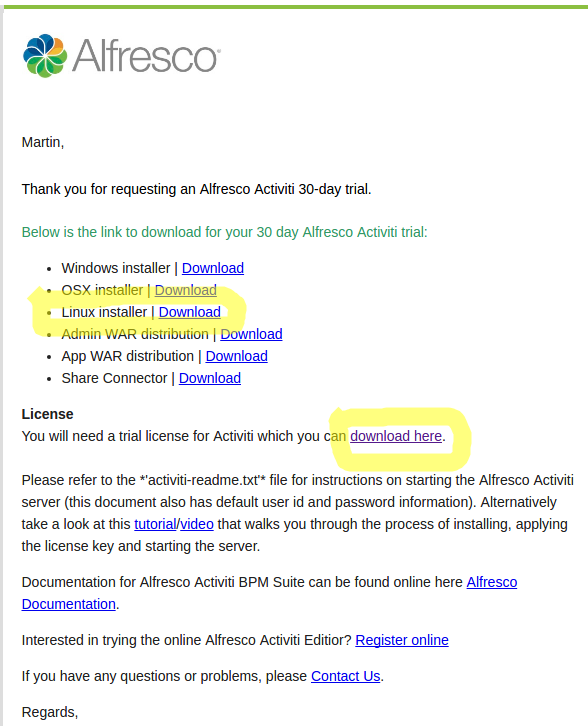
Via this email you can download the full product installer by clicking on the Download link for your operating system. In my case I’m downloading the Linux installer.
Then, to get your 30-day trial license, click on the download here link.
Installing
After downloading you will have the following two files with installer and license:

Now, create a directory where to install Alfresco Process Services:
martin@gravitonian:/opt$ sudo mkdir activiti15
[sudo] password for martin:
martin@gravitonian:/opt$ sudo chown martin:martin activiti15/
Then make the installer executable:
martin@gravitonian:~/Downloads$ chmod +x activiti-1.5.0-linux-x64-installer.run
martin@gravitonian:~/Downloads$ ls -l act*
-rwxrwxr-x 1 martin martin 300722117 Oct 11 10:56 activiti-1.5.0-linux-x64-installer.run
Start the installer:
martin@gravitonian:~/Downloads$ ./activiti-1.5.0-linux-x64-installer.run
The first screen just asks you to agree to the trial:
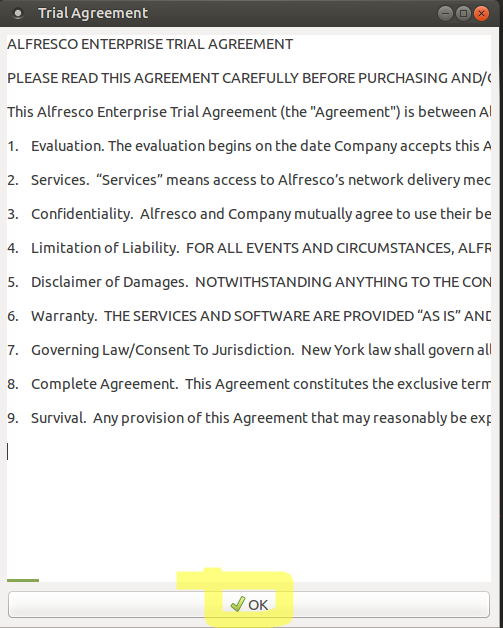
Click OK, which brings up another info dialog where you click Forward button. Next dialog asks where you want to install, pick the directory created initially:

Now click Forward and then Forward again to start installation. When installation has completed you will see this information dialog:

Make a note of the Activiti application URL: http://localhost:8080/activiti-app and the default username: admin@app.activiti.com and password admin.
There is also another Administrator/Management application available at http://localhost:8080/activiti-admin. However, we will not use this admin app initially. And it is not deployed anyway if you look in the tomcat/webapps dir:
martin@gravitonian:/opt/activiti15/tomcat/webapps$ ls -l
total 207632
-rw-r--r-- 1 martin martin 38913709 Aug 25 12:33 activiti-admin.war.undeployed
drwxrwxr-x 16 martin martin 4096 Oct 11 14:05 activiti-app
-rw-r--r-- 1 martin martin 173670025 Aug 25 12:33 activiti-app.war
drwxr-xr-x 14 martin martin 4096 Oct 11 13:54 docs
drwxr-xr-x 6 martin martin 4096 Oct 11 13:54 examples
drwxr-xr-x 5 martin martin 4096 Oct 11 13:54 host-manager
drwxr-xr-x 5 martin martin 4096 Oct 11 13:54 manager
drwxr-xr-x 3 martin martin 4096 Oct 11 13:54 ROOT
Click OK and then Finish to complete the installation.
Installing license file
Before we start the application server with the Activiti web applications we need to copy the downloaded Alfresco Process Services Trial license file to the correct directory.
martin@gravitonian:~/Downloads$ unzip activiti-trial.zip
Archive: activiti-trial.zip
inflating: activiti.lic
martin@gravitonian:~/Downloads$ cp activiti.lic /opt/activiti15/tomcat/lib/
Starting the Activiti Application Server
Now that the installation is finished we can start it all up. An Apache Tomcat server is provided by the installer to run the Activiti Application. Step into the installation directory and execute the following command:
martin@gravitonian:~$ cd /opt/activiti15/
martin@gravitonian:/opt/activiti15$ ./start-activiti.sh
The log should print license information, so you can verify that the license was installed correctly:
...
02:25:58,184 [localhost-startStop-1] INFO org.activiti.engine.impl.cfg.ProcessEngineConfigurationImpl - License found:
------------------------------------------
Holder:User
Product Key:1.0ent
Good After date:20161011
Good Before date:20161125
Multi tenant?:false
Default tenant name:trial
------------------------------------------
...
You should see following types of logs indicating that the server has started up successfully:
11-Oct-2016 14:26:19.521 INFO [main] org.apache.coyote.AbstractProtocol.start Starting ProtocolHandler ["http-nio-8080"]
11-Oct-2016 14:26:19.530 INFO [main] org.apache.coyote.AbstractProtocol.start Starting ProtocolHandler ["ajp-nio-8009"]
11-Oct-2016 14:26:19.531 INFO [main] org.apache.catalina.startup.Catalina.start Server startup in 36093 ms
As you know, the Apache Tomcat server runs on Java, but we have not installed Java and it works anyway. This is because the installer also installs Java for us in /opt/activiti15/java. The installer will also come with an H2 database. So there is really nothing needed except the installer to try everything out. You should not use the H2 database for production though.
If you which to stop the Activiti server use the following command:
martin@gravitonian:/opt/activiti15$ /opt/activiti15/tomcat/bin/catalina.sh stop
This stops Tomcat, to also stop the H2 database do:
martin@gravitonian:/opt/activiti15$ /opt/activiti15/h2/stop-h2.sh
Shutting down TCP Server at tcp://localhost
Alfresco Process Services Architecture
The architecture for the Alfresco Process Services platform looks like this:
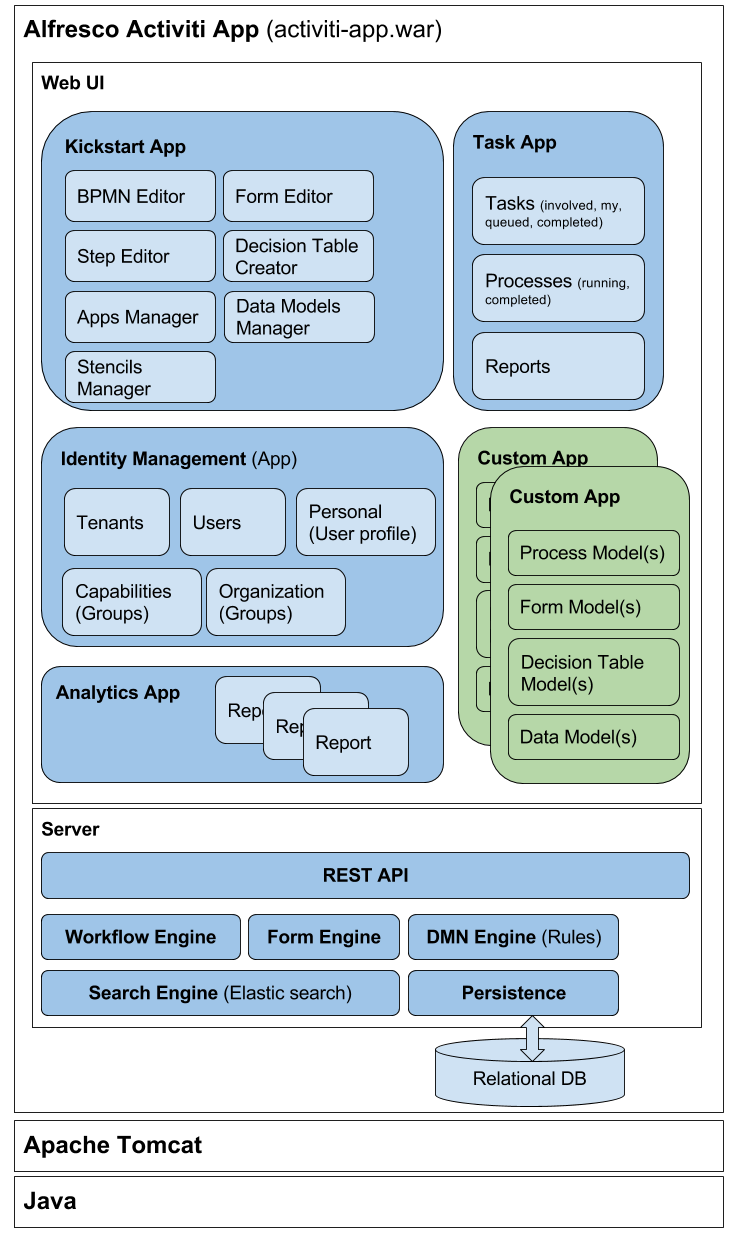
As we can see, it is all Java based and runs in a standard Java Web Container, such as Apache Tomcat. The user interface consist of a number of so called Activiti Applications. The central one for us developers and architects is the one called Kickstart App, which is used to design and implement a business process.
The Task App is used by the end-users of the business process when they want to complete tasks and manage a workflow instance. The Identity Management application is used to manage your user profile, and if you are an administrator, you can also manage groups and permissions.
When we implement business processes we create a custom application for them to live in. The application will also contain any forms, decision tables, and data models used by the business process model.
The different types of Activiti Engines implement running workflows defined with BPMN 2.0, forms execution, rules processing according to DMN standard, search, etc. Everything runs in a Java Virtual Machine (JVM).
Getting to know the Alfresco Process Services Application
Now when the server is up and running we can try out the main application that you will be working with. It is available at the http://localhost:8080/activiti-app URL and the first screen is the login:

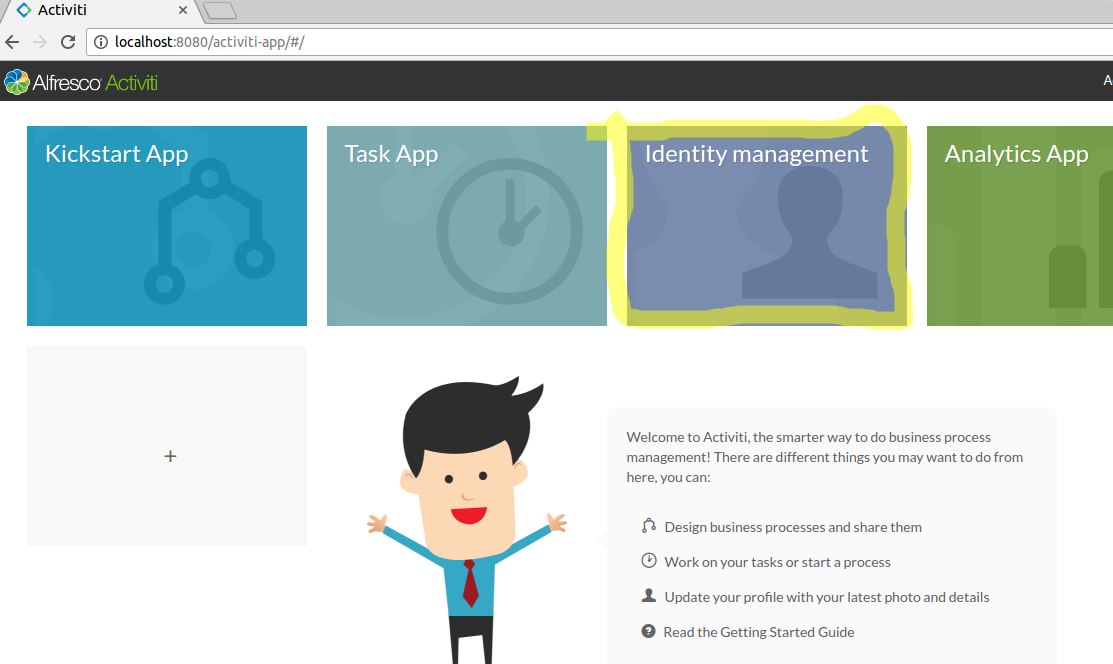
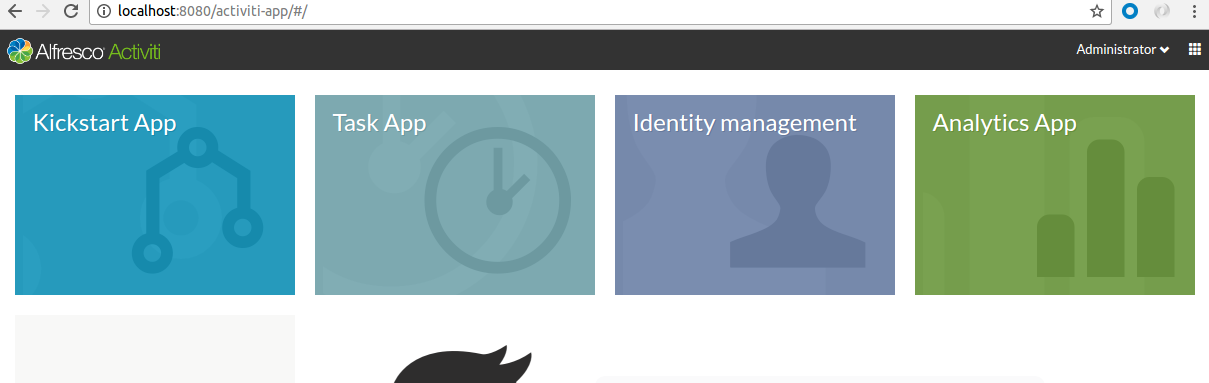
Login with admin@app.activiti.com/admin. After a successful login a home page should appear looking something like this:
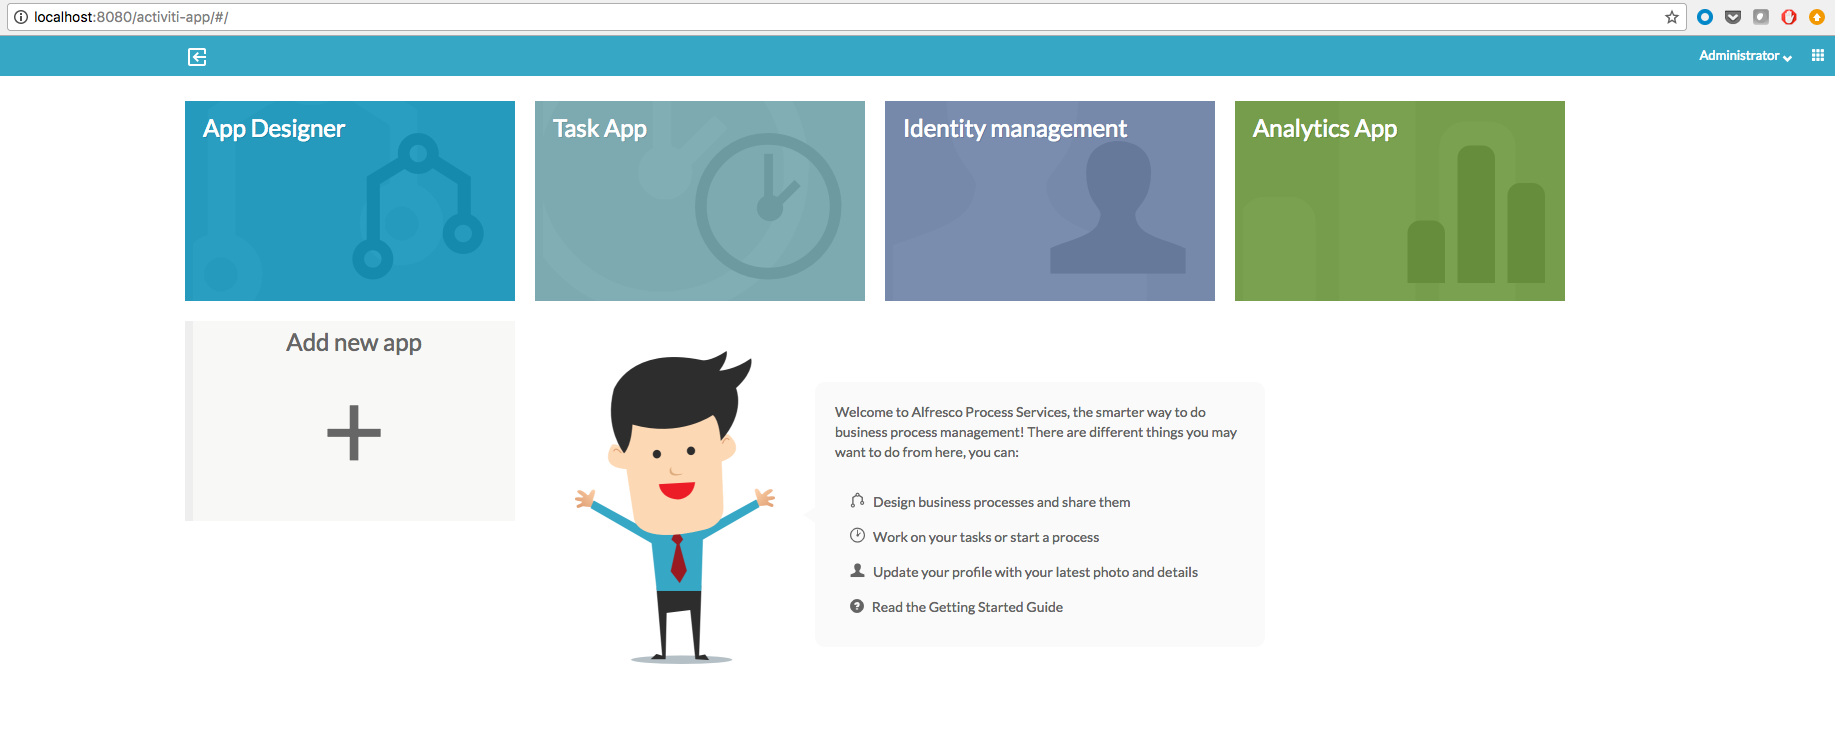
The home page presents a kind of Dashboard with a number of applications available to you. As I logged in as Administrator all available applications are visible. Applications can be restricted to certain users and groups. The out-of-the-box applications are used to do the following tasks:
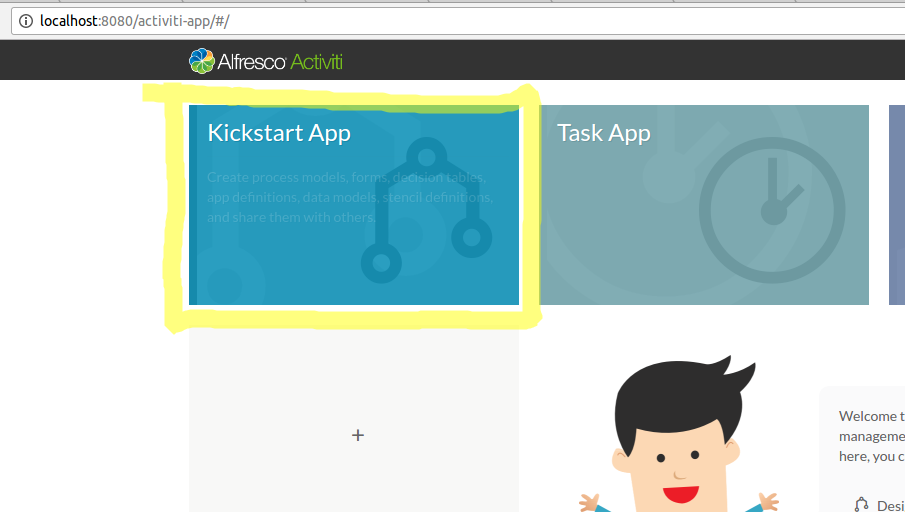
- Kickstart App - this is the workbench basically, where you design and to some extent implement your processes and share them with others as applications
- Task App - when a process instance is executed the Task App will contain any Tasks that have been assigned to the logged in user (admin in this case)
- Identity Management - this is the application you use to set up groups, tenants, users etc.
- Analytics App - various process reports with performance and throughput statistics
Implementing a Business Process
The following section will take you through implementing a business process with Alfresco Process Services. We will build a simple Invoice Payment Approval Process.
Initial Design
When designing a business process it can sometimes be beneficial to start with a Swim-lane diagram as it provides an easy way to see what participant (user, group, system) should do what in the workflow. A swim-lane diagram is also easy to discuss around when you have many different types of stakeholders, such as developers, architects, business analysts, end-users.
You don’t even have to involve Activiti at this stage if you don’t want to. A swim-lane diagram can be created in a many different diagram tools. Note though that swimlane diagrams have no explicit execution meaning from the point of view of the workflow engine.
The swim-lane diagram for our simple Invoice Payment Approval Process looks like this:

Here we can see that this workflow is started by a Team Assistant when they receive an invoice. At the same time as they are starting the workflow they also assign the person that should be the Approver. This manual assignment is needed because there might be different people approving depending on the amount.
An Approve Invoice task is then assigned to the selected Approver, which can approve or require further clarification of what the invoice is really for. If further clarification is needed then a Clarify Invoice task is assigned the initiator, which is the Team Assistant. If the invoice cannot be clarified the process is terminated.
If the invoice is approved for payment then a new pooled task Prepare Payment is assigned the Accounting group. At the same time an Escalate Timer is started that will expire after let’s say 15 days if nothing has been done and re-send an Escalated Prepare Payment task. There is usually a pay by date on invoices so the Prepare Payment task cannot hang around forever.
When the prepare payment task is completed the process execution transitions into the File Invoice task and then the Send Payment Approved Email task. The send email service task could send an email to both the initiator and the company sending the invoice, if their email were supplied when process was started. The process then terminates.
Design & Implementation
We now have a swim-lane diagram with the process that we want to implement laid out. This diagram could have been created by anybody in the client organization. They don’t even have to know that Activiti will be used to implement the process.
What we need to do now is to look through the design and fix any ambiguities. We need to make sure that the process design hangs together and that there are no loose ends. The person doing the initial design might not know all the stuff around workflow definitions and what is possible with BPMN 2.0. So there might be several iterations before we have a consistent swim-lane diagram to work with that is straightforward to translate to BPMN 2.0.
When using the BPMN Editor most people don’t use swimlanes when modelling the process as they just occupy space on the editor area and adds more work to have everything fit into the swimlanes.
The BPMN Editor and Form Editor are very powerful tools so you will actually implement the workflow as you go along, as well as designing it. The only time you really need to set outside these Editors are when you need to implement Java service tasks, listeners, custom REST endpoints etc.
Create Custom Stencils
Stencils are something that is used throughout the Activiti platform. It is basically a way to reuse domain specific stuff. It allows non-technical users to integrate custom components into their workflow without the knowledge of the component's API.
There are three types of stencils:
- Process Editor Stencils that are used to customize the BPMN Editor
- Form Editor Stencils that are used to customize the Form Editor
- Step Editor Stencils that are used to customize the Step Editor
You might be thinking, is it really necessary to talk about stencils in a getting started guide? Yes it is, once you create your process model and form models it is not possible to switch the stencils that are used for the BPMN Editor and Form Editor.
So it is good practice to create a custom process stencil and a custom form stencil and base the editors you use on them. Then you can incorporate custom components in the editors in the future without having to redraw the whole process or redesign the forms from scratch when you want to take advantage of the custom editor stencils.
So what are custom stencils anyway? The following examples will illustrate what you can use stencils for, but they are basically a way to create custom editors.
Let’s say you have a service task that can be used to call an enterprise REST API to fetch user information. The service task implementation is in Java in the com.mycompany.activiti.service.UserProfileServiceImpl. And you have to pass in userId, endpointURL etc. Basically, as a business user wanting to use this service you would have to know quite a bit of details, which most business users would not. You would have to know to use a Service Task, the service task implementation classname, parameter names etc.
Would it not be a lot nicer if the business user could use a ready made component for this as follows in the BPMN Editor:

Here the user does not have to know what the fields are called, what the classname is etc. They can just drag-and-drop this custom service task onto the canvas and set the custom properties. Note that most of the default properties for a service task have also been removed to make it easier for the end user. This is all possible by using a custom BPMN Editor stencil.
We can customize the Form Editor in a similar way by adding custom controls. Let’s say we wanted to add an Image Hyperlink control, which does not exist in the default Form Editor. We could make it available in the Form Editor as follows by creating a custom Form Editor Stencil:

The control would also have a new property tab to collect specific data needed by the control:

As we can see, stencils are really useful so let’s create some basic custom stencils that we can base our process and forms on. The custom stencils will be empty but they will prepare us for the future when we might need to add custom components to the editors.
Stencils are created via the App Designer (If you want to import ready stencils download ZIPs from here):
Clicking on this application shows the following page:

Click on the Stencils menu item at the top and then on the Create a new Stencil now! Button:

Specify the name of the stencil to “My Company Process Editor” and press the Create new stencil button. The Editor type is by default set to BPMN editor so we don’t need to change it:
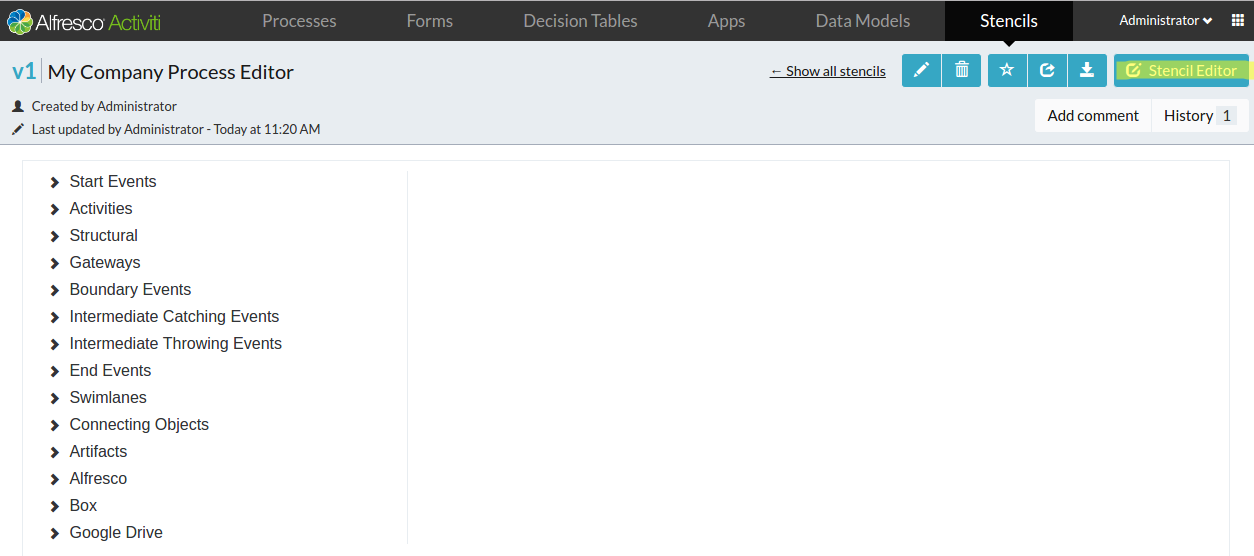
This shows the default BPMN Editor that we can now customize by clicking on the Stencil Editor button in the upper right corner. We are not going to do that but instead just keep the default Editor layout for this article. However, we are prepared to add new components if needed in the future.
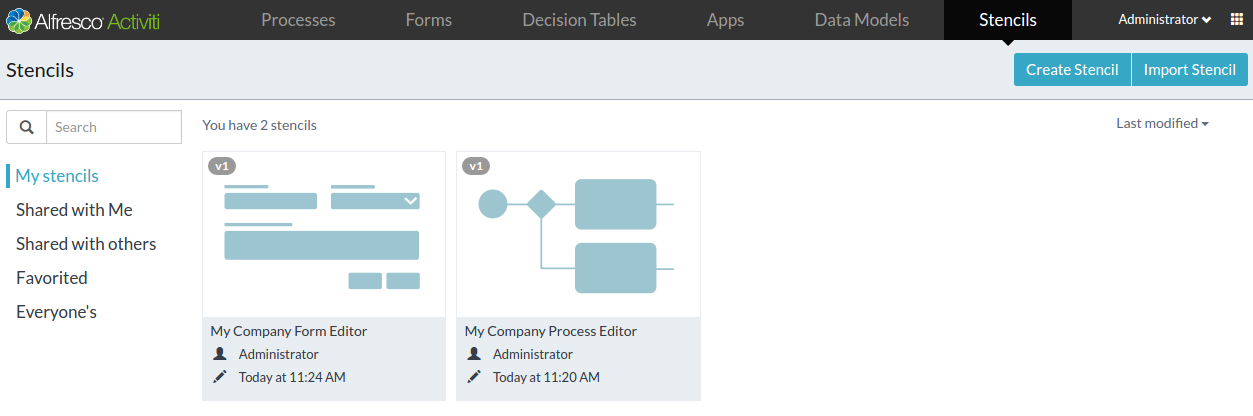
In the same way we add a Form Editor Stencil:

Here I have to select Form editor from the Editor type drop down. We should now have two stencils as follows:
Create Process Model
Now that we have custom stencils to base the editors on and we have nailed down the business process with the customer, it is time to draw it up in Activiti. We do that using the App Designer (If you just want quickly have a look at this process, then you can import it via ZIP file available here):
Clicking on this application shows the following page:
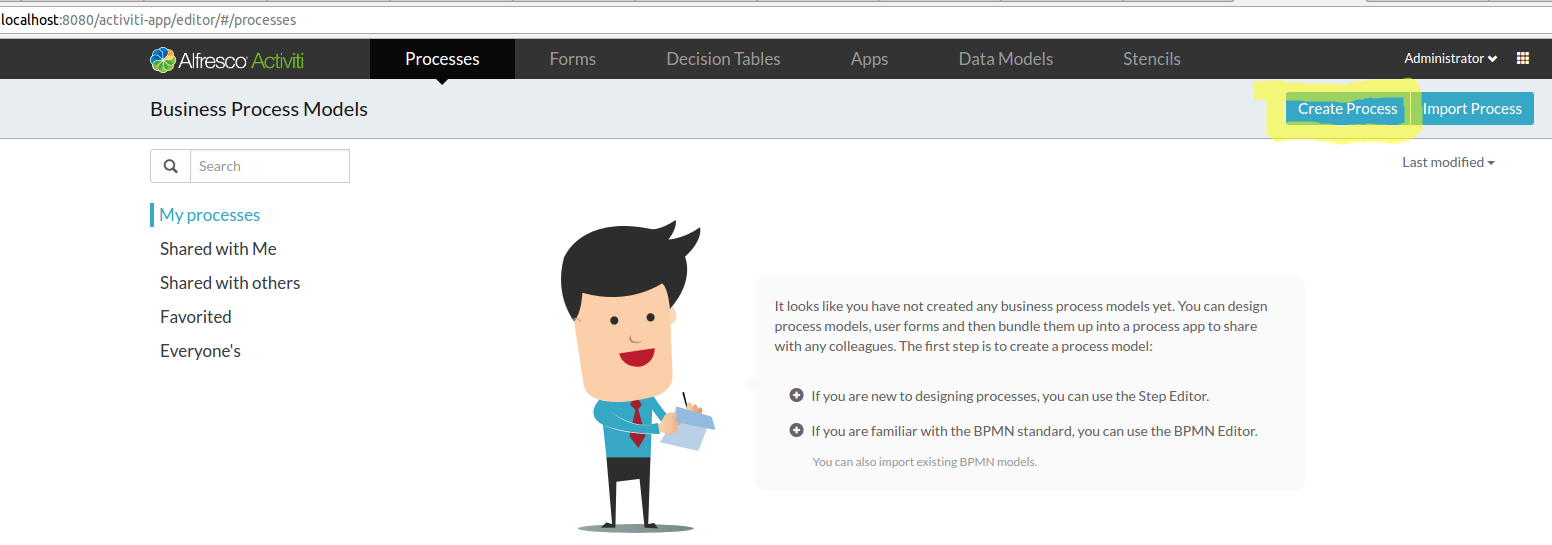
Here we can design the process, create forms for user tasks, define decision tables, data models, and new applications to contain all this. It is good practice in most cases to start with the process definition. If you need forms they can too be created via the Kickstart app page.
Click the Create Process button in the upper right corner to start the web based BPMN 2.0 designer. The first dialog that pops up is asking you for a name and description of the process:
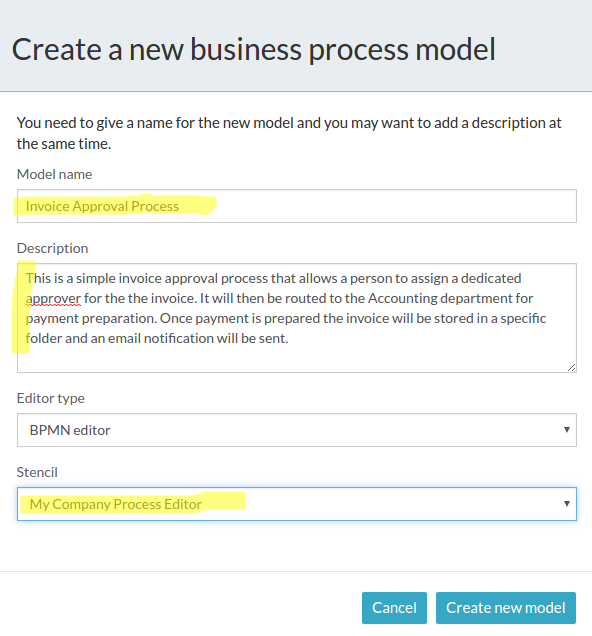
Enter name and description as above. As we are keeping the BPMN editor selection we will use the familiar BPMN 2.0 shapes to design the process. If we selected instead the Step Editor we would use a more simplified, step based, approach to designing the business process.
As stencil it is important that we now select the custom process editor stencil that we defined a moment ago. So select “My Company Process Editor” from the Stencil drop down. This future profs us so we can add custom components to this stencil and use them in this process definition in the future.
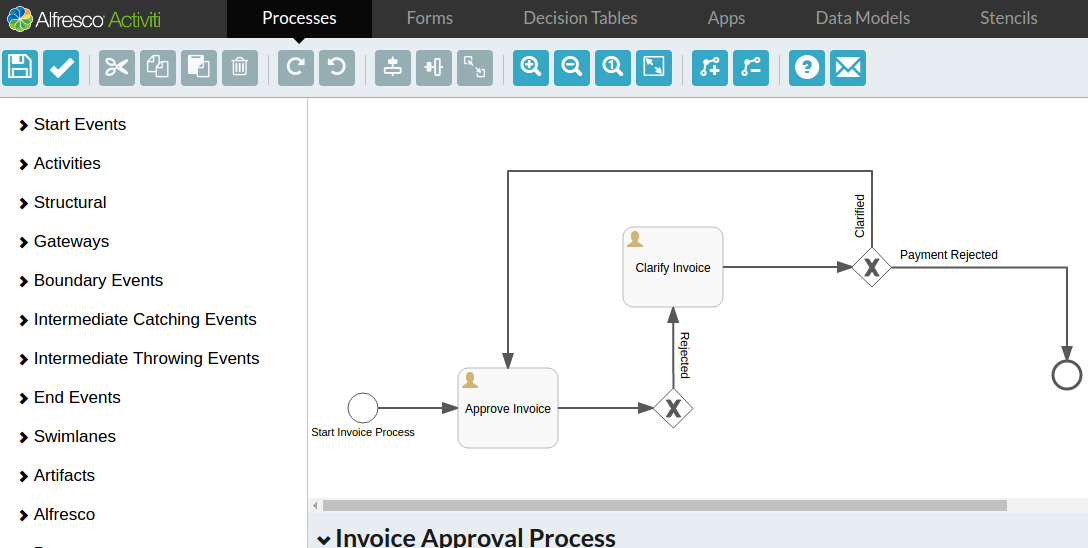
To create the new process model click the Create new model button, we should now see the BPMN Editor:

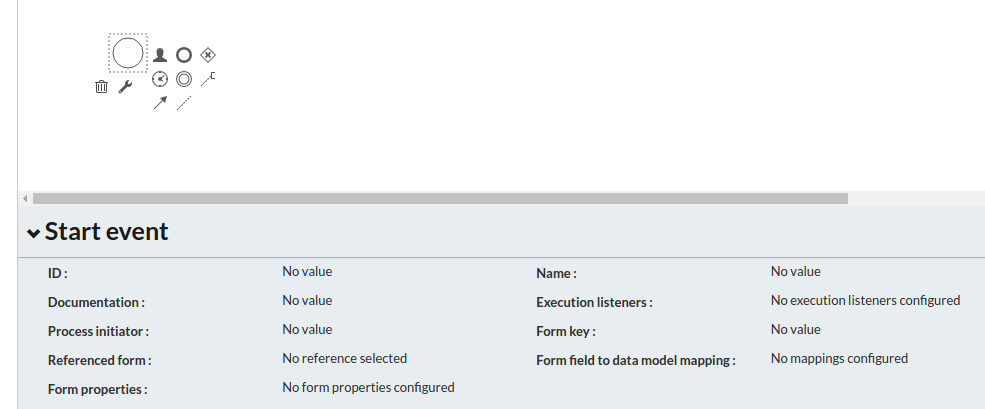
We don’t get much to start with, just the start event. To the left in the BPMN Editor is all the different BPMN elements that we have at our disposal to work with. We have already covered the basic ones in this article. But as you can see there are a truckload of them available. The main area in the center of the screen is where you draw your process, and as we said, there is currently only a Start Event there.
At the bottom of the screen is element/node related information. Clicking outside any element will show information/properties related to the whole process:

This is the place to go when you want to set up things like listeners, signals, variables, forms, IDs etc. You can do a lot actually from the BPMN Editor without having to touch any XML.
Start Event
If you click on an element of the process definition, such as the Start Event (there is no other element to click on actually), the properties section will show data specifically for that element (online Activiti docs for Start Event):
For every element that we add it can be useful to give it an identifier. If we don’t do this then Activiti will generate an identifier for us, which is OK. However, it is easier to read the generated process definition XML if we give the element a more readable identifier. Click in the ID property for the Start event element and give it the startInvoiceProcess ID so it looks like this:

In this case I gave the start event also a corresponding name to be consistent.
The available properties differ depending on what element that is clicked. A start event can have a form associated with it so we see some new properties here related to forms, such as Referenced form. We want to actually link a form to the start event where we can select Approver, specify email for the company the invoice came from, and upload the invoice file. Click on the Referenced form property as follows:

This will display the following dialog:

If we had started out defining a bunch of forms they would have popped up here now. At this point though we have no forms defined yet. So click the New form button to start creating one:
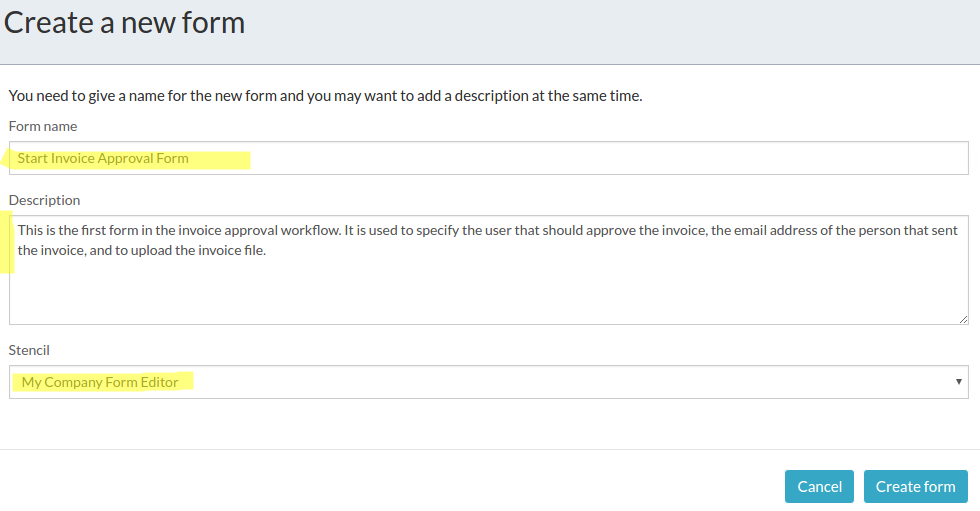
Fill in the name, which we set to Start Invoice Approval Form as it is the first form displayed as soon as you start a new workflow instance based on this workflow definition. Then give a useful description.
And again, at the end, we can see the Stencil dropdown. Make sure to pick the custom form stencil called “My Company Form Editor” that we created earlier on. So we can add and use custom controls in the future.
Click Create form button to start defining the form:

We can see that we are now no longer in the BPMN Editor but instead in the Form Editor. By default we will be in the Design mode in the Form Editor so we can start adding controls on to the canvas in the middle. Let’s add a people picker, company email text field, and an attach field so we can upload the invoice that is to be approved:

What I did here was basically just drag-and-drop the controls onto the form canvas. Then I set the label for the controls by hovering over them and clicking the pen. In this case I just used the default layout of one column and a number of rows. It is possible to customize the number of columns and rows in each column. You can also specify things like column span, tabs etc.
Here is the Approver label and ID:

While typing in the label the ID will be automatically generated. It is good to remember what IDs that were used so you can refer to them in the process later on. The text control for the Company Email looks like this:

And the invoice file Attach control properties:

When the form is finished click on the validation button in the upper left corner:

If all is green an the form is valid click the disk next to the validation button to Save the form:
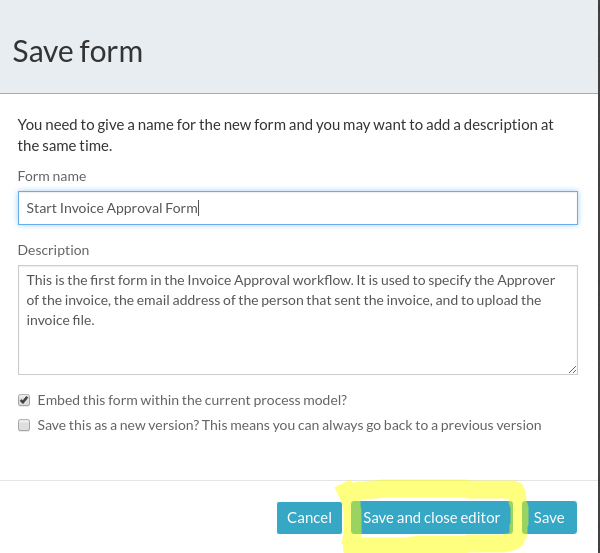
We want to save the form and close the Form editor and get back to the BPMN Editor, so click on the Save and close editor button. Clicking on the Start Event should now show the form we created linked to it:

This is very cool, without leaving the Activiti web environment I have created a form and linked it up with an element in the process model, not touching any XML so far.
Approve Invoice User Task
Next node in the workflow definition should be the Approve Invoice user task (online Activiti docs for User Tasks). Open up the Activities section in the left hand side navigator so you can drag-and-drop a User Task on to the process definition canvas:

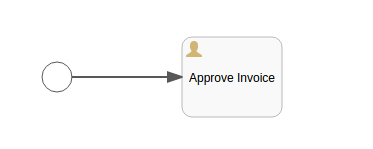
Then connect the Start event with this new user task by clicking in the Start event and then selecting the transition arrow:

After that double click on the User task and give it the name Approve Invoice. We now have this:
At this point it is definitely time to validate and save the process model:
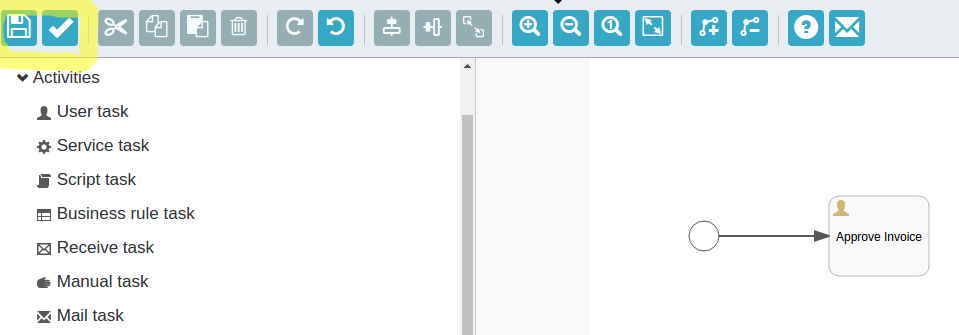
Click on the validate button in the upper left corner and then the save button to the left of it. The validation will actually fail as we got stuff to do with the Approve task before it is valid. But it shows how a validation error is displayed:

You can still save the process though, so do that. It will now show up under My Processes:
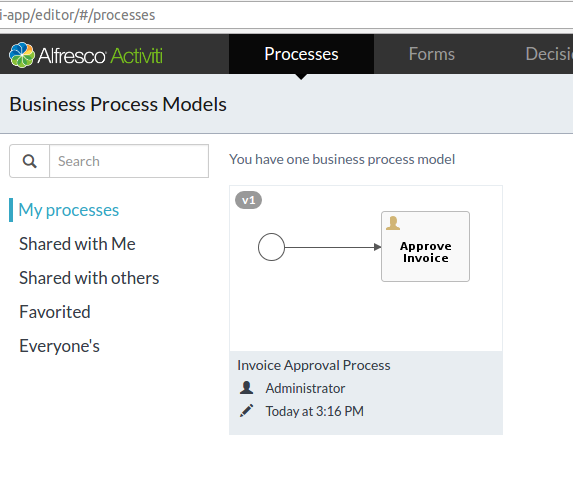
To get back to the BPMN Editor just click on the process model:
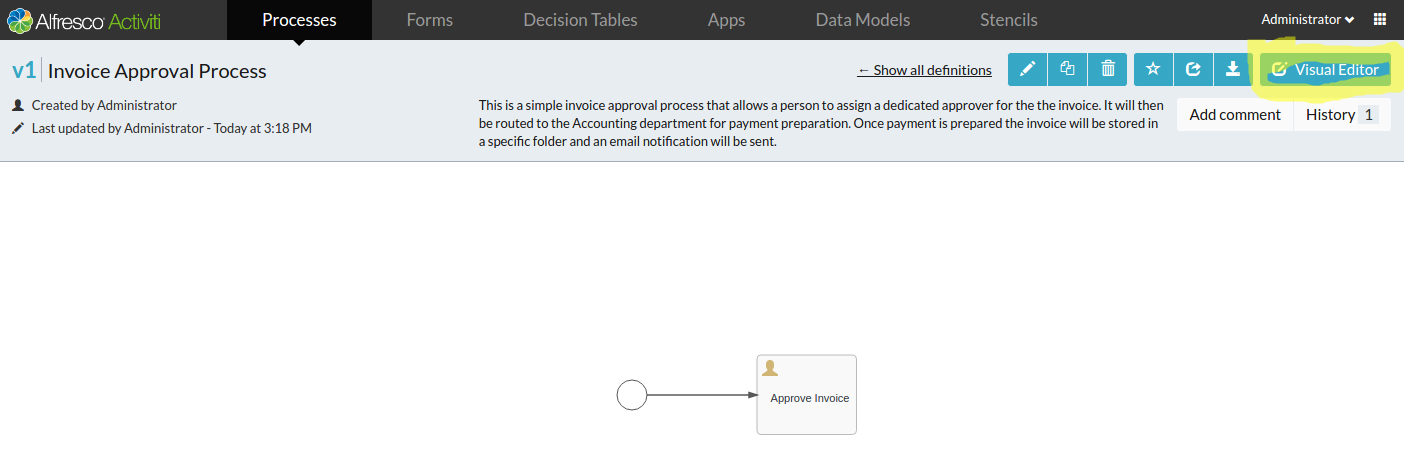
And then click the Visual Editor button in the upper right corner. We need to update the properties for the Approve Invoice task so click on it. Then fill in approveInvoice as the id for the task so it looks like this:

This user task is going to need a form where the Approver can see some information text about what to do and download the invoice file to have a look at it. Click on the Referenced form property:
And create a new form called Approve Invoice form:

After clicking the Create form button design the form as follows in the Form Editor:

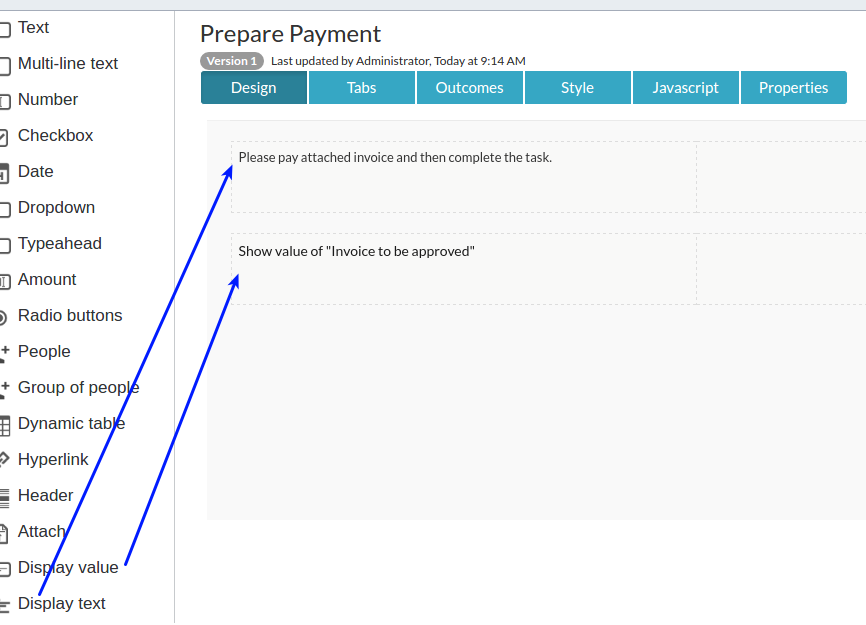
The first information Display text field has the following properties:
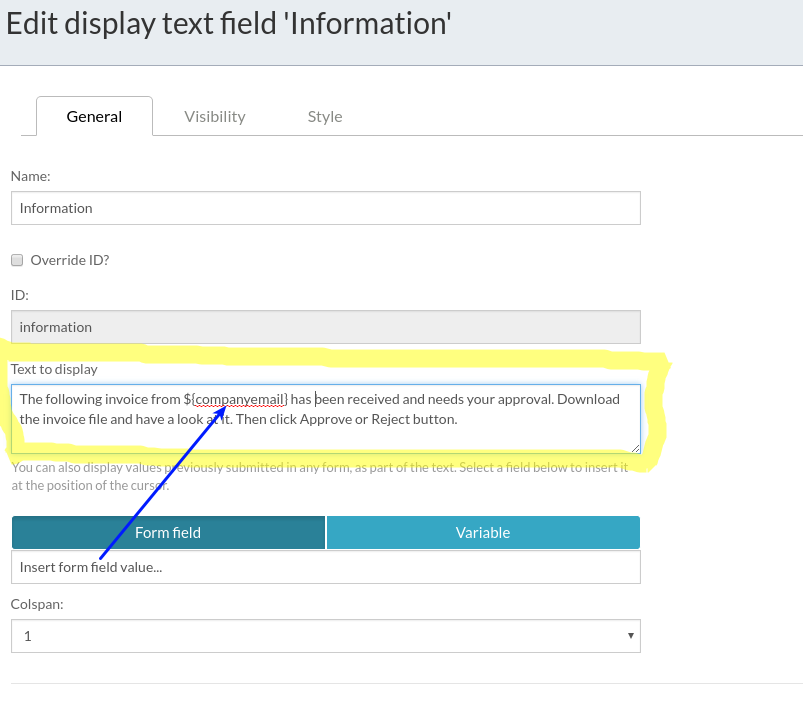
What we have done here is first fill in the Name of the display text field, which has generated the ID for us. Then we have typed in the text to display. But at one point we have inserted the Company Email form field value by selecting it from the Form field drop down below. The ${companyemail} variable will be substituted for the Company Email value we entered in the Start form.
It is also possible to explicitly write the ${...} variable/field place holder in the text with same final effect as picking from drop list, if you can remember the variable name. Picking from the drop down is just a way to get it faster and in proper syntax.
The Display value field has the following properties:
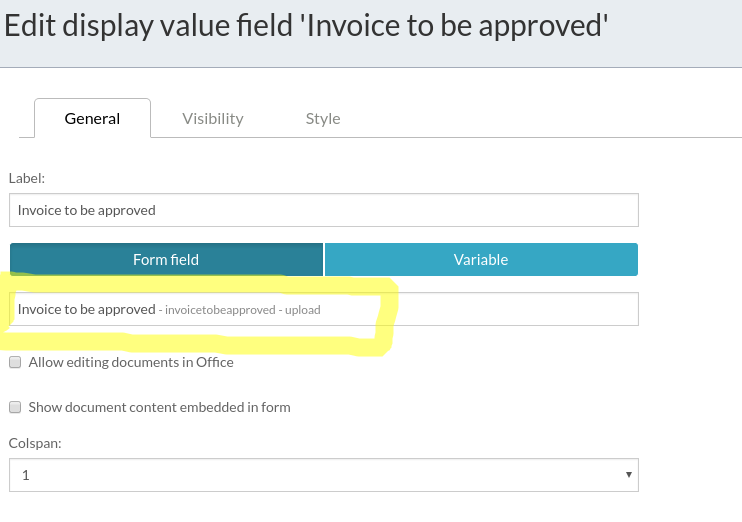
We have given the field a Label and then selected the form field value that should be displayed as the Invoice file uploaded in Start form.
And finally the multi-line Comment field, which will be used by the Approver to relay any message to the initiator if the invoice was rejected and needs to be clarified, or to the accounting department paying the invoice:

By default a user task will have a Complete button that the user clicks when the task is complete. In our case we don’t want that but instead two buttons, one Approve button and one Reject button. These buttons will represent the decision from the Approver if to pay the invoice or not. We call these decisions different task outcomes. And there is a special tab in the Form Editor to set them up:

Click the Use custom outcomes for this form radio button to start doing this:
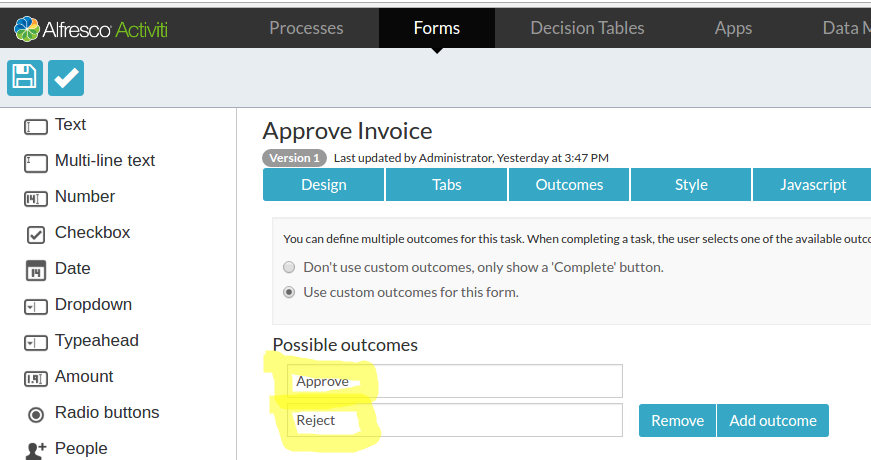
The two outcomes are just specified in standard fields as shown in the screenshot. Note that these buttons can have any name you like, the BPMN Editor will make sure that the related conditions have the correct variable names. And you can also have more than just two buttons if needed.
The Approve Invoice form is now complete so Save it and go back to the BPMN Editor:

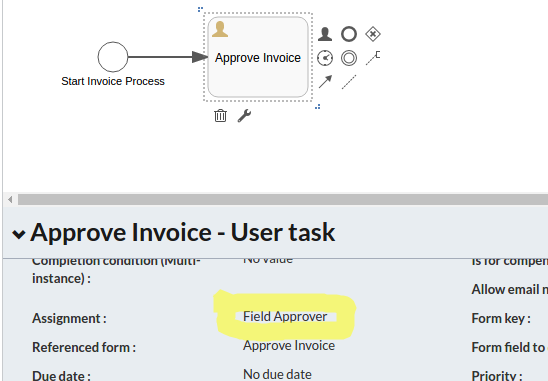
Every user task needs to be assigned to a user or a group of users. As we can see in the above screenshot, no one is assigned the Approve Invoice task yet. If we do nothing then the BPMN Editor will by default assign to the initiator of the process.
Click on the Assignment property to fix this:

This dialog is a bit trickier then we have seen before. Basically what we want to do is set the person selected as Approver in the first Start form as the assignee. To do this click first (1) on the Identity store tab. Then select (2) Assign to single user in the Assignment dropdown. And then click on the Form field tab (3). Then finally select (4) the Approver from the Form field drop down.
The BPMN Editor is capable of identifying all person form fields used in other forms in the process and make them available for us to choose. Also, under the Fixed values section, variable placeholders corresponding to authorities can also be leveraged, not just form fields.
Now save the assignment configuration. You should see this now in the properties section:
This completes the Approve Invoice user task and we can now move on to the next element in the workflow.
Approve Outcome Exclusive Gateway
As we have two outcomes (Approve or Reject) we need an exclusive gateway following the Approve Invoice task (online Activiti docs for Exclusive Gateway). Add one as follows:
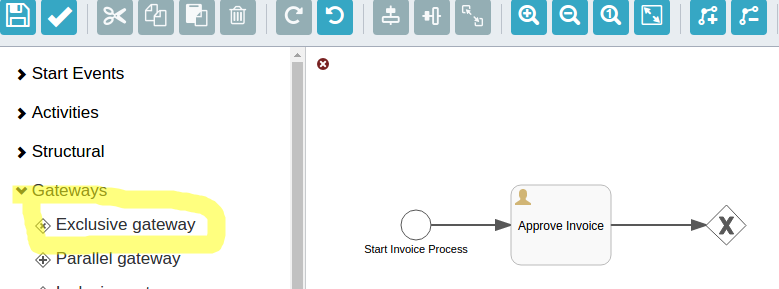
After the gateway we can either go the Rejected invoice way or the Approved invoice way. There will be one user task following in each execution path.
Clarify Invoice User Task
Let’s start with the Rejected path, which should have a Clarify Invoice user task assigned to the Initiator of the workflow:
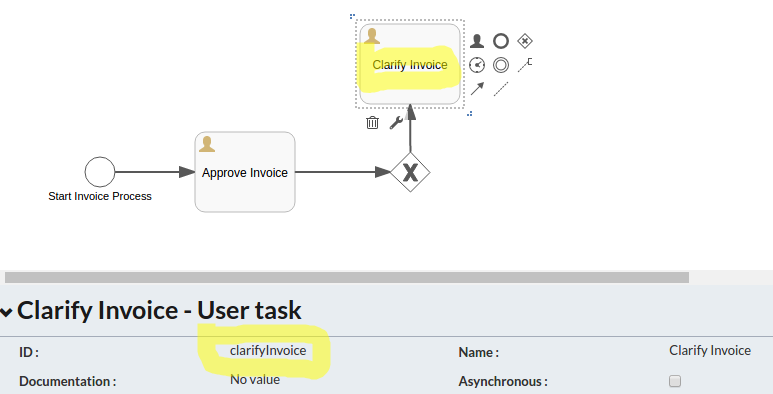
I have given the new task an ID and typed in the name of it by double clicking the symbol. Also, I have connected it to the exclusive gateway by using the arrows. This new task will automatically be set to be routed back to the Initiator, as you can see in the properties:

So we don’t need to set up any Assignment details. What we need though is a form with a link to the invoice file and the Comment about why the Approver rejected the invoice at this point. Click the Referenced Form property for the Clarify Invoice task and give it a name and description as follows:

Note that the form name can also be displayed to the end user in the task inbox and form page, so it’s a good idea to pick a useful name. You can also leverage variable/field placeholders to make it easier for the user to identify what the task is about before opening it. We will look at how to dynamically set the task name later on in this article.
Then design the form as follows:

Here we display the comments from the Approver and a link to the invoice file. The initiator can then clarify the problem by filling in the multi-line text field called Clarification. The clarification text will be relayed back to the Approver to have another go with the Approve Invoice task.
The Comments Display value field has the following properties:
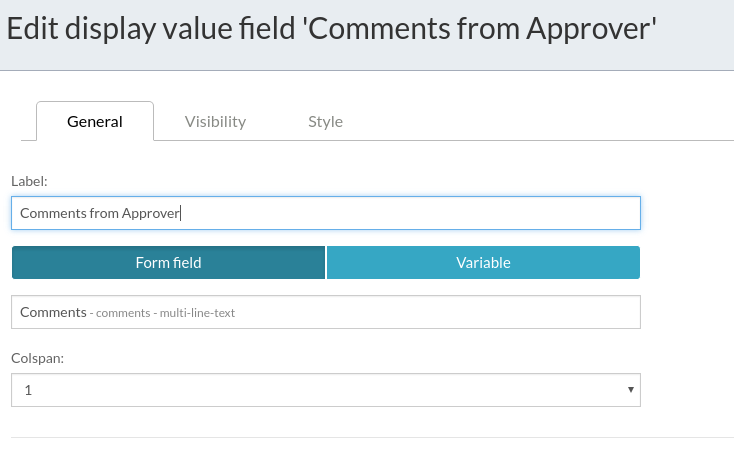
Note that I change the Label after selecting the Form field.
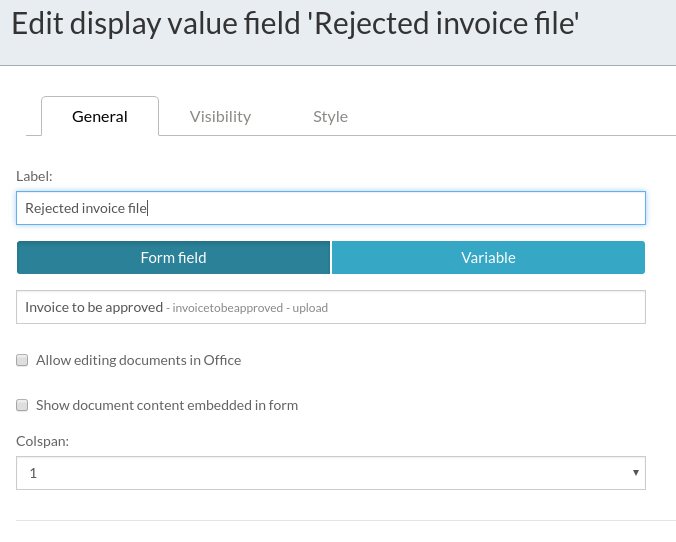
And the Invoice file Display value field has the following properties:
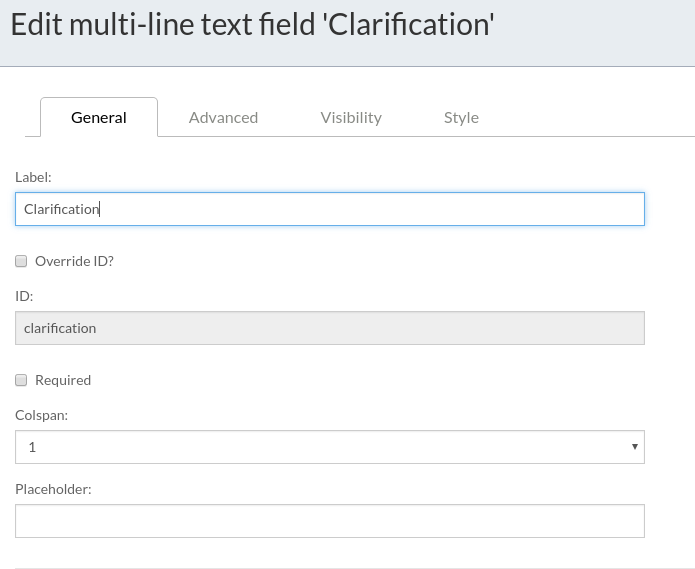
Finally the new Clarification multi-line field:
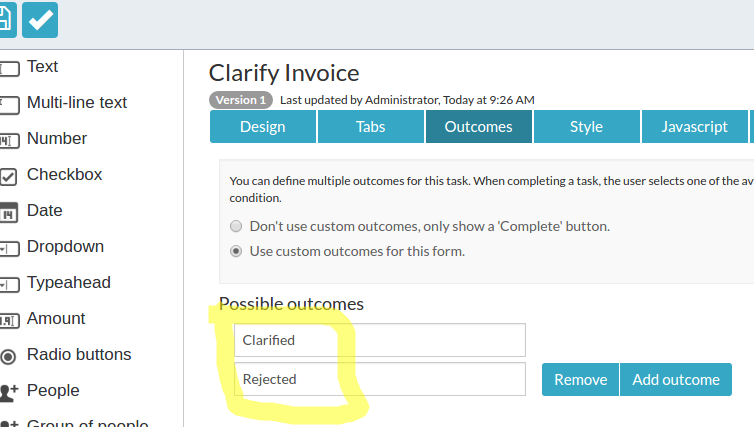
This task has two outcomes, the invoice can either be clarified and sent back for approval, or the invoice can be rejected for payment. So in the Outcomes tab enter the following two outcomes:
The Clarify Invoice form is now finished so save it and go back to the BPMN Editor.
As the Clarify Invoice Task has more than one outcome we need an exclusive gateway following it.
Clarify Outcome Exclusive Gateway
This gateway follows right after the Clarify Invoice user task, and its Rejected outcome execution path goes directly to an End event. The Clarified execution path leads back to the Approve Invoice user task. If you model this you should now see something like this:
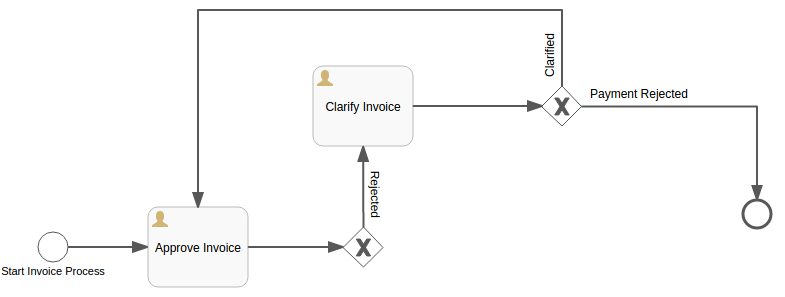
What I have done here also is to give the sequence flows (transitions) names so it is easier to read the diagram. Further on, I have added bending points to the sequence flows following the exclusive gateway so the diagram looks a bit neater. You can add bending points by clicking on the following buttons in the BPMN Editor:

Now, the sequence flows after the gateways will actually not work until you set up a flow condition for each one of them. The flow condition determines if a certain sequence flow should be taken or not. Let’s start with the Clarified sequence flow, click on it as follows so you can see the properties for it:
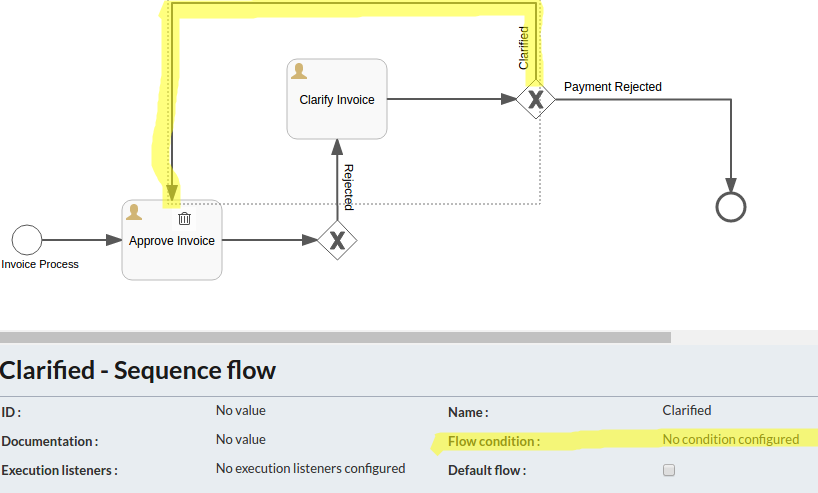
There is one special case when you don’t have to configure a Flow condition, and that is when the sequence flow should be taken if all other sequence flow conditions evaluate to false. We call this the default flow and a sequence flow can be configured as the default flow by checking the Default flow property. We are not using this feature now though.
Then click on the Flow condition property and fill it in as follows:
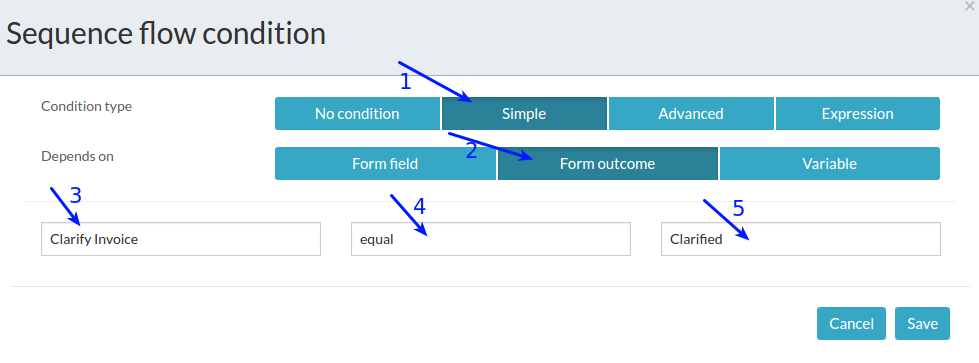
First (1) select that this is a Simple flow condition based on a Form outcome (2). Then select the Clarify Invoice form (3). And say that the outcome from it should be equal (4) to “Clarified” (5).
Then click on the Payment Rejected sequence flow:

And configure like this:
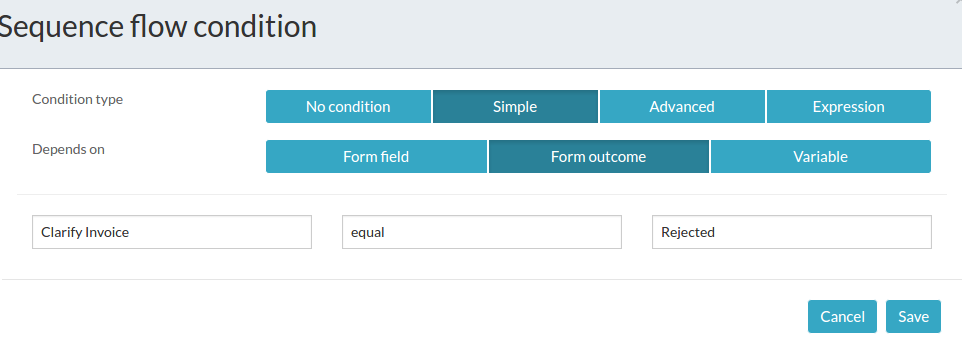
We also need to setup the flow condition for the Rejected sequence flow from the first gateway:

Configure it as follows:

Note that this flow condition is based on the outcome from the Approve Invoice user task.
Approve Invoice User Task with Clarification Message
It would be nice to display the clarification message in the Approve Invoice Form if we are transitioning to it from the Clarified outcome of the Clarify Invoice task. Click on the Approve Invoice Task and then on the Referenced form to start updating the form:

Select Open form and add a Display Value field for the Clarification text after the Comments field as follows:

The properties for the Clarification field are as follows:

Basically show the Clarification form field value. We don’t want to show this field if nothing has been clarified, meaning we are coming from the Start event, so put in a Visibility configuration as follows:

Save the updated Approve Invoice form and close the Form Editor. We are now ready to move on with the Approved invoice flow.
Prepare Payment User Task
The first task in the approved invoice flow is the Prepare Payment task that should be assigned to the Accounting group. So we actually need to create a group of users called Accounting before we can complete modelling this task. Normally you would most likely have your Activiti installation hooked up to Active Directory (AD) or an LDAP server. And then you would be set to start configuring the Assignment property.
We however will just create this group manually to get going. Close the BPMN Editor by saving the process model and closing the editor. Then click on the Alfresco Activiti icon in the upper left corner so you get back to the home page:
Now, click on the Identity management application to create the new group:

In this app click the Organization tab and then the Create group button:

Call the group Accounting and then click + add user and add yourself (i.e. the Administrator) as the sole member.
Now we should be ready to continue with the Prepare Payment task. Navigate back to the BPMN Editor for the process so you see:
Add a new User task called Prepare Payment so the process model looks like this:

Give the task the preparePayment ID. You might have noticed that the User Tasks have a property called Allow email notifications that is enabled by default. This means that every time a task is assigned to someone they will get an email sent to them about it. So they don’t have to be logged into Activiti to know they got something to do. This is true for group assignments too.
In our case the Prepare Payment task should be assigned to the Accounting group we just created, and it should be as a pooled task. What this means is that not all users in the Accounting group should complete the task, but only one of them. Whoever is about to complete the task claims it and it will then disappear from all other users in the group.
Click on the Assignment property as follows:
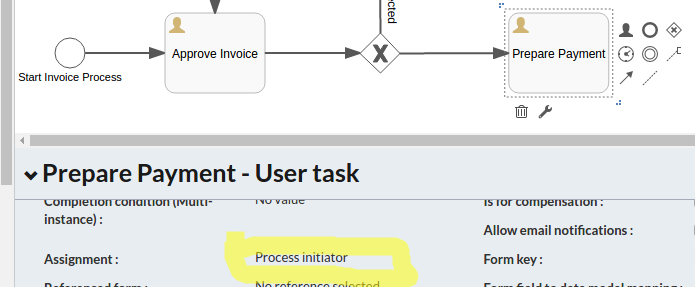
It defaults to the Initiator of the workflow, so we need to change it:

Select Candidate groups and then select the Accounting group. At this point you might be a bit confused about initiator, assignee, candidate groups, candidate users, pooled tasks, and you might even have heard about task owner. So what do they all mean:
- Initiator - the user that starts a workflow instance
- Owner - An owner is the user that's responsible for the user task. For example, when the Prepare Payment task is created it does not have an Assignee (as it is a Pooled task), owner is set to the Initiator.
- Assignee - the assignee is the user that's allocated to complete a user task.
- Candidate User - A candidate user is a user that can claim the user task and become the assignee.
- Candidate Group - A candidate group is a group of users that can claim the user task to become the assignee. See pooled task.
- Involved User - An involved user is somebody that's linked to the user task. You can have only 1 assignee, but you can have multiple users involved in a user task.
- Pooled Task - nobody is assigned this task when it is created. Someone from a candidate group needs to claim it to become the assignee.
- Queued Task - Queued tasks are user tasks that don't have an assignee, but only candidate users / groups.
You can think of the owner and any involved users as just implicit concepts that have no runtime meaning in the process definition.
If you now validate and save the process model it will become clear that there are parts missing:
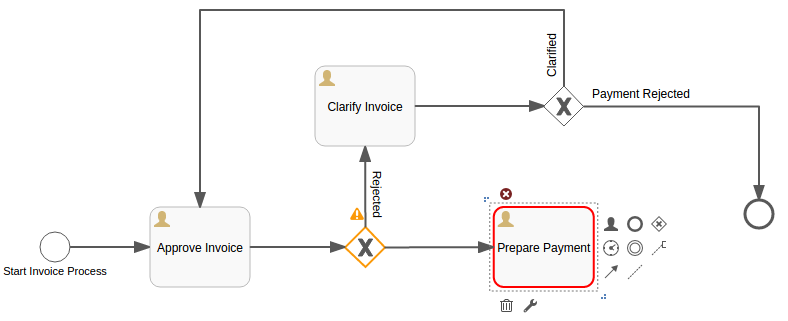
The exclusive gateway has a warning. We have not set the flow condition for the transition from the gateway to the Prepare Payment task. Let’s do that as follows:

We should transition to the Prepare Payment task when the Approve Invoice task has the Approve outcome. At the moment we also do not have any form defined for the Prepare Payment task, so the Accounting user will not have a clue about what invoice to pay. Set up a new form for the task as follows:

The layout will look like this:
When the Prepare Payment task is completed by one of the Accounting team people it is time to file the invoice file and send an email to the Company that the invoice was coming from. These are all service tasks performed by the system and does not involve any human interaction. But first we need to define the Timer that should escalate this task if it has not been completed by a certain period of time.
Prepare Payment Task Timer
A timer will be used to trigger a resend of the Prepare Payment task with a new name “ESCALATED: Prepare Payment”. The timer is defined as a boundary event on the user task activity. A boundary event is attached to the activity and while the activity is running the boundary event listens for a trigger, such as a timer expiring (online Activiti docs for Timer Events).
Add the Timer to the Prepare Payment user task as follows:

The timer needs to be configured with a duration, click on it to show the properties:

We set the timer duration to PT2M, which means expire after 2 minutes. For a full list of duration syntax see this page. We need to also add a transition (sequence flow) from the timer and back to the Prepare Payment task when the timer expires:

When the timer expires the activity (i.e. the Prepare Payment user task) will automatically be cancelled. This is because we have the timer property Cancel activity checked. Now we are ready to move on with the filing of the invoice.
File Invoice Service Task
The thought behind this task is that when the invoice have been set up for payment it should be filed in some system for records management purpose. The first implementation of this task will just do some logging. Then we will change it to write the file to the file system, and later on we will implement another version of it that stores the file in the Alfresco ECM content repository, possibly set up with the Records Management module.
Add the File Invoice Service Task as follows by picking it from the Activities section to the left:

I also gave the service task an ID of fileInvoice. Now, the service task obviously is not finished, it needs to do something, call some code. There are a number of ways to call code from a Service task. Scroll down a bit in the properties section and you should see the following:

These properties have the following meaning (for full documentation around this see this page):
- Class: put here a class name, including full package path, for a class that implements the org.activiti.engine.delegate.JavaDelegate interface. Activiti will then call the execute method whenever it hits this service task.
- For example: activiti:class="org.alfresco.activiti.service.task.MyServiceTask"
- Thread safe? No: One class instance will be created for every service task that uses this delegate class. However, they will be shared between process instances.
- Delegate expression: it is also possible to make a Spring Bean out of the JavaDelegate and give the Spring Bean Name as the delegate expression.
- For example: activiti:delegateExpression="${someBeanName}"
- Thread safe? No: By default Spring Beans are singletons, so if you use a delegate expression (i.e. bean) from more than one service task, they will use the same bean instance. This can be fixed by using @Scope(BeanDefinition.SCOPE_PROTOTYPE) on the bean
- Expression: it is also possible to use a standard Java POJO instance as a process variable. Then call any method in it from an expression, passing in parameters if needed.
- For example: activiti:expression="${myVariable.doStuff(param1)}"
- Thread safe? Yes: every process instance will have its own variable instance
Most likely we would also like to pass in some parameters to our service task implementation. In our case we want to pass in the Company Email and the Invoice File. This can be done with the Class fields property if you are using a Class or Delegate expression. Start by setting up the class org.alfresco.training.activiti.task.FileInvoiceServiceTaskDelegate as a Java delegate:

Then click on the Class fields to start adding those:

Set up the companyEmail class field as follows:

Now it is time to go back and look at what variable names you gave to company email and invoice file if you forgot them. Set up the invoiceToBeApproved class field as follows:

This will resolve to the following BPMN 2.0 XML:
<serviceTask id="fileInvoice" name="File Invoice"
activiti:class="org.alfresco.training.activiti.task.FileInvoiceServiceTaskDelegate">
<extensionElements>
<activiti:field name="companyEmail">
<activiti:expression><![CDATA[${companyemail}]]></activiti:expression>
</activiti:field>
<activiti:field name="invoiceToFile">
<activiti:expression><![CDATA[${invoicetobeapproved}]]></activiti:expression>
</activiti:field>
</extensionElements>
</serviceTask>
Implementing the FileInvoiceServiceTaskDelegate class is the next step. We need a Maven based extension project for that. This is because all the dependencies this class will use are easiest pulled in via Maven and artifacts.alfresco.com. The best way to get going is to use the SDK 3 beta 5, which provides an Activiti project template. However, to use SDK 3 we need to have an Enterprise Account login to artifacts.alfresco.com so we can download the Alfresco Process Services artifacts.
I want you to be able to follow along with this article using just the trial license that was downloaded in the beginning. So I will show you the class implementation here and provide the following link to an Activiti Extension JAR that you can put on the server’s classpath (the source code for the class is here):
package org.alfresco.training.activiti.task;
import org.activiti.engine.delegate.DelegateExecution;
import org.activiti.engine.delegate.Expression;
import org.activiti.engine.delegate.JavaDelegate;
import org.slf4j.Logger;
import org.slf4j.LoggerFactory;
public class FileInvoiceServiceTaskDelegate implements JavaDelegate {
private static Logger logger = LoggerFactory.getLogger(FileInvoiceServiceTaskDelegate.class);
/**
* Injected class fields
*/
private Expression companyEmail;
private Expression invoiceToFile;
public void execute(DelegateExecution execution) throws Exception {
logger.debug("Storing the invoice file somewhere safe!");
String emailAddress = (String) companyEmail.getValue(execution);
logger.debug("The invoice was sent in from: " + emailAddress);
// We will deal with the invoiceToFile field later on
}
public void setCompanyEmail(Expression companyEmail) {
this.companyEmail = companyEmail;
}
public void setInvoiceToFile(Expression invoiceToFile) {
this.invoiceToFile = invoiceToFile;
}
}
This service task does not actually do anything useful more than printing a log message. But you can imagine it storing the file away in some enterprise archive system. The important thing here is that we implement the JavaDelegate interface to make it a service task delegate implementation and we implement the execute method in this interface.
The execute method takes one parameter of the type DelegateExecution, which contains information about the process instance that is invoking the Java Delegate. If we did not have access to the execution context, then you would have no way of getting to process instance info such as Process Instance ID, Process Definition ID, Tenant ID, Activity ID, etc.
This method will be called by the Activiti workflow engine when it reaches the service task. Later on we will see how we can extract and store the invoice file from the service task, but let’s try out the workflow before we start with that implementation.
Send Approved Email Task
The last step in the approved invoice route is to send an email to the initiator of the workflow and to the company from whom the invoice came from.
Activiti has a ready-made service task for sending emails, so this is quite easy. Drag-and-Drop a Mail task into the canvas and connect it to the File Invoice service task and the End Process node:

Then scroll down in the list of properties for the Send Approval Email task and fill in the relevant mail properties, such as from, to, subject etc:

If we look at the generated BPMN 2.0 XML we should see something like this now:
<serviceTask id="sendApprovalEmail" name="Send Approval Email" activiti:type="mail">
<extensionElements>
<activiti:field name="to">
<activiti:expression><![CDATA[${emailBean.getProcessInitiator(execution)}]]>
</activiti:expression>
</activiti:field>
<activiti:field name="from">
<activiti:string><![CDATA[activiti@mycompany.com]]></activiti:string>
</activiti:field>
<activiti:field name="subject">
<activiti:string><![CDATA[Invoice Approved for Payment]]></activiti:string>
</activiti:field>
<activiti:field name="cc">
<activiti:expression><![CDATA[${companyemail}]]></activiti:expression>
</activiti:field>
<activiti:field name="text">
<activiti:string><![CDATA[Invoice Approved for Payment]]></activiti:string>
</activiti:field>
</extensionElements>
</serviceTask>
This concludes the implementation of this workflow, this was the last step.
Generating BPMN 2.0 XML for your Process Model
When describing the last two service tasks I showed you some BPMN 2.0 XML. You are probably wondering from where I got it? You can download the current BPMN 2.0 XML for you process model at any time.
Navigate to the Kickstart application:

Then click on your process model:

Now click on the Export to BPMN 2.0 button in the upper right corner:
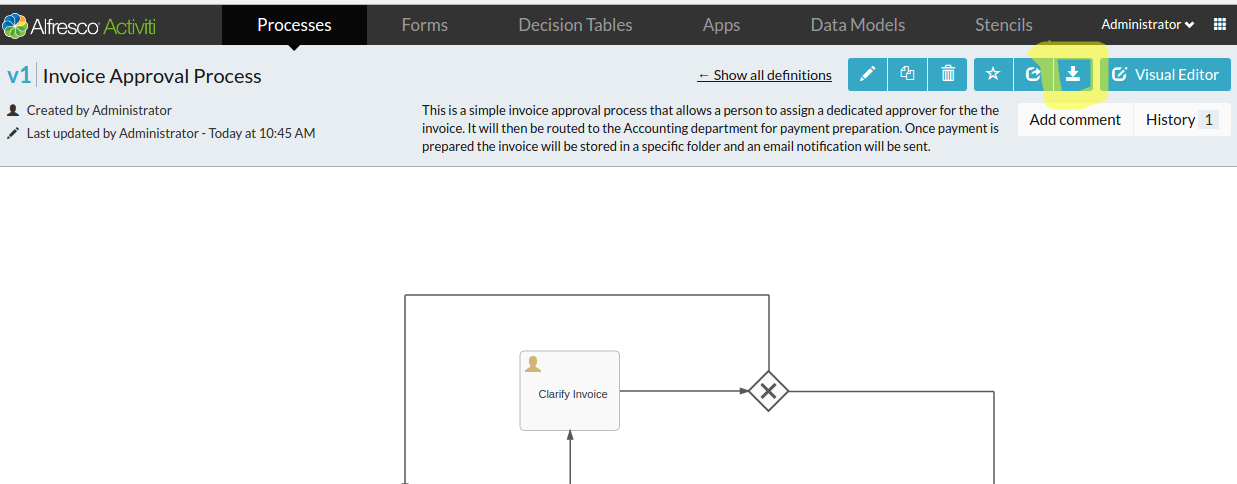
This will download your current process model as BPMN 2.0 XML.
Create an Application For the Business Process
We got our business process sorted now, but we cannot really run it yet. We need it to be part of an Activiti Application first. And then we can publish this app and run the workflow from the published version. A process application is also used for sharing processes between different users. If you want some other Activiti user to be able to run this process you need to share the application with them.
Start from the Kickstart application and then click on the Apps menu item at the top:

This will show the following application management page:

Now, click the Create App button in the upper right corner:
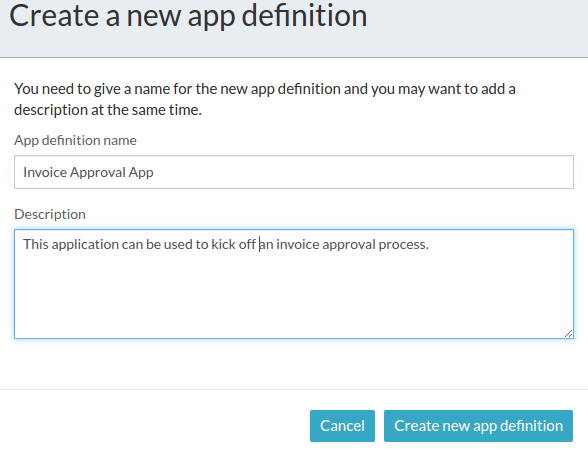
Fill in the name and description for the new application and then click the Create new app definition:

Here I have added the process definition we have just created by clicking on the Edit included models. As you can see, an application can host multiple process models if you like.
Then I changed the application icon and theme. This is also the place to set up sharing of this application with other users, click on the Add another person or Add another group to do that. In my case I will be starting the workflow myself so no need to add any other users.
Finally click the Save button in the upper left corner.
Clicking the Activiti home button now will not actually show this app but still just the default apps:
This is because we have not yet published a version of this application. To do that click on the Kickstart application and then the Apps menu item followed by the Invoice Approval App:
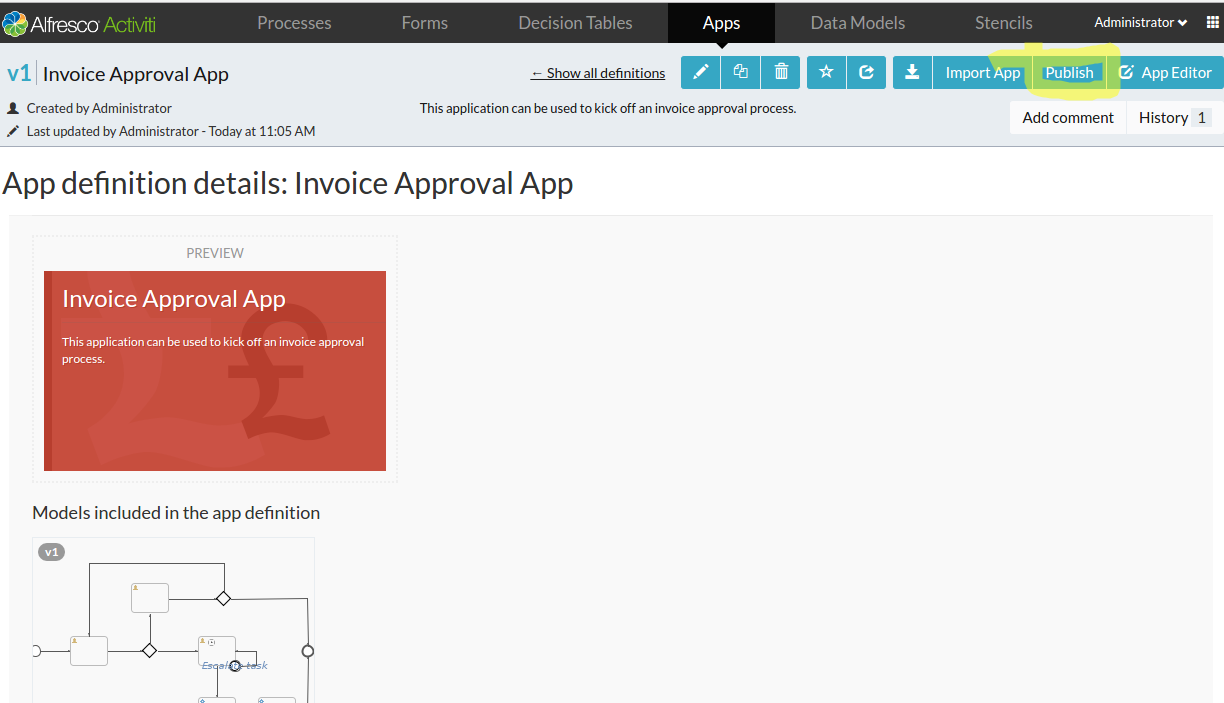
Now to publish this application click on the Publish button in the upper right corner. Now navigate back to the home page and you should see the new application on the dashboard:

The invoice application, with its embedded Invoice Approval workflow is now ready to be used.
Running the Business Process
It’s time to test out all the work we have done designing and implementing the Invoice Approval workflow. However, first we need to make sure we got the File Invoice service task class on the classpath. Copy it from here and put it in tomcat/webapps/activiti-app/WEB-INF/lib, something like this:
martin@gravitonian:/opt/activiti15/tomcat/webapps/activiti-app/WEB-INF/lib$ cp ~/src/sdk3/alfresco-sdk-tests/activiti-jar-blog/target/activiti-jar-blog-1.0-SNAPSHOT.jar .
Note. it does not work to put the JAR in tomcat/lib.
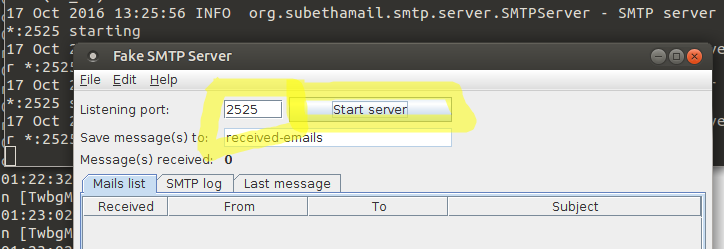
And we also need to make sure we got an email server (SMTP) configured so Activiti have a chance to send emails in the last Mail task. I use the Fake SMTP server (download from here). Start it like this:
martin@gravitonian:~/apps/fakeSMTP$ java -jar fakeSMTP-1.13.jar
Then set the port to 2525 and Start the SMTP server by clicking on the Start server button:
Now, configure Activiti to send emails via local SMTP server, open up the following file:
martin@gravitonian:/opt/activiti15/tomcat/lib$ gedit activiti-app.properties
And configure the following SMTP server properties:
email.host=localhost
email.port=2525
email.useCredentials=false
Then restart the Activiti server:
martin@gravitonian:/opt/activiti15$ /opt/activiti15/tomcat/bin/catalina.sh stop
martin@gravitonian:/opt/activiti15$ /opt/activiti15/h2/stop-h2.sh
Shutting down TCP Server at tcp://localhost
martin@gravitonian:/opt/activiti15$ ./start-activiti.sh
Running the Approved Invoice flow
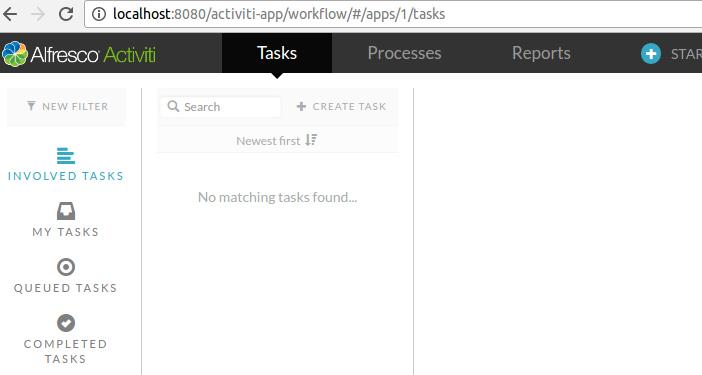
Now click on the Invoice Approval App, you should see this:
If the user Administrator had any tasks assigned they would show up here.
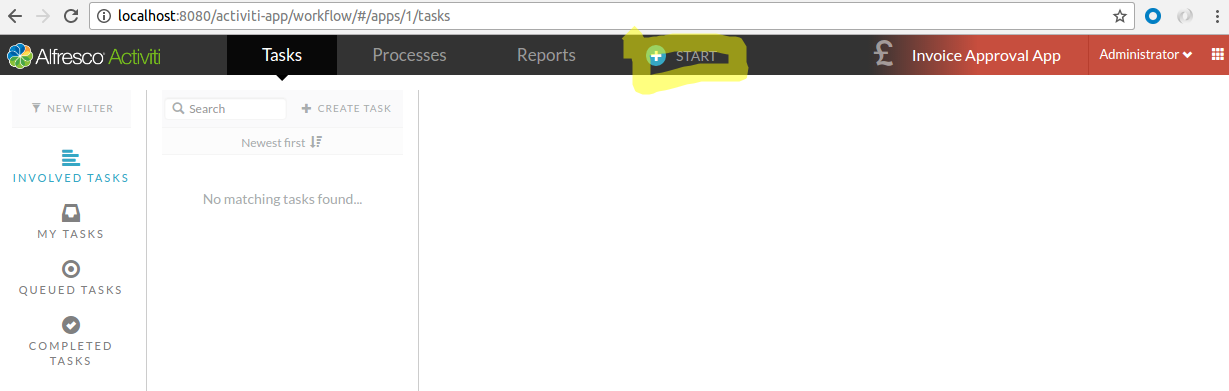
Starting the Process Instance
We got no process instances running yet, so first thing we need to do is click on the +START menu item:

We can now see all the fields that we defined in our “Start form”, pretty cool! Select Approver (choose yourself - i.e. admin), then specify a fictive email, and upload a file that will represent the invoice. It should now look something like this:

Click on the START PROCESS button to kick off the process instance:
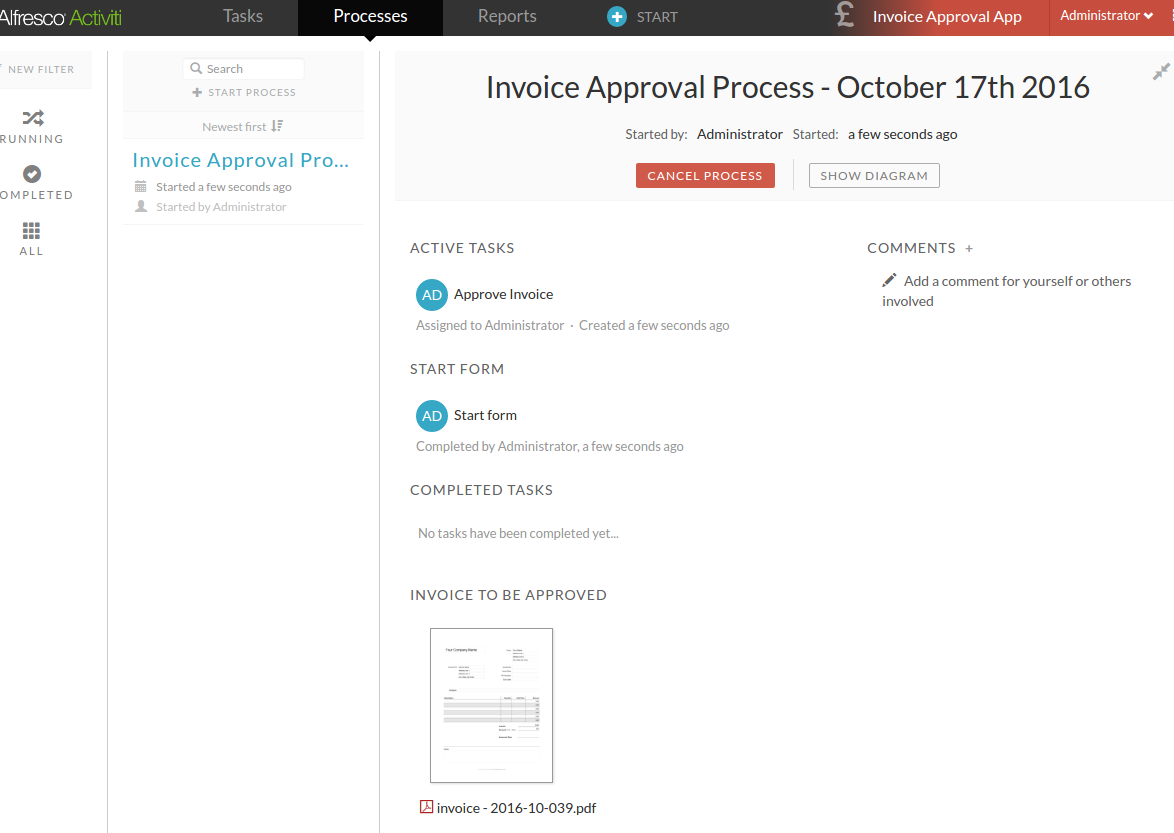
Here we can see the active tasks for the workflow instance (i.e. the Approve Instance task), what tasks that have been completed so far, process variables etc. We can also click on SHOW DIAGRAM to see a graphical view of where we are in the process flow:

Current task has green color border.
Complete the Approve Invoice Task
Now click on the Tasks menu item:

This displays any tasks assigned to you (i.e. the Administrator):
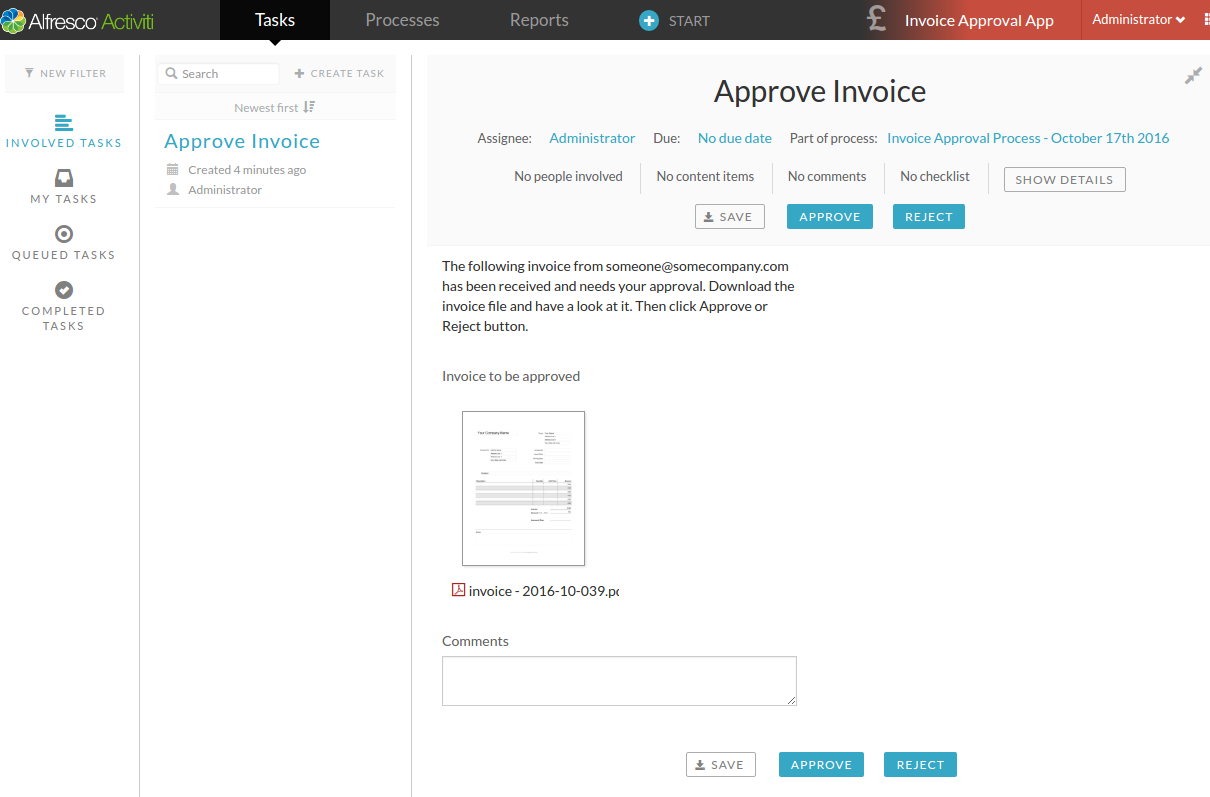
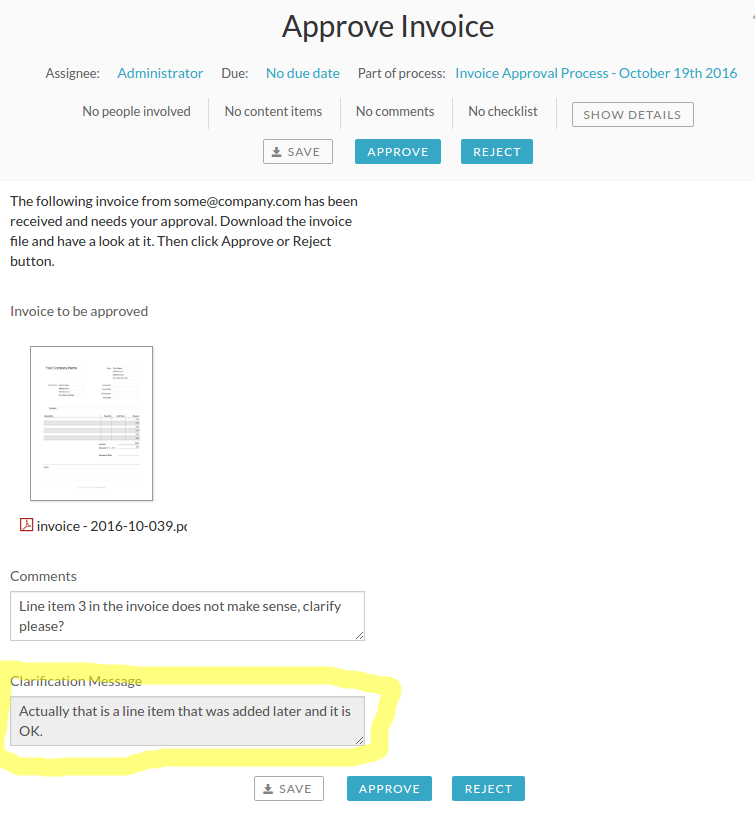
What we see here is the Invoice Approval form. The information text is there, with the companyEmail variable resolved. We also got the different outcomes represented with the APPROVE and REJECT buttons. If we reject the invoice we can give a comment here that will be presented to the initiator when doing clarification. But let’s follow the Approved flow for now. First click on the invoice file to see a preview:

Being able to view the invoice without leaving the Activiti UI is very cool and time saving. We are happy with the invoice so we click the APPROVE button.
Looking at the Process instance via the REST API
At this point it might be useful to look at the REST API a bit, as it is a fundamental cornerstone of most solutions.
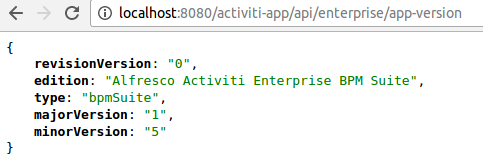
First get the app server info:
API Call (GET): http://localhost:8080/activiti-app/api/enterprise/app-version
Result:
Fetch the process instance we are working on:
API Call (GET): http://localhost:8080/activiti-app/api/enterprise/process-instances/65001
Result:

In this case the process ID is 65001, it is displayed in a lot of URLs in the Activiti Webapp.
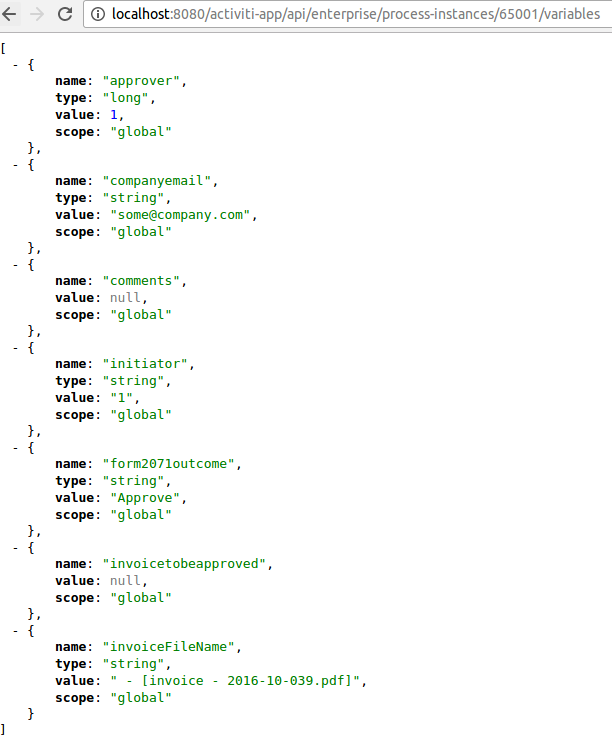
Get the process variables set at this point:
API Call (GET): http://localhost:8080/activiti-app/api/enterprise/process-instances/65001/variables
Result:
Get currently active tasks for the process instance:
API Call (POST): http://localhost:8080/activiti-app/api/enterprise/tasks/query
Result:

For POST calls use a tool like Postman for Chrome. In the above call I have set authorization credentials in under the Authorization tab.
Complete the Prepare Payment task
Now, let’s continue with our process instance. There are no more tasks assigned to us as the next task in the flow is Prepare Payment, click on the Processes menu item:
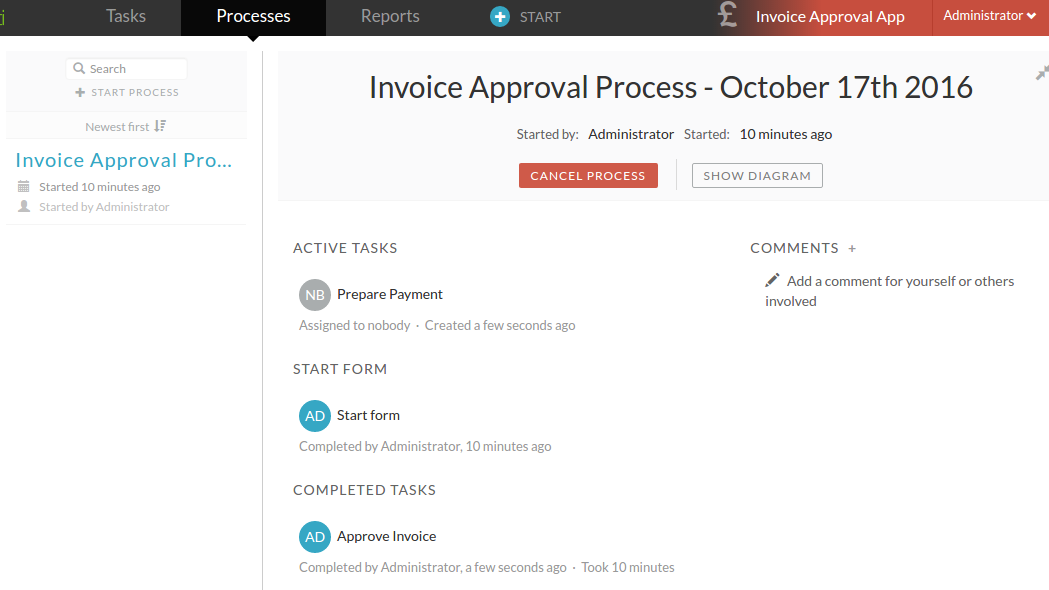
The Prepare Payment task is a pooled task for the Accounting group that we created. We added ourselves to this group (i.e. we added Admin). So you would think it should pop-up when we click Tasks in the menu. But we don’t see it:
This is because this task is a pooled task that is not assigned to anybody yet. The task is up for grabs by anybody in the Accounting group. And if you remember when we were talking about different tasks, assignees etc. A Queued task is one that has yet to be assigned to someone, so let’s click on QUEUED TASKS in the left menu:
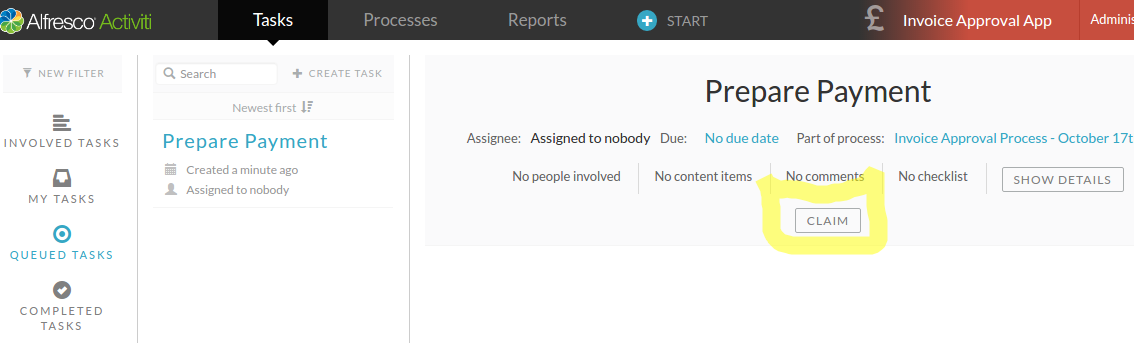
And there it is. What we need to do first is remove the task from anybody else's QUEUED TASKS list. We do this by claiming it. Click the CLAIM button:

We can now prepare the payment of this invoice. If we decided at this point that it was a mistake to claim this task, and that somebody else should actually handle it, then we can send it back to being queued again by clicking on the REQUEUE button.
If we are happy to do the task then we can click on the COMPLETE button when we are done. This should send an email looking like this in the Fake SMTP client:

This completes the business process instance. It will now show up under COMPLETED on the Processes page. Where we can also download an audit log of all the steps that were taken in the business process and by whom.
Running the Rejected Invoice flow
Let’s make sure the rejected invoice path works too. Start a new Invoice Approval workflow instance and click Reject in the Approve Invoice task:

Fill in a comment about your concerns with the invoice, then click on either of the REJECT buttons. Now we should have the Clarify Invoice task assigned to us as the initiator. Click on the Processes menu item, and then on the Running link to the left and you should see:

We can see that the Clarify Invoice task is among the Active tasks and it has correctly been assigned to the Administrator, which initiated the workflow instance. Click on the SHOW DIAGRAM button in the upper right corner so we can verify where in the workflow paths we are:
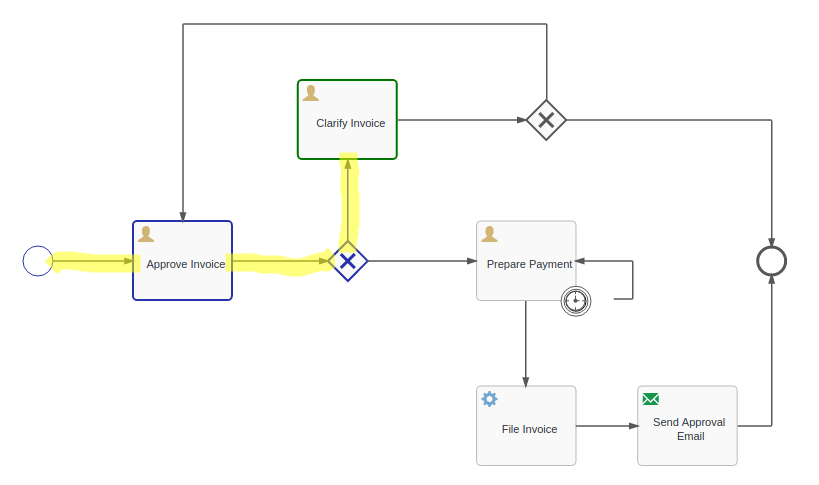
Close the diagram view and then click on the Clarify Invoice task in the Active Tasks list:
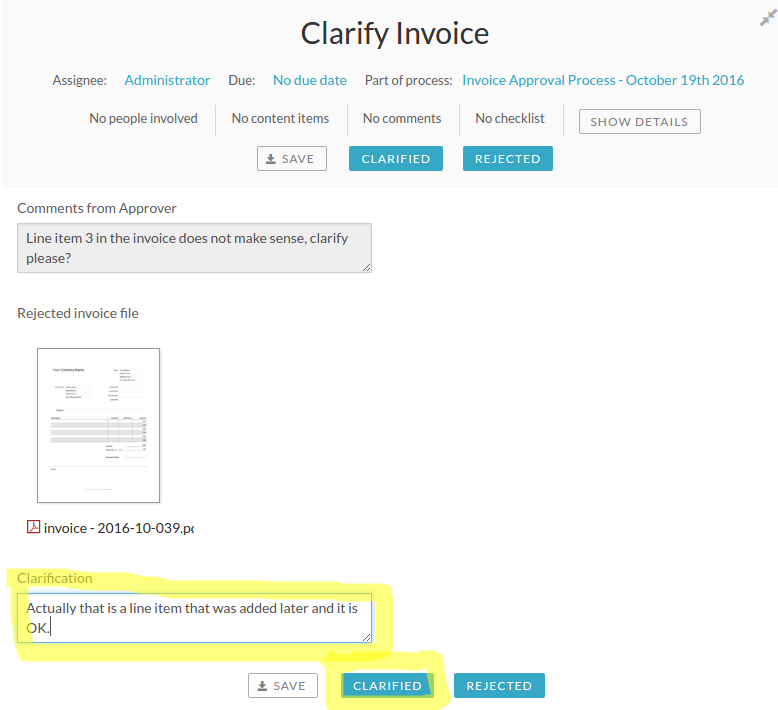
We can see in the comment field the message from the Approver. Fill in some clarification message and then click on the CLARIFIED button, this should assign the Approve Invoice task to the approver user again. Click on Tasks in the top menu and then on MY TASKS in the left navigation:
We should see the extra Clarification Message. Click APPROVE to move the workflow into the approved path. Then click on QUEUED TASKS to see the pooled Prepare Payment task. Claim the task and complete it.
This ends the workflow instance.
Improving the Business Process
As with all processes and applications, things change frequently with new business requirements etc. In this section we will make a few updates to the process and then republish it. We will then try out this new version of the process.
Update the File Invoice Task to store the file
The first implementation of the File Invoice Service task did not do much more than a bit of logging and showed us how we can easily access a String class field. Now, we would very much like to access the invoice file from the service task implementation and store it in the file system, or in whatever other system we need to store it in (source code for the updated service task implementation is available here).
We cannot access the invoice file via the Expression variable passed in as follows:
public void setInvoiceToFile(Expression invoiceToFile) {
this.invoiceToFile = invoiceToFile;
}
The invoicetobeapproved process variable actually just contains a DB ID for the file. This is for performance reasons. There is a special Activiti Service called RelatedContentService that we need to use to access the actual file. This service needs to be wired into the service task implementation as follows:
public class FileInvoiceServiceTaskDelegate implements JavaDelegate {
private static Logger logger = LoggerFactory.getLogger(FileInvoiceServiceTaskDelegate.class);
/**
* Used to access content files related to the workflow instance
*/
@Autowired
RelatedContentService relatedContentService;
However, because this is a Spring bean being wired into the class, it needs to be a Spring bean itself that can be scanned and detected by the system. For this to work we need to do two things, first set the service class need to be annotated as a Spring Component. And secondly, it needs to be defined in a Java package that is actually scanned. The Java package that the service task implementation is defined in now is not scanned. The class needs updating to look like this:
package com.activiti.extension.bean;
import com.activiti.service.runtime.RelatedContentService;
import org.activiti.engine.delegate.DelegateExecution;
import org.activiti.engine.delegate.Expression;
import org.activiti.engine.delegate.JavaDelegate;
import org.slf4j.Logger;
import org.slf4j.LoggerFactory;
import org.springframework.beans.factory.annotation.Autowired;
import org.springframework.stereotype.Component;
@Component
public class FileInvoiceServiceTaskDelegate implements JavaDelegate {
private static Logger logger = LoggerFactory.getLogger(FileInvoiceServiceTaskDelegate.class);
/**
* Used to access content files related to the workflow instance
*/
@Autowired
RelatedContentService relatedContentService;
Note the new package com.activiti.extension.bean, which will be scanned for beans. And the class has been annotated with @Component. We can now get to the content as follows:
package com.activiti.extension.bean;
import com.activiti.content.storage.api.ContentObject;
import com.activiti.domain.runtime.RelatedContent;
import com.activiti.service.runtime.RelatedContentService;
import org.activiti.engine.delegate.DelegateExecution;
import org.activiti.engine.delegate.Expression;
import org.activiti.engine.delegate.JavaDelegate;
import org.slf4j.Logger;
import org.slf4j.LoggerFactory;
import org.springframework.beans.factory.annotation.Autowired;
import org.springframework.stereotype.Component;
import java.util.List;
@Component
public class FileInvoiceServiceTaskDelegate implements JavaDelegate {
private static Logger logger = LoggerFactory.getLogger(FileInvoiceServiceTaskDelegate.class);
private static final String INVOICE_FILE_VAR_NAME = "invoicetobeapproved";
@Autowired
RelatedContentService relatedContentService;
private Expression companyEmail;
public void setCompanyEmail(Expression companyEmail) {
this.companyEmail = companyEmail;
}
public void execute(DelegateExecution execution) throws Exception {
logger.info("Storing the invoice file somewhere safe!");
String emailAddress = (String) companyEmail.getValue(execution);
logger.info("The invoice was sent in from: " + emailAddress);
List<RelatedContent> contentList = relatedContentService.getFieldContentForProcessInstance(
execution.getProcessInstanceId(), INVOICE_FILE_VAR_NAME, 1, 0).getContent();
if (contentList != null) {
for (RelatedContent relCon : contentList) {
logger.info("Content file: " + relCon.getName() + ", created: " + relCon.getCreated());
ContentObject co = relatedContentService.getContentStorage().getContentObject(
relCon.getContentStoreId());
// Get the InputStream and do stuff with the file
// co.getContent()
}
}
}
}
Now update the process definition so it uses the new task implementation, which is now a Spring bean. Click on the Kickstart App and then click on the Visual Editor button that appears when hovering over the Invoice Approval Process Model:
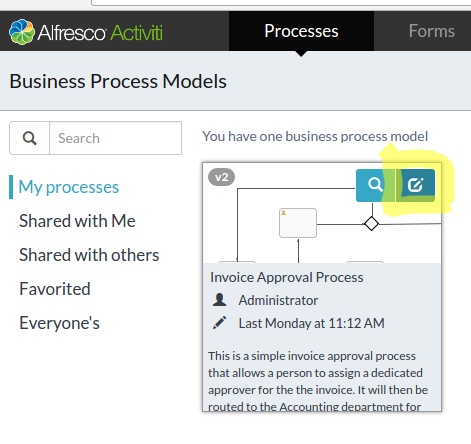
This takes you straight into the BPMN Editor:

Click on the File Invoice task and remove the Class name and put the Spring bean name into the Delegate expression property as an expression, like this: ${fileInvoiceServiceTaskDelegate}. The name of the bean, if not specified via the Component annotation, will be the class name with the first character in lower-case.
Save the model and close the BPMN Editor.
Important! If you have process instances running for version 1 of the process model, then there will be a problem if you stop the server and install the new extension JAR with the File Invoice service task implementation updated. The V1 process instances will assume that the org.alfresco.training.activiti.task.FileInvoiceServiceTaskDelegate class is still available on the classpath. If not the process instance will fail/crash. So for a period of time, you might have to live with both service task implementations side by side.
Update task names to reflect invoice name and escalated
If this workflow was actually deployed to production it would be difficult for the users to know what tasks are related to what invoices. There is nothing in the task name that tells them what invoice it is related to. Also, if the Prepare Payment task is escalated it is not shown to the users.
It would be nice if the name of the task clearly showed if it has been escalated, such as ESCALATED - Prepare Payment..., so it is clear to the users that the task needs to be dealt with immediately.
To change the name of the task we have to update the task property called name. This is typically done via a so called task listener (for full documentation around these see this page).
Task listeners are implemented in a similar way to task delegate classes for service tasks. However, they can be executed more than just once during a task’s lifecycle events:
- Create - when the task is created
- Assignment: when the task is assigned to a user
- Completed: when the user completes the task
- Deleted: when the task instance is deleted
Because we are going to use the invoice filename in the task name for multiple user tasks, it make sense to fish out this filename in the beginning of the process. We can for example do this when we enter the Approve Task, and then set up a process variable with this name for reuse in the Clarify Invoice and Prepare Payment user tasks.
Click on the Approve Invoice task and then click on the Task listeners property:
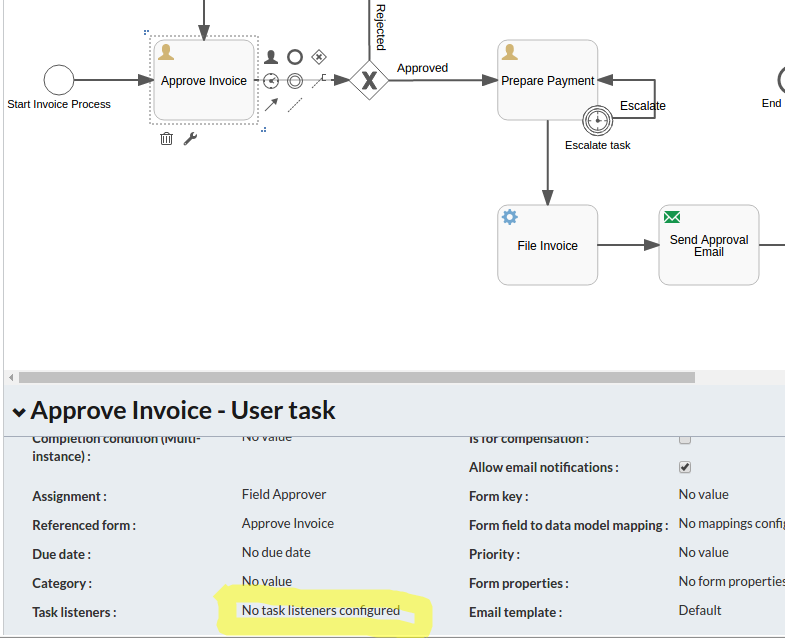
This opens up the following dialog where task listeners can be added:
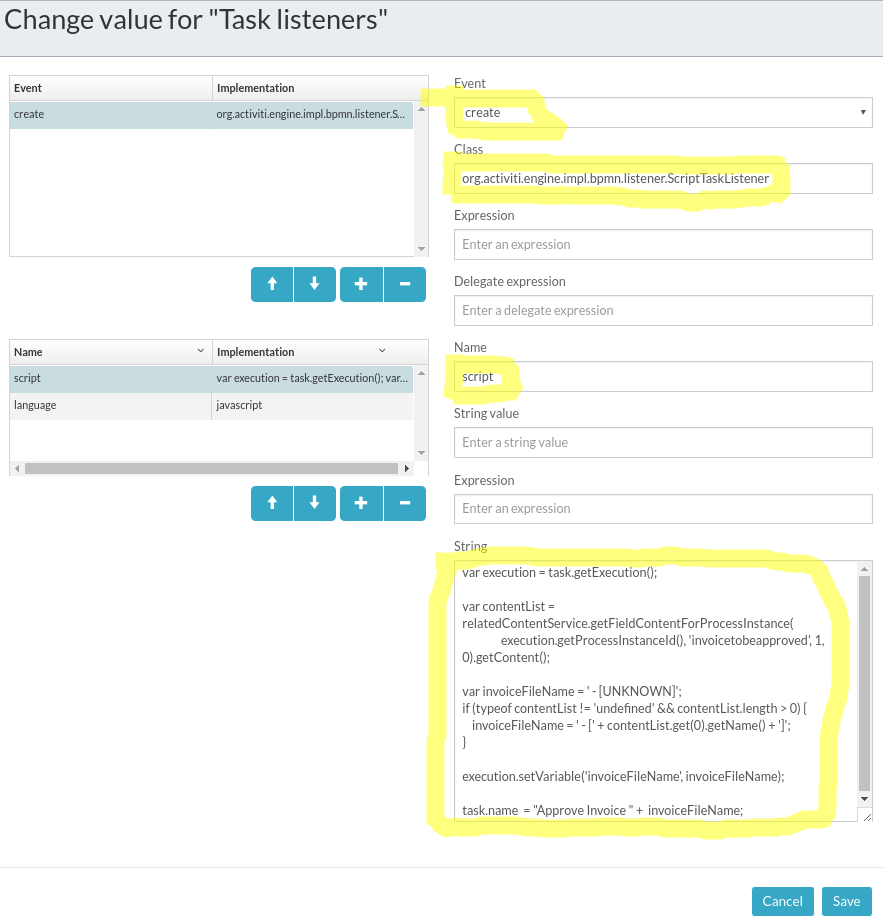
In our case we want to update the task name when the task is created. And we can set the task name via a script, which can be executed via a built in task listener implementation called org.activiti.engine.impl.bpmn.listener.ScriptTaskListener:
The script code is then inserted via a field with the name script. We also need a field called language that specifies the scripting language that we intend to use, in our case javascript. But we could use other scripting languages also, such as Groovy.
When you start working with scripts instead of Java it is worth thinking about pros and cons between the two.
Java
Pros: Easy to debug, easy to test, most likely faster, easier to reuse code, code completion, secure, you can change them for an active process instance
Cons: More involved to get going, you need an extension project. Need to stop the server to install a new version, unless using something like JRebel
Scripting
Pros: Very easy to get going with it and you don’t have to leave the BPMN Editor, no other tools required, no server restarts required
Cons: Changes to script cannot be used by active process instances, can be a security risk (however, just recently there have been the release of so called secure script listeners that can be used to handle certain security risks), harder to debug problems, more error prone as you see error first during runtime, not easy to create tests
The resulting BPMN 2 XML for this looks something like this:
<userTask id="approveInvoice" name="Approve Invoice"
activiti:async="true" activiti:exclusive="false"
activiti:assignee="${taskAssignmentBean.assignTaskToAssignee('approver', execution)}"
activiti:formKey="3">
<extensionElements>
...
<activiti:taskListener event="create" class="org.activiti.engine.impl.bpmn.listener.ScriptTaskListener">
<activiti:field name="script">
<activiti:string>
<![CDATA[
var execution = task.getExecution();
var contentList = relatedContentService.getFieldContentForProcessInstance(
execution.getProcessInstanceId(), 'invoicetobeapproved', 1, 0).getContent();
var invoiceFileName = ' - [UNKNOWN]';
if (typeof contentList != 'undefined' && contentList.length > 0) {
invoiceFileName = ' - [' + contentList.get(0).getName() + ']';
}
execution.setVariable('invoiceFileName', invoiceFileName);
task.name = "Approve Invoice " + invoiceFileName;]]>
</activiti:string>
</activiti:field>
<activiti:field name="language">
<activiti:string><![CDATA[javascript]]></activiti:string>
</activiti:field>
</activiti:taskListener>
...
</extensionElements>
</userTask>
What’s happening here is that we first get an instance of the execution environment from the task object. The execution JavaScript object is not accessible directly in a task listener. Then we use the RelatedContentService spring bean to get the content for a field that we pass in, this is the field called invoicetobeapproved that we created in the start form. You can access many of the Activiti Service beans directly in the script code. Normally the bean class name with first character in lower-case works as bean instance identifier.
When we have got the filename from the content object it is saved away in the process variable called invoiceFileName for use in any user tasks that need it later on. Last thing we do is update the task name so it includes the invoice file name.
The Prepare Payment task listener looks like this:
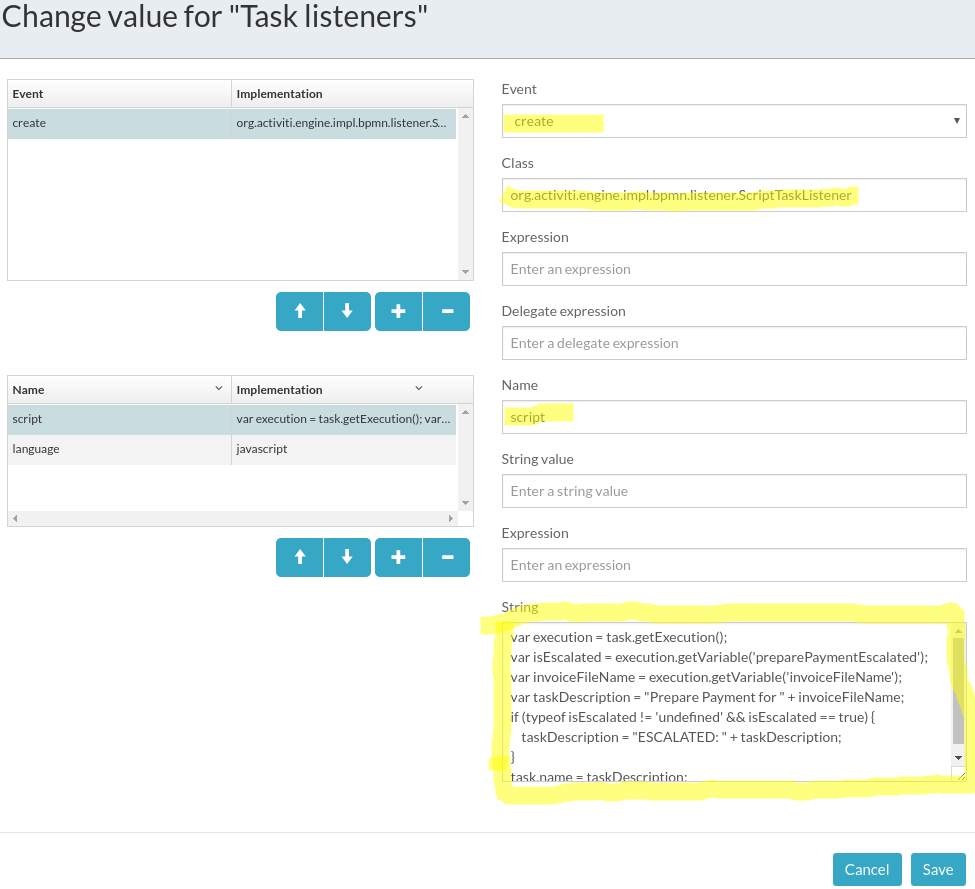
The task listener setup is the same as for the Approve Invoice task, the only thing that differs is the script. It will also look at if the task has been escalated, and in this case it will prefix the task name with the “ESCALATED” word. The BPMN 2.0 XML for this looks like this:
<userTask id="preparePayment" name="Prepare Payment"
activiti:candidateGroups="1001" activiti:formKey="1001">
<extensionElements>
<activiti:taskListener event="create"
class="org.activiti.engine.impl.bpmn.listener.ScriptTaskListener">
<activiti:field name="script">
<activiti:string><![CDATA[
var execution = task.getExecution();
var isEscalated = execution.getVariable('preparePaymentEscalated');
var invoiceFileName = execution.getVariable('invoiceFileName');
var taskDescription = "Prepare Payment for " + invoiceFileName;
if (typeof isEscalated != 'undefined' && isEscalated == true) {
taskDescription = "ESCALATED: " + taskDescription;
}
task.name = taskDescription;]]>
</activiti:string>
</activiti:field>
<activiti:field name="language">
<activiti:string><![CDATA[javascript]]></activiti:string>
</activiti:field>
</activiti:taskListener>
...
</extensionElements>
</userTask>
You might have noticed that the script assumes that there is a process variable called preparePaymentEscalated available and set to true to indicate when the task has been escalated. The variable obviously needs to be set somewhere and the most obvious place would be on the transition out of the timer when it expires.
To do this we have to use a so called execution listener (for full documentation around these see this page).
Click on the transition from the Escalate task timer to the Prepare Payment user task and then on the Execution Listeners property:

This will display a dialog where you can set up an execution listener to be executed when the transition is taken:
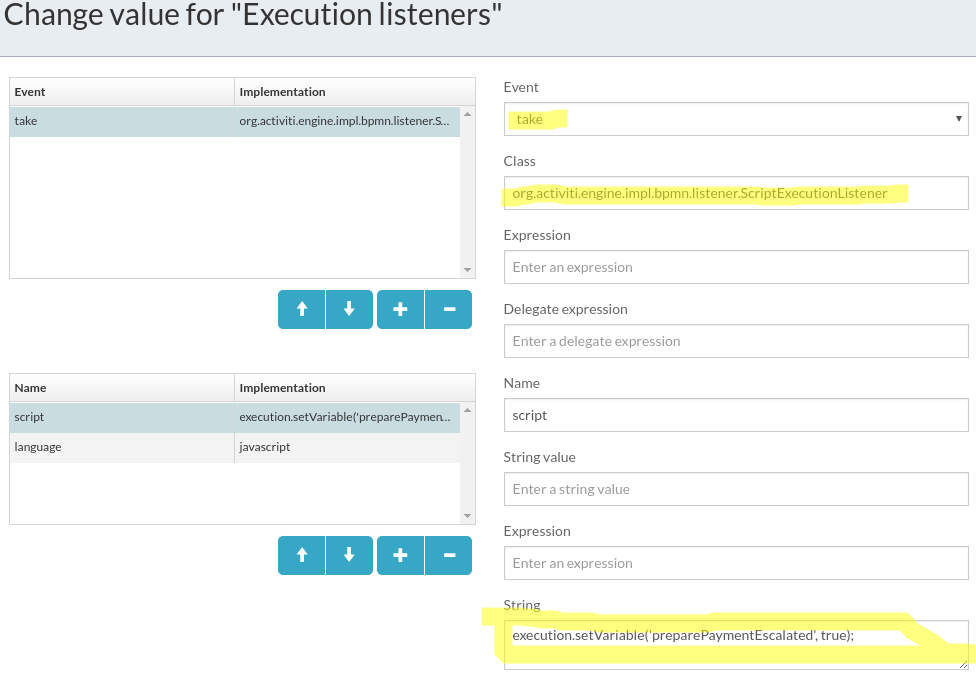
Note the Event property that is set to take and the new class, which is org.activiti.engine.impl.bpmn.listener.ScriptExecutionListener. The script is simple and just sets the preparePaymentEscalated variable to true.
The BPMN 2.0 XML for this looks as follows:
<sequenceFlow id="sid-E174B2BB-83BF-4443-893A-A411488FE30A" name="Escalate"
sourceRef="escalatePreparePayment" targetRef="preparePayment">
<extensionElements>
<activiti:executionListener event="take"
class="org.activiti.engine.impl.bpmn.listener.ScriptExecutionListener">
<activiti:field name="script">
<activiti:string><![CDATA[execution.setVariable('preparePaymentEscalated', true);]]></activiti:string>
</activiti:field>
<activiti:field name="language">
<activiti:string><![CDATA[javascript]]></activiti:string>
</activiti:field>
</activiti:executionListener>
...
</extensionElements>
</sequenceFlow>
The Clarify Invoice task can also be set up to have its task name show the invoice file name.
Publish a new version of the Invoice Approval Application
To be able to use the new and updated process definition we need to publish a new version of the Invoice Approval App, and then also indirectly a new version of the Invoice Approval process. We can see in the following screenshot that we are working on version 2 of the Invoice Approval App.

To publish version 2, click on the Publish button in the upper right corner.
Run the updated process
Before we can execute the new process we need to update the extension JAR with all the new stuff. Build and then copy the JAR in a similar way to this (if you are not able to build the JAR copy it from here):
martin@gravitonian:/opt/activiti15/tomcat/webapps/activiti-app/WEB-INF/lib$ cp ~/src/sdk3/alfresco-sdk-tests/activiti-jar-blog/target/activiti-jar-blog-1.0-SNAPSHOT.jar .
Then start a new process. We should see the Approve Task name containing invoice file info as follows:
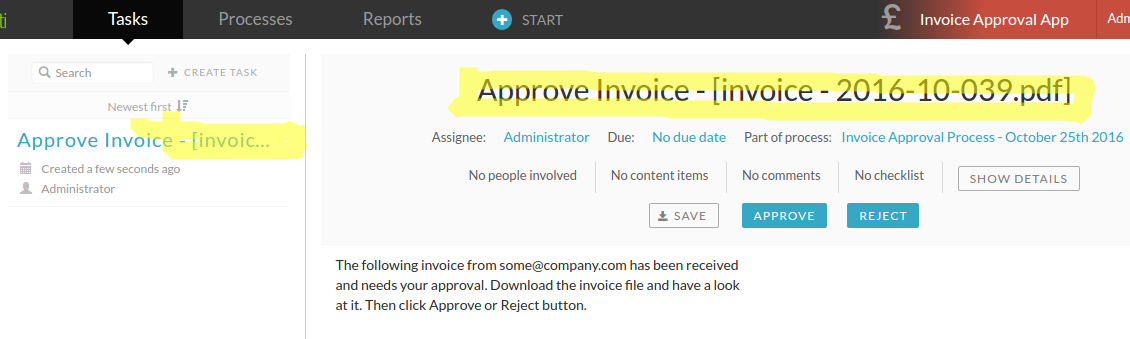
It is now easier to see what invoice a task is associated with. If we complete this task, and wait a bit, we will see that the Prepare Payment task is escalated with a new task name:

Completing the process should show you logging similar to this from the Filing service task:
03:42:11,135 [http-nio-8080-exec-1] INFO com.activiti.extension.bean.FileInvoiceServiceTaskDelegate - Storing the invoice file somewhere safe!
03:42:11,136 [http-nio-8080-exec-1] INFO com.activiti.extension.bean.FileInvoiceServiceTaskDelegate - The invoice was sent in from: some@company.com
03:42:11,139 [http-nio-8080-exec-1] INFO com.activiti.extension.bean.FileInvoiceServiceTaskDelegate - Content file: invoice - 2016-10-039.pdf, created: 2016-10-25 15:35:03.798
Summary
This article has showed you how to work with Alfresco Activiti, the Enterprise Edition of the Activiti business process management product. It has shown that the web tools available to design and implement business processes with Activiti, are very powerful. And working from the web UI for most of the time saves a lot of time compared to manually coding XML, and it is much less error prone.
I’m sure that most of you that followed this article from start to finish were able to get the process running pretty much immediately after finishing the initial design and implementation of it. I was certainly surprised myself about how powerful it was to work mostly from the web UI, validating everything while you are designing and implementing, instead of at runtime.
Sure, we did not cover more than the basic stuff here and we did not look at stuff such as decision tables, data models, REST steps, embedding javascript in forms, signals, messages, subprocesses, events, etc. If we were, then it would not be a getting started guide :-)
You must be a registered user to add a comment. If you've already registered, sign in. Otherwise, register and sign in.
Alfresco Process Services Archive Docs
Alfresco Hub documents relating to Alfresco Process Services and Activiti.
Latest Articles
- GAAP.bpmn20.xml
- Create a Tooltip in Alfresco Process Services Form...
- Alfresco Process Services 1.7 Available Now
- AnnualBonusActiviti6.zip
- Annual bonus (1).zip
- Single ticket price calculator.dmn
- REST Example.zip
- TestJava7SerializationBug.bpmn
- Getting Started with Alfresco Process Services
- Installing Alfresco Process Services Trial using a...
- Welcome to the New Alfresco Process Service & Acti...
- Activiti - Engine 5.21.0 API
- 10 Minute Tutorial
- Activiti ReadMe
We use cookies on this site to enhance your user experience
By using this site, you are agreeing to allow us to collect and use cookies as outlined in Alfresco’s Cookie Statement and Terms of Use (and you have a legitimate interest in Alfresco and our products, authorizing us to contact you in such methods). If you are not ok with these terms, please do not use this website.