
Taking ADF 2.0 out for a spin
Turn on suggestions
Auto-suggest helps you quickly narrow down your search results by suggesting possible matches as you type.
Showing results for
- Alfresco Hub
- :
- ADF - Forum
- :
- Taking ADF 2.0 out for a spin
Taking ADF 2.0 out for a spin
- Subscribe to RSS Feed
- Mark as New
- Mark as Read
- Bookmark
- Subscribe
- Printer Friendly Page
- Report Inappropriate Content
29 Nov 2017
6:01 PM
Now that ADF 2.0 is finally released, we need to update all our Getting Started content. While we're doing this, we wanted to give you a quick guide to create an ADF based application.
ADF 2.0 works with Alfresco Content Services 5.2.x, Alfresco Community Edition 5.2.x and Alfresco Process Services (Powered by Activiti) 1.6.4+/1.7.x. You'll need to have at least one of these running before going ahead. No special configuration is required during development.
Please note that ADF does not currently support Activiti, only Alfresco Process Services. We plan to bring this support in the future. Stay tuned for more news on this topic.
Since we're embracing Angular CLI, there are a few things you need to have installed:
- node.js 8.x (we recommend the latest version)
- Angular CLI 1.5.0
- Yeoman
- Alfresco ADF App Generator
Start by installing node.js. Once this is installed install Angular CLI, then Yeoman and the ADF App Generator:
$ npm install -g @angular/cli
$ npm install -g yo
$ npm install -g generator-alfresco-adf-appDepending on your system, you may have to run the commands above with sudo.
Next up, let's generate our application with Yeoman:
$ yo alfresco-adf-appThe generator will now ask a few questions, mainly the name of your app, and which blueprint you want to use:
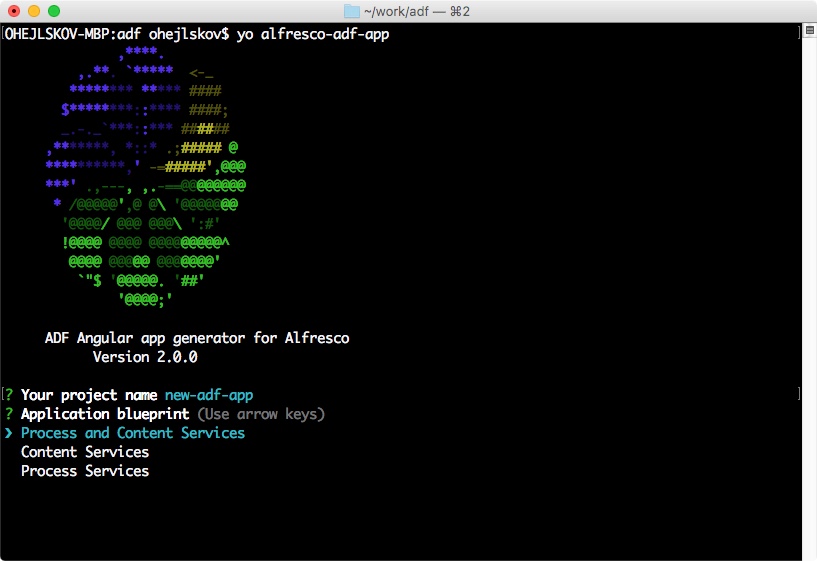
You can select one of three blueprints. To describe them from the bottom up:
Process Services
This will generate an application for Alfresco Process Services. It contains the following components: Login, App List, Task List, Form and Start Process.
Content Services
This will generate an application for Alfresco Content Services (or Alfresco Community Edition). It contains the following components: Login, Document List, Viewer.
Process and Content Services
This will generate an application for both Alfresco Process and Content Services and will be a combination of the two blueprints above.
Select the one you want to use, and the generator will now ask if you want to install dependencies right away. Enter "Y" and hit enter.
This can take a minute or two depending on your internet connection. You might see a few warnings at the end like this:
npm notice created a lockfile as package-lock.json. You should commit this file.
npm WARN @angular/flex-layout@2.0.0-beta.10 requires a peer of @angular/core@0.0.0-NG but none is installed. You must install peer dependencies yourself.
npm WARN @angular/flex-layout@2.0.0-beta.10 requires a peer of @angular/common@0.0.0-NG but none is installed. You must install peer dependencies yourself.
npm WARN @angular/material-moment-adapter@5.0.0-rc0 requires a peer of moment@^2.18.1 but none is installed. You must install peer dependencies yourself.
npm WARN codelyzer@3.2.2 requires a peer of @angular/compiler@^2.3.1 || >=4.0.0-beta <5.0.0 but none is installed. You must install peer dependencies yourself.
npm WARN codelyzer@3.2.2 requires a peer of @angular/core@^2.3.1 || >=4.0.0-beta <5.0.0 but none is installed. You must install peer dependencies yourself.These warnings are normal. Unfortunately they happen within the Angular Flex Layout package that ADF depends on. You can safely ignore them.
Next you want to change into the directory of your app and inspect the proxy.conf.json file. This file will tell Webpack to create a proxy for your backend (Content or Process services). Change the URLs and ports to reflect where they are currently running. In my case I have ACS running on http://localhost:8080 and APS running on http://localhost:9999, so my proxy.conf.json file should look like this:
{
"/alfresco": {
"target": "http://localhost:8080",
"secure": false,
"changeOrigin": true
},
"/activiti-app": {
"target": "http://localhost:9999",
"secure": false,
"changeOrigin": true
}
}You'll notice that this is an Angular CLI project, so you can now take advantage of all the CLI commands to generate new components, modules and much more. We encourage you to checkout the Angular CLI documentation.
Now you can simply run "npm start". This takes a couple of seconds, and will automatically open a browser to http://localhost:4200/. Once the page loads, you can navigate to http://localhost:4200/login which should look like this:

Enter a valid username and password and you have now successfully created your very first ADF 2.0 application!
Happy hacking!
About the Author
Angel Borroy is Hyland Developer Evangelist.
Over the last 15 years, he has been working as a software architect on Java, BPM, document management and electronic signatures. He has been working with Alfresco during the last years to customize several implementations in large organizations and to provide add-ons to the Community based on Record Management and Electronic Signature.
He writes (sometimes) on his personal blog http://angelborroy.wordpress.com.
He is (proud) member of the Order of the Bee.
1 Comment
You must be a registered user to add a comment. If you've already registered, sign in. Otherwise, register and sign in.
Application Development Framework Blog
Blog posts and updates about Application Development Framework (ADF).
Latest Articles
- Extending the Alfresco Digital Workspace (ADW)
- Developing Take Ownership Extension for ACA 2.8.0
- Creating your first extension for Alfresco Content...
- ADF 4.0.0 is out!
- Hey Front-End Developer, what are your preferred o...
- We want to (thank and) reward our ADF contributors...
- How to update ADF from version 2.5.0 to 2.6.1
- Application Development Framework (ADF) 2.6.1 Rele...
- ADF 2.6.0 Release Note
- How to update ADF from version 2.4.0 to 2.5.0
- ADF 2.5.0 Release Note
- ADF 2.4.0 Release Note
- How to deploy an ADF APP
- How To Add The New Sidenav Layout Component In You...
- How to integrate ADF log service with Mixpanel an...
We use cookies on this site to enhance your user experience
By using this site, you are agreeing to allow us to collect and use cookies as outlined in Alfresco’s Cookie Statement and Terms of Use (and you have a legitimate interest in Alfresco and our products, authorizing us to contact you in such methods). If you are not ok with these terms, please do not use this website.