- Subscribe to RSS Feed
- Mark as New
- Mark as Read
- Bookmark
- Subscribe
- Printer Friendly Page
- Report Inappropriate Content
- Project Objective
- Disclaimer
- Software requirements
- How to run the project
- 1. Authenticating to Azure
- 2. Authenticating toNexus
- 3. Set the correct values in run-azure script
- 4. Download the Digital Workspace WAR file:
- 5. Run the project script
- What happens when running the project
- Creating managed Images in Azure
- Building Azure infrastructure and deploying Alfresco
- Connecting to the infrastructure
- To do list
Project Objective
(Link to the project in Github)
Note: the most up to date information about the project can be found in the github page (link above).
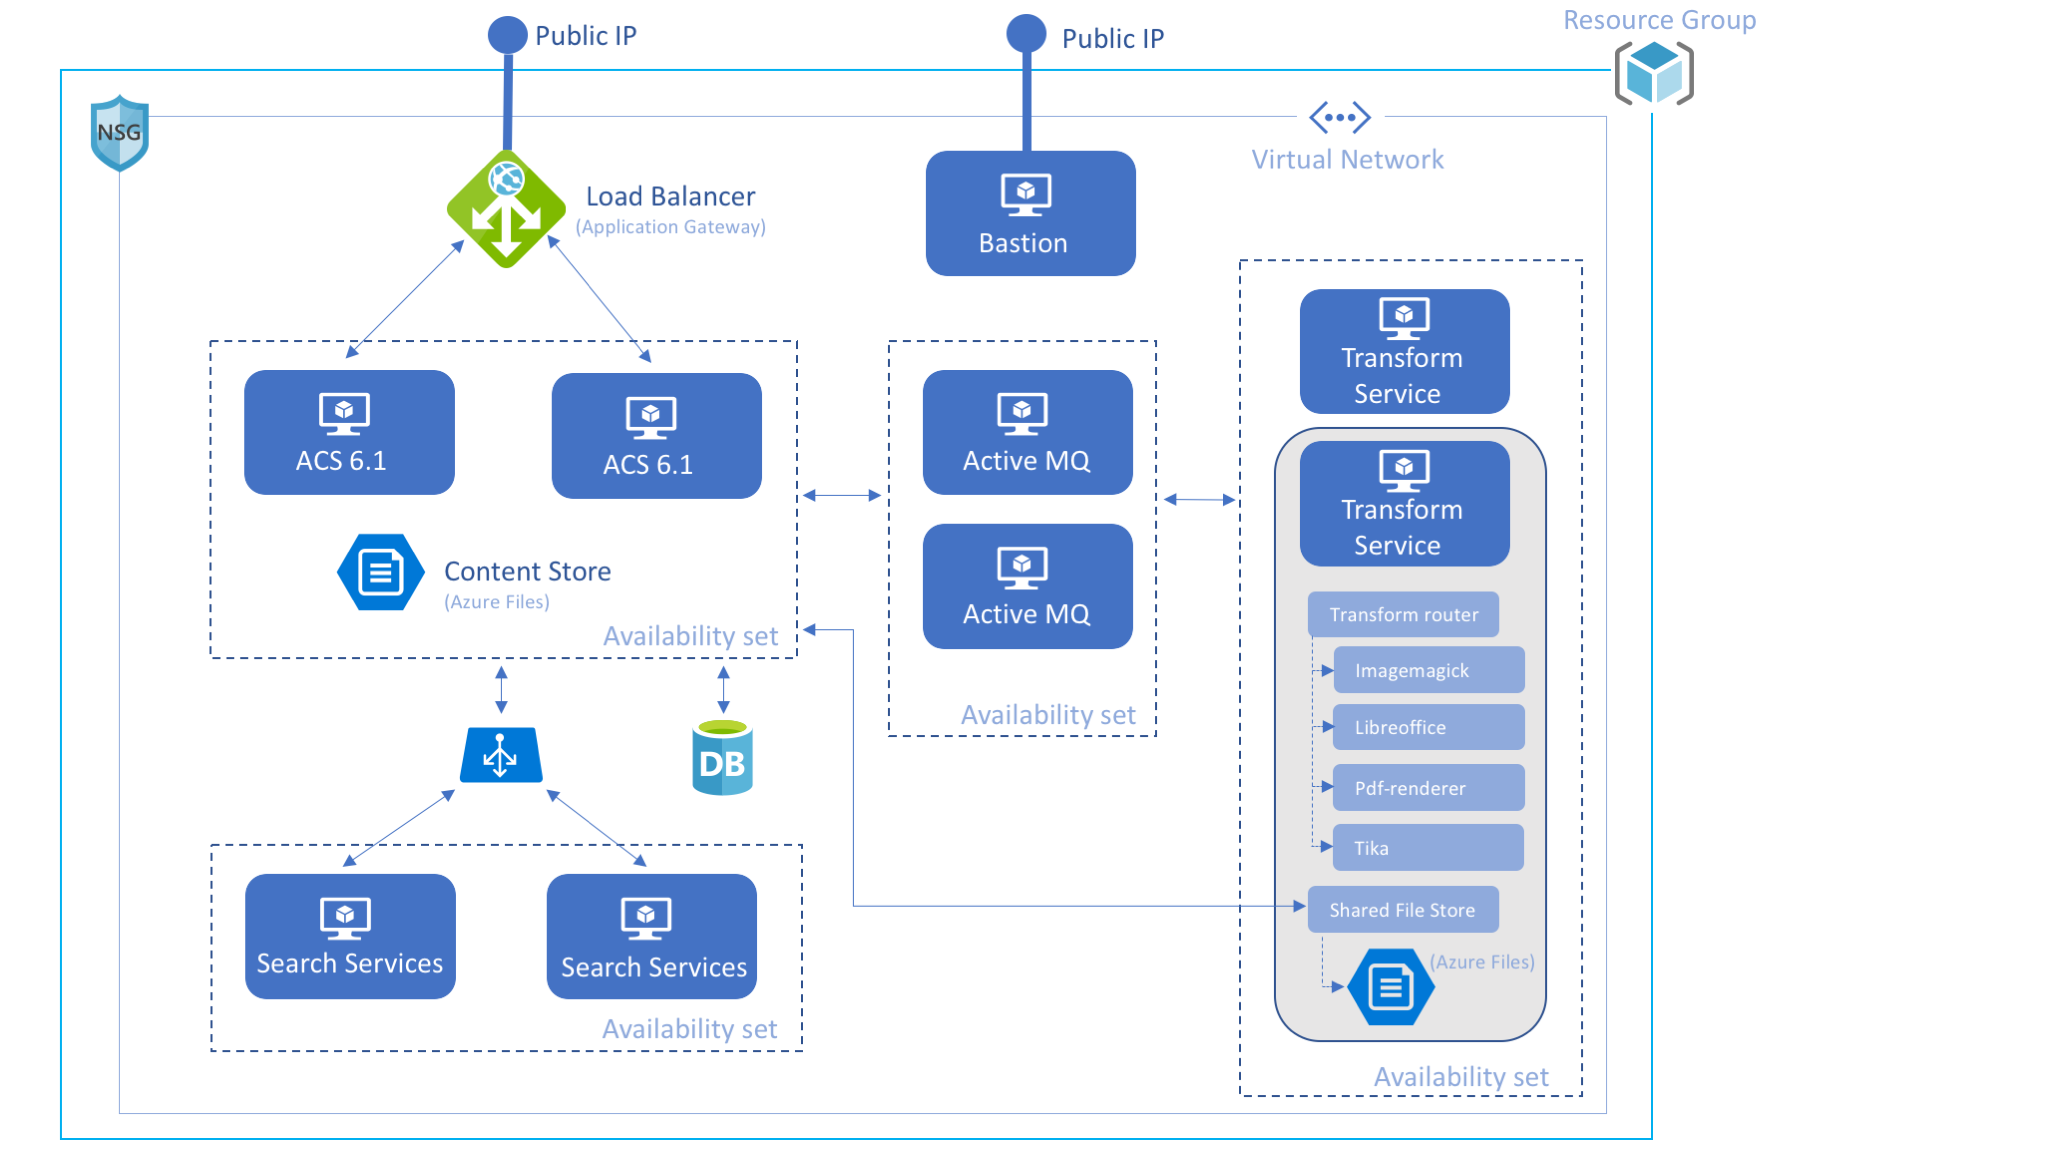
In this blog we cover the deployment of ACS (Alfresco Content Services) Enterprise 6.1 on Azure using VMs. The deployment consists of two mayor steps:
Creating Azure Managed Images containing a base installation of the corresponding Alfresco component (Alfresco Content Services, Alfresco Search Services...).
- Building an Azure infrastructure (Load balancers, VMs, networks, public ips, etc) and deploying Alfresco Enterprise 6.1 to it.
The final ACS architecture looks like this:
Disclaimer
The tools and code used in this blog to deploy ACS Enterprise 6.1 are not officially supported by Alfresco. They are used as a POC to show you how you can use OpenSource tools to deploy and configure resources and applications to Microsoft Azure in an automated way.
The software used to build and deploy ACS Enterprise 6.1 is available in a public repository in GitHub.
Software requirements
The following software is required to create and deploy resources in Azure:
(Mac Os X versions)
Packer 1.4.0 - used to automate the creation of Azure Images.
Terraform 0.11.13- used to create and update infrastructure resources.
- Ansible 2.7.6 - Ansible is an IT automation tool used to deploy and configure systems.
- OpenSSL 1.0.2f - used to decrypt credentials stored in a file.
- Azure-cli 2.0.55 - used to create and check resources in Azure.
Make sure these tools have been installed on the computer you are using to build and deploy ACS Enterprise 6.1.
How to run the project
The project contains a bash script called run-azure.sh. The script will do the following:
- Create the managed Images in Azure.
- Build the infrastructure and deploy and configure Alfresco Enterprise 6.1.
However, before running the script, the Azure and Nexus credentials should be stored encrypted in a file so the script can use the credentials.
Instructions about how to store the credentials and run the project are described below.
1. Authenticating to Azure
Azure-cli, Packer and Terraform need to authenticate to Azure in order to create resources. Since we are creating a large number of infrastructure resources, the user we authenticate with to Azure, needs to have administrator access.
In order to authenticate in Azure we need the following information:
- Subscription ID
- Tenant ID
- Client ID
- Client Secret
The following links provide information to get the above values:
- https://docs.bitnami.com/azure/faq/administration/find-subscription-id/
- https://docs.microsoft.com/en-gb/azure/active-directory/develop/howto-create-service-principal-porta...
Once you gathered all the credentials you should store them encrypted in a file so the values can be accessed by the run-azure.sh script:
$ cat > ~/.az <<EOF
{
"client_id": "XXXXXX",
"client_secret": "XXXXXXXX",
"subscription_id": "XXXXXX",
"tenant_id": "XXXXXXXX"
}
EOF
$ openssl enc -aes-256-cbc -in ~/.az -out ~/.az.dat$ chmod 400 ~/.az.dat
$ rm ~/.az
2. Authenticating to Nexus
Alfresco Enterprise customers have Nexus credentials as part of their license subscription. Please refer to your CRM if you don't know or have your Nexus credentials.
$ echo "NEXUS_USER:NEXUS_PASSWORD" > ~/.nexus
$ openssl enc -aes-256-cbc -in ~/.nexus -out ~/.nexus.dat$ chmod 400 ~/.nexus.dat
$ rm ~/.nexus
3. Set the correct values in run-azure script
There are some variables that should be configured before running the script:
- NEXUS_FILE - location of the encrypted file containing the Nexus credentials.
- AZURE_FILE - location of the encrypted file containing the Azure credentials
- DOMAIN_NAME_LABEL - domain name that will be used in the url to access the infrastructure. The format will be {DOMAIN_NAME_LABEL}-{UNIQ_ID}.{LOCATION}.cloudapp.azure.com. Example:
alfresco61-demo-02e16d30.uksouth.cloudapp.azure.com
- RESOURCE_GROUP_NAME_IMG - name of the Azure resource group where the managed images will be created.
- RESOURCE_GROUP_NAME_DEPLOY - name of the Azure resource group where the infrastructure will be deployed.
- LOCATION - name of the location used in Azure for the project. To get a list of locations use the following command:
az account list-locations
4. Download the Digital Workspace WAR file:
Download the "Digital workspace" war file from here and save it as packer-files/downloaded/digital-workspace.war (this file is not yet available in Nexus for an automated download).
5. Run the project script
Make sure you have execution permission in the script and then execute it:
$ ./run-azure.sh
~~~~~~~~~~~~~~~~~~~~~
M A I N - M E N U
~~~~~~~~~~~~~~~~~~~~~
1. Run the entire project (create Azure Images, build infrastructure and deploy Alfresco Enterprise 6.1)
2. Create Azure Images
3. Build Azure infrastructure and deploy Alfresco Enterprise 6.1
4. Show infrastructure IPs and DNS names
Enter choice [ 1 - 4]
Select option 1 if you want to run the entire project or option 2 followed by option 3 if you want to run it on stages. The last option will show the IPs and DNS names generated in case you need them again (the information is shown as well in options 1 and 3).
What happens when running the project
Creating managed Images in Azure
The first stage of the project consists in creating the following managed images:
- Alfresco Frontend Image - containing Alfresco Repository, Share, ADW (Alfresco Digital Workspace) and Apache Zeppelin.
- Insight Engine Image - containing Alfresco Search Services.
- Transform Service Image - containing the new Alfresco Transform Service.
- ActiveMQ Image - containing Apache ActiveMQ.
- DB Image - containing a base installation of MySQL Server.
The run-azure.sh script calls packer to create every image individually. A CentOS 7.6 distribution image is used by packer as a baseline, and after uploading the required files (from packer-files folder), ansible is called for provisioning the image. In the provisioning phase, ansible downloads from Nexus and other repositories the necessary "artifacts" and installs them.
As the run-azure script runs you can see what is is doing during its execution...
#############################################################
Creating Images
#############################################################
.....
#####################################
Creating image AlfrescoFrontendImage
#####################################
azure-arm output will be in this color.
==> azure-arm: Running builder ...
==> azure-arm: Getting tokens using client secret
azure-arm: Creating Azure Resource Manager (ARM) client ...
....
==> azure-arm: Waiting for SSH to become available...
==> azure-arm: Connected to SSH!
==> azure-arm: Provisioning with shell script: /var/folders/z3/qv3400px0ys93js187p3fwwh0000gp/T/packer-shell046700839
.....
==> azure-arm: Uploading packer-files/downloaded/digital-workspace.war => /var/tmp/ansible/downloaded/digital-workspace.war
digital-workspace.war 2.81 MiB / 2.81 MiB [===============================================================================================================================================] 100.00% 0s
....
==> azure-arm: Provisioning with Ansible...
....
And the time elapsed for every image created:
##################
16 minutes and 37 seconds elapsed for AlfrescoFrontendImage image creation.
##################
Building Azure infrastructure and deploying Alfresco
Once the images are created it's time to build the infrastructure using Terraform. The file cluster.tf contains the terraform configuration for the Azure and ACS deployments. Additionally cluster_variables.tf contains some specific values (mostly private static ips) required in the deployment.
The output of the run-azure script when creating the infrastructure looks like this:
#############################################################
Deploying bastion
#############################################################
An execution plan has been generated and is shown below.
Resource actions are indicated with the following symbols:
+ create
Terraform will perform the following actions:
+ azurerm_network_interface.bastionnic
id: <computed>
applied_dns_servers.#: <computed>
dns_servers.#: <computed>
enable_accelerated_networking: "false"
enable_ip_forwarding: "false"
internal_dns_name_label: <computed>
internal_fqdn: <computed>
...
azurerm_virtual_machine.bastionvm: Provisioning with 'ansible'...
azurerm_virtual_machine.bastionvm (ansible): Connecting to remote host via SSH...
azurerm_virtual_machine.bastionvm (ansible): Host: 51.XXX.XXX.10
azurerm_virtual_machine.bastionvm (ansible): User: azureuser
azurerm_virtual_machine.bastionvm (ansible): Password: false
azurerm_virtual_machine.bastionvm (ansible): Private key: true
azurerm_virtual_machine.bastionvm (ansible): SSH Agent: true
azurerm_virtual_machine.bastionvm (ansible): Checking Host Key: false
azurerm_virtual_machine.bastionvm (ansible): Connected!
And the time elapsed for deploying the infrastructure:
##################
17 minutes and 5 seconds elapsed for entire infrastructure deployment.
##################
Connecting to the infrastructure
This is the screen shown when the infrastructure has been created (or when selecting the option 4 in the menu):
#############################################################
DNS NAMES AND IPS GENERATED
#############################################################
VM created on resource group "Alfresco_deployment"
Alfresco Content Services 6.1 (share) -----------> http://alfresco61-demo-4XXXXXX4.uksouth.cloudapp.azure.com/share
Alfresco Content Services 6.1 (admin console) ---> http://alfresco61-demo-4XXXXXX4.uksouth.cloudapp.azure.com/alfresco/s/enterprise/admin/admin-systemsummary
Digital Workspace -------------------------------> http://alfresco61-demo-4XXXXXX4.uksouth.cloudapp.azure.com/digital-workspace
Alfresco Insight Engine 1.0.0 -------------------> http://alfresco61-demo-4XXXXXX4.uksouth.cloudapp.azure.com/zeppelin
Via Bastion urls:
-----------------
Alfresco Search Services 1.2.0 ------------------> http://51.XX.XX.81:8983
IPs:
----
Application gateway IP: 52.XX.XX.250
Bastion ip (ssh): 51.XX.XX.81
Through the bastion node it's possible to connect to the VMs inside the private network. As follows there's a table containing all the endpoints reachable from the bastion IP:
| Endpoint | NAT Port | Real port | VM |
|---|---|---|---|
| SSH | 22 | 22 | bastion |
| ActiveMQ console | 8161 | 8161 | activemq-0 |
| ActiveMQ console | 8162 | 8161 | activemq-1 |
| Solr admin console | 8983 | 8983 | insight-0 |
| Solr admin console | 8984 | 8983 | insight-1 |
| Libreoffice transformer | 8090 | 8090 | transformation-0 |
PDF-renderer transformer | 8091 | 8091 | transformation-0 |
| Imagemagick transformer | 8092 | 8092 | transformation-0 |
| Tika transformer | 8093 | 8093 | transformation-0 |
| Shared File Store (console) | 8094 | 8094 | transformation-0 |
| Transform router | 8095 | 8095 | transformation-0 |
| Libreoffice transformer | 8190 | 8090 | transformation-1 |
PDF-renderer transformer | 8191 | 8091 | transformation-1 |
| Imagemagick transformer | 8192 | 8092 | transformation-1 |
| Tika transformer | 8193 | 8093 | transformation-1 |
| Shared File Store (console) | 8194 | 8094 | transformation-1 |
| Transform router | 8195 | 8095 | transformation-1 |
| SSH | 2200 | 22 | activemq-0 |
| SSH | 2201 | 22 | activemq-0 |
| SSH | 2202 | 22 | db |
| SSH | 2203 | 22 | frontend-0 |
| SSH | 2204 | 22 | frontend-1 |
| SSH | 2205 | 22 | insight-0 |
| SSH | 2206 | 22 | insight-1 |
| SSH | 2207 | 22 | transformation-0 |
| SSH | 2208 | 22 | transformation-1 |
| JMX | 50500 | 50500 | frontend-0 |
| JMX | 50501 | 50500 | frontend-1 |
To do list
- Secure the infrastructure using https and fine tune other security aspects.
- Capability to integrate custom amps when creating the infrastructure.
- Use the customer Alfresco license when deploying Alfresco. (Currently the license installed is a trial license of 2 days however a new license can be uploaded through the admin console).
- Use autoscaling for the VMs
- Use Azure SQL DB instead of a dedicated VM with MySQL.
- Many other things 😉
You must be a registered user to add a comment. If you've already registered, sign in. Otherwise, register and sign in.
