
Alfresco Process Services components in action
Turn on suggestions
Auto-suggest helps you quickly narrow down your search results by suggesting possible matches as you type.
Showing results for
- Alfresco Hub
- :
- ADF - Forum
- :
- Alfresco Process Services components in action
Alfresco Process Services components in action
- Subscribe to RSS Feed
- Mark as New
- Mark as Read
- Bookmark
- Subscribe
- Printer Friendly Page
- Report Inappropriate Content
14 Feb 2017
6:40 PM
![]() Before diving deep in the technical topic, let’s start from the beginning, seeing how an APS process works with an existing ADF application. To reach the goal, we are going to use a brand new environment for the next discussions and development. Before discussing the technical stuff, please check the disclaimer for versions, requirements and further details. In particular we assume you have:
Before diving deep in the technical topic, let’s start from the beginning, seeing how an APS process works with an existing ADF application. To reach the goal, we are going to use a brand new environment for the next discussions and development. Before discussing the technical stuff, please check the disclaimer for versions, requirements and further details. In particular we assume you have:
- An Alfresco Process Services instance up and running. You can check the user guide to understand how to install it.
- An existing Alfresco ADF application, called
my-adf, created exactly in the same way it is described into the ADF 101 Getting started tutorial.
Once you environment is up and running, let’s list the tasks to follow.
- Creating your process using Alfresco Process Services. In this task we are going to design, publish and start a new process, to be used into the
my-adfapplication.
- Viewing and managing tasks and processes using the
my-adfapplication. In this task we are going to access to themy-adfapplication, in particular we will see theactiviti-democomponent and how it uses the ng2-activiti-tasklist and the ng2-activiti-processlist.
Below you can find a “step by step” description of each task, assuming you are quite familiar with Activiti and ADF architecture and principles.
Creating your process using Alfresco Process Services
If you are familiar with Alfresco Process Services, this task in particular will be very straightforward. As you will see, nothing changes from a standard “design + publish + start” tasks, that you usually follow to create your process into the BPM System.
Below you can find a “step by step” description, completed by pictures, to show how to accomplish to this task. Even if you are not extremely familiar with Alfresco Process Services, this tutorial should guide you to the creation of your first process instance.
As a summary, below are listed the tasks we are going to see in the following paragraphs.
- Creating your first process model in Alfresco Process Services. In this task we are going to start creating a very basic process model using the Alfresco Activiti web application.
- Creating your first form in Alfresco Process Services. In this task we are going to create the requested form to be included into the new process model.
- Including the form in the process model. Here we will show how to connect the user task with the created form.
- Creating your first app in Alfresco Process Services. In this task we are going to publish the process model in an Alfresco Process Services app.
- Creating your first process instance in Alfresco Process Services. Where we will start a new process instance to be used into the
my-adfapplication.
Below you can find a paragraph for each step, for a more detailed description.
1. Creating your first process model in Alfresco Process Services
Using a browser, after being authenticated in Alfresco Process Services using the administrator credentials, you land directly into the Alfresco Process Services welcome page. Below a screenshot showing the Alfresco Process Services welcome page.
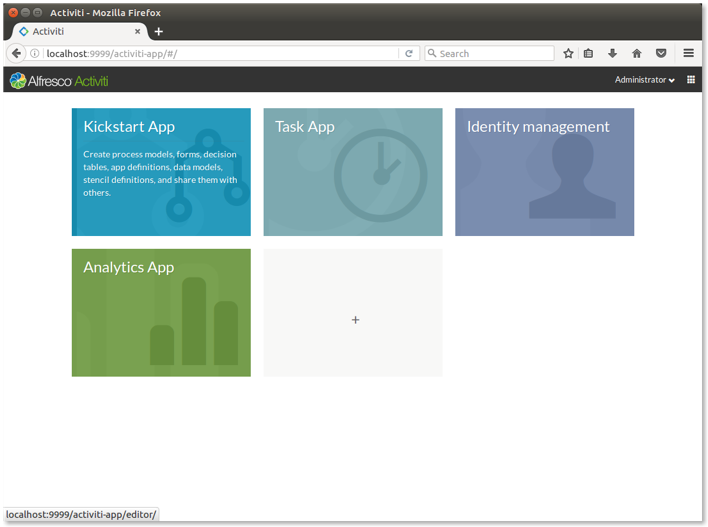
Alfresco Process Services welcome page.
Click on the Kickstart App content, to access to the administration dashboard where you can create (and manage) all the Alfresco Process Services models and definitions. Below a picture showing how the dashboard looks like.
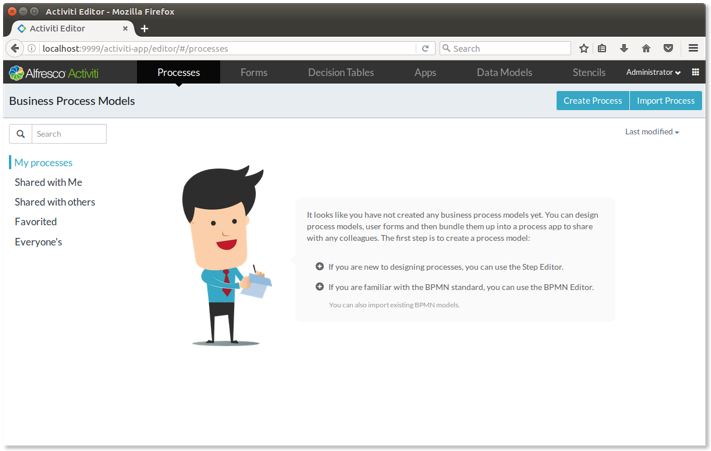
Kickstart App page in Alfresco Process Services.
Once you are in the Kickstart App page, it’s time to create your first process model, clicking on the Create Process button on the top right. To complete the task, fill in the form and click on the Create new model button, as shown below.
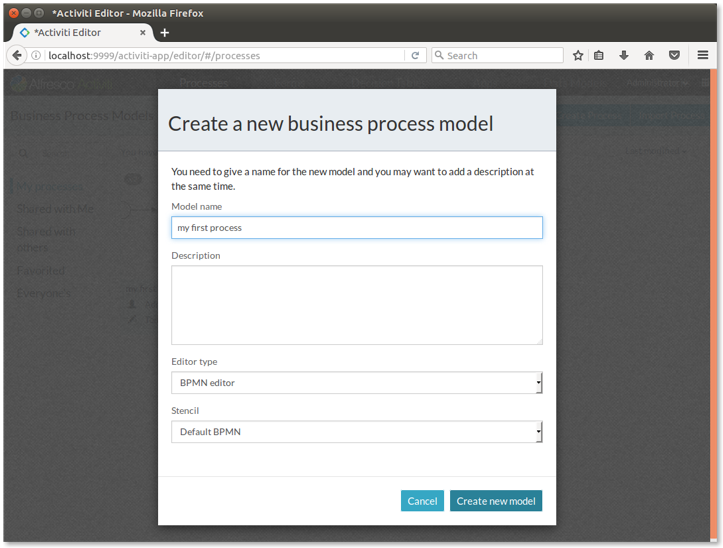
Creating the my first process in Alfresco Process Services.
Once the process model is created as empty, it’s time to design a very simple process composed by: a starting event (mandatory), a user task, an ending event (mandatory). The starting event is included in the process model by default (the circle you can see in the right panel). To add a user task, click on the left menu, expand the Activities item and select the User task. Drag and drop the User task into the right panel, to include it as part of the process model. Click on the starting event and select the arrow. Drag and drop the arrow to the User task, to create a sequence of events.
In a similar manner, click on the left menu, expand the End events item and select the End event. Drag and drop the End event into the right panel, to include it as part of the process model. Click on the user task and select the arrow. Drag and drop the arrow to the End event, to create the sequence of events.
Now that the process is completed, the whole model should looks like the picture below.
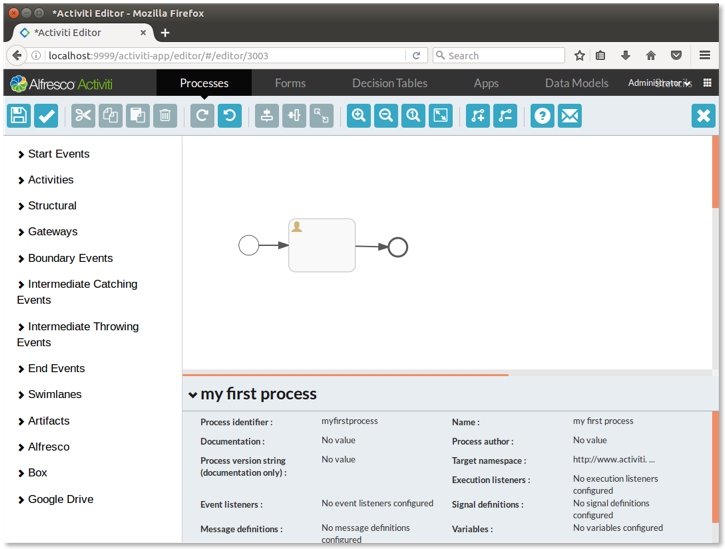
The my first process design in Alfresco Process Services.
Save the model, pressing the disk icon on the top left and your first process model is created.
2. Creating your first form in Alfresco Process Services
As you have seen in the previous paragraph, we included a User task event into the process. As you can imagine, the user task is an event that requires an interaction with the user. The interaction is done using a form, that we have to create in Alfresco Process Services before declaring the process model as completed.
To create the form, let’s click on the Forms item in the top menu of the Alfresco Process Services page (look at picture below for an example). Once you will be in the forms page, click on the Create Form button on the top right. To complete the task, fill in the form and click on the Create new Form button, as shown below.

Creating the my first form in Alfresco Process Services.
Once the form is created as empty, it’s time to design it, simply including a single text field. Before going ahead with the form definition, let’s focus on the left panel containing the list of available stencils. The Alfresco Process Services stencils can be defined as the set of palette of process elements, available to a user when designing a process.
To add the text stencil to the form, drag the Text item from the left panel and drag it into the right one. Even if you could customize various settings, in this example in particular we won’t modify the defaults. Now that the form is completed, the whole form should looks like the picture below.
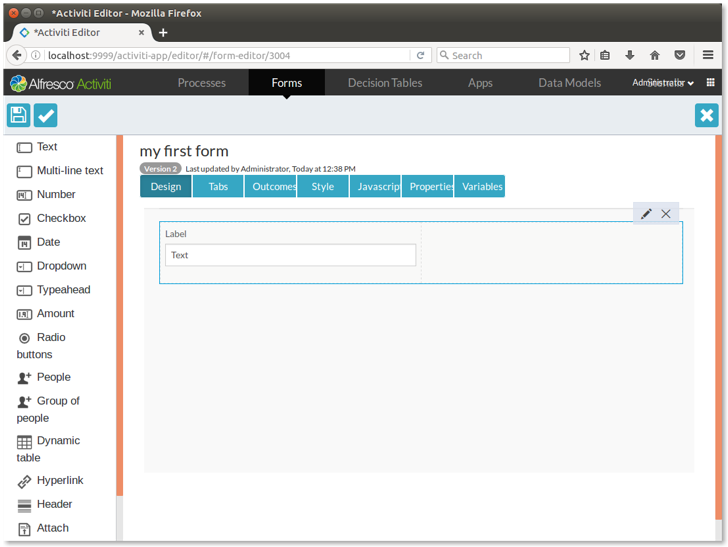
The my first form design in Alfresco Process Services.
Save the form, pressing the disk icon on the top left and your first form is created.
3. Including the form into the process model
Now that the form is created, let’s go back to the process model, to complete the user task (and the process model with it). Let’s click on the Processes item in the top menu of the Alfresco Process Services page (look at picture below for an example) and then on the Visual Editor icon, directly into the my first process thumbnail. Once the editor is shown, click on the user task and click again on the Referenced form item in the bottom panel. In the picture below a screenshot of the visual editor, with highlighted the Referenced form item.

The my first process design with focus on the Referenced form item.
Once the Referenced form item is selected, a modal window shows you the available forms. Select my first form and press the Save button. Now the form is referred from the user task and we can save again the process model, pressing the disk icon on the top left.
4. Creating your first app in Alfresco Process Services
Now that the process model is completed with a simple form in the user task, it’s time to define an Alfresco Process Services app and publish it. An Alfresco Process Services app is a group of bundled process models, created to have a single place where to share processes and tasks with colleagues. To create a new Alfresco Process Services app, click on the Apps item in the top menu of the Alfresco Process Services page (look at picture below for an example). Once you will be in the Apps page, click on the Create Apps button on the top right. To complete the task, fill the form and click on the Create new App button, as shown below.

Creating the my first app in Alfresco Process Services.
Once the app is created as empty, it’s time to include the process model we created above. To add the process model to the app, press the Edit Included Models button, select my first process and press the Close button. Now that the app is completed, the whole page should looks like the picture below.
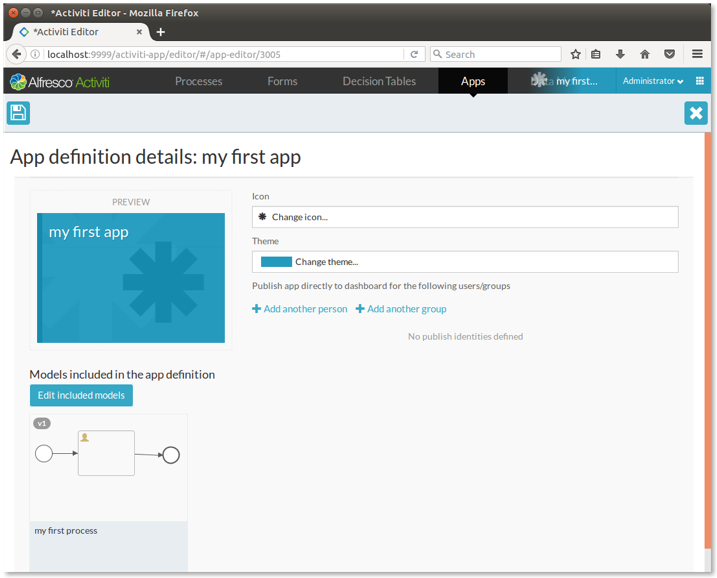
The my first app design in Alfresco Process Services.
Save the form pressing the disk icon on the top left, but pay attention to check the Publish checkbox, otherwise the process won’t be available and visible to the users. Below a picture showing that form.

Saving the my first app in Alfresco Process Services.
5. Creating your first process instance in Alfresco Process Services
Now that everything is properly defined and published, let’s create a first process instance, for a future use. Clicking on the Alfresco Activiti icon on the top left of your page, you land in the Alfresco Process Services welcome page, that now looks like the picture below.

Alfresco Process Services welcome page after my first app publication.
As you can see, the my first app is visible. Clicking on it, you will land into the page where processes and tasks can be managed. To create your first instance of process, click on the Start item on the top menu. Then click on the Start process button to launch the starting event.
Now an existing instance of process is waiting for your management, in the user task event. Below a picture shows the diagram of the process instance, you can view into your environment clicking on the Diagram button.
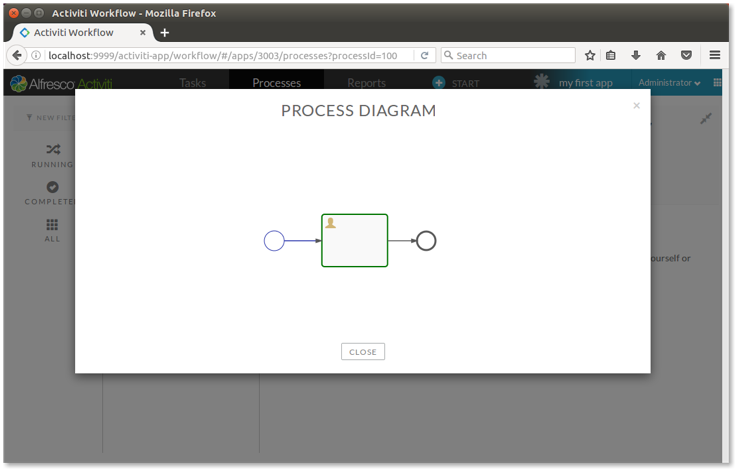
Diagram of the available process instance.
This is all you have to do on the Alfresco Process Services side, to prepare the environment for the ADF application.
Viewing and managing tasks and processes using the my-adf application
After the process model and its first instance have been created on the Alfresco Process Services side, it’s time to access to the my-adf application, to see how the activiti-demo component works and how it uses the ng2-activiti-tasklist and ng2-activiti-processlist. Before any technical discussion, let’s see how the ADF application appears, in the views related to the process services.
The process services of an ADF application
Assuming you have the my-adf application up and running, created in the same way it is described in the ADF 101 tutorial, let’s see how the home page looks like, once you successfully login.

Home page of my-adf application.
Let’s click on the Process Services content or on the Process Services item in the upper menu, to access to the process service view. As you can see, the view shows a similar dashboard to the Activiti welcome page (look at picture below for an example). The difference is that only the task apps are available, in particular: Task App and my first app. Click on my first app to have access to the task view. Below a picture showing the view related to the process services.
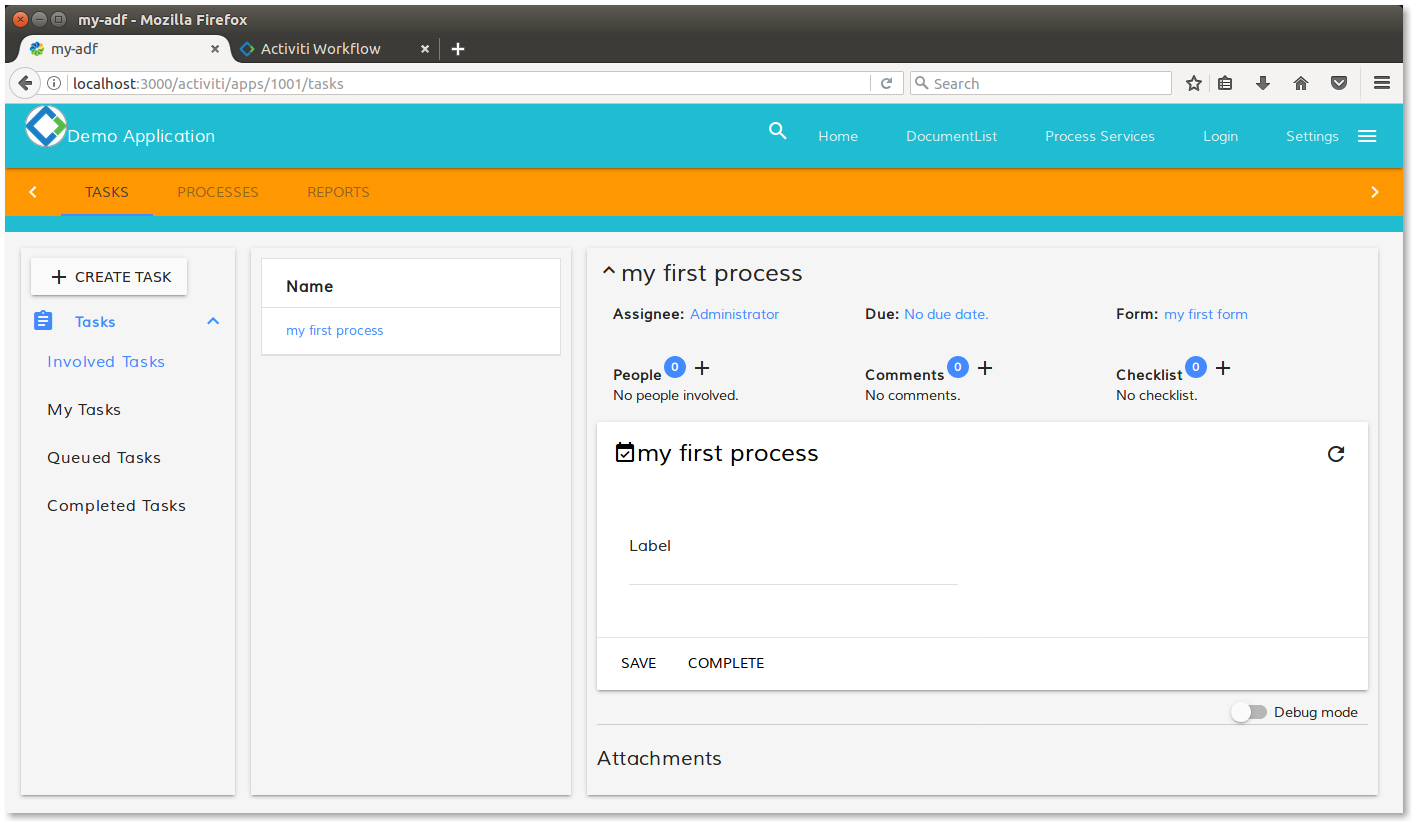
Process service view into the my-adf application.
As you can see, the view shows: the task list, the processes and reports (the orange bar on top of the page). In the task list view, we recognise the preview of the my first form, in the right panel and inside of it, there is the text field included. If you cannot see the preview using the Involved Tasks filter, try to select the Queued Tasks or the My Tasks. In the next paragraph we are going to see the technical details behind the view. We won’t treat the reports feature in detail, even if it is introduced ahead in the tutorial.
About the activiti-demo component
As described in ADF 102, behind a view there is always an Angular component. In our specific case, using my-adf application created with the Alfresco App Generator, the involved component is called activiti-demo and it is stored into the <my-adf>/app/components/activiti path.
This component is a good example of how a process management can be developed, using ng2-activiti-tasklist, ng2-activiti-processlist and ng2-activiti-analytics. It’s up to you to modify the behaviour for a different rendering or a different management. Everything depends on your specific use case and your specific needs and requirements.
As we learnt in the ADF 102 tutorial, the presentation layer of the component is managed into the activiti-demo.component.html file (together with the css file) and the business logic is managed into the activiti-demo.component.ts file. Taking a look at the HTML file, you can discover other related components, represented in the HTML content by the specific tags listed below.
<!--  TASKS COMPONENT -->

// Starts a new task.
<activiti-start-task ...>

// Shows the available task apps.
<activiti-filters ...>

// Renders a task list, according to some parameters.
<activiti-tasklist ...>

// Renders the task details (highly configurable).
<activiti-task-details ...>

<!--  PROCESS COMPONENT -->

// Show the filters on processes, according to some parameters.
<activiti-process-instance-filters ...>

// Renders a process list, according to some parameters.
<activiti-process-instance-list ...>

// Renders the process details (highly configurable).
<activiti-process-instance-details ...>

// Starts a new process instance.
<activiti-start-process ...>

<!--  ANALYTICS COMPONENT -->

// Renders all the available reports.
<analytics-report-list ...>

// Shows a specific report/chart.
<activiti-analytics ...>
We won’t treat more than this, the details about the activiti-demo component. Instead, we would like to share that both the ng2-activiti-tasklist and the ng2-activiti-processlist, use ng2-activiti-form to render (and manage) every form related to Alfresco Process Services. Considering that often the forms are the core of the customizations, we would like to share further details about this component in particular.
Introduction of the ng2-activiti-form
Talking about ng2-activiti-form, this is the basic component used by ng2-activiti-tasklist and ng2-activiti-processlist to render and manage the user interactions. The ng2-activiti-form component is heavily based on the concept of widget: a smart way to manage the input of a form, with a single TypeScript class, useful to render and control each field. To have a complete list of the available widgets, you can check directly in the GitHub project.
Looking at the purpose of the widgets, we can see that there is a strict relation with the Alfresco Process Services stencils introduced above in the content. Below a picture showing the exact correspondence between the bundled Alfresco Process Services stencils and the bundled ADF widgets.
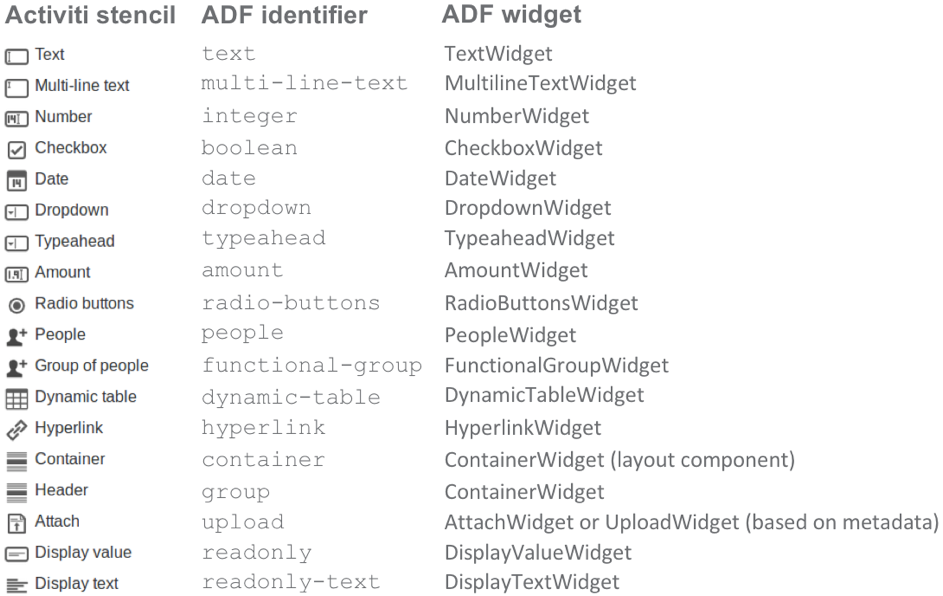
Correspondence between Alfresco Process Services stencils and ADF widgets.
For further details on how components and widgets are rendered in a form, please refer to the documentation available on GitHub. In few words:
- Every ADF widget (bundled or custom) must inherit
WidgetComponentclass, in order to work properly.
- Every ADF widget has to be added to the application module or any custom module that is imported.
- The mapping between the HTML tags of the form and the Angular components can be customized using the
FormRenderingServiceclass, injected directly into the view component.
No worries if this description sounds tricky, we will see in the following parts of the tutorial how the ADF widgets work and how they can be customized. To be extremely practical, every ADF widget is nothing more and nothing less than an Angular component. For its nature, a widget can be customized, wrapped, extended, exactly in the same way a regular Angular component can be. In the following paragraphs we are going to see in practice this concept, customizing an existing widget (related to an existing stencil) and creating a custom widget for a custom stencil.
Labels
You must be a registered user to add a comment. If you've already registered, sign in. Otherwise, register and sign in.
Application Development Framework Blog
Blog posts and updates about Application Development Framework (ADF).
Latest Articles
- Extending the Alfresco Digital Workspace (ADW)
- Developing Take Ownership Extension for ACA 2.8.0
- Creating your first extension for Alfresco Content...
- ADF 4.0.0 is out!
- Hey Front-End Developer, what are your preferred o...
- We want to (thank and) reward our ADF contributors...
- How to update ADF from version 2.5.0 to 2.6.1
- Application Development Framework (ADF) 2.6.1 Rele...
- ADF 2.6.0 Release Note
- How to update ADF from version 2.4.0 to 2.5.0
- ADF 2.5.0 Release Note
- ADF 2.4.0 Release Note
- How to deploy an ADF APP
- How To Add The New Sidenav Layout Component In You...
- How to integrate ADF log service with Mixpanel an...
We use cookies on this site to enhance your user experience
By using this site, you are agreeing to allow us to collect and use cookies as outlined in Alfresco’s Cookie Statement and Terms of Use (and you have a legitimate interest in Alfresco and our products, authorizing us to contact you in such methods). If you are not ok with these terms, please do not use this website.