
Custom stencils with Alfresco ADF
Turn on suggestions
Auto-suggest helps you quickly narrow down your search results by suggesting possible matches as you type.
Showing results for
- Alfresco Hub
- :
- ADF - Forum
- :
- Custom stencils with Alfresco ADF
Custom stencils with Alfresco ADF
- Subscribe to RSS Feed
- Mark as New
- Mark as Read
- Bookmark
- Subscribe
- Printer Friendly Page
- Report Inappropriate Content
10 Feb 2017
2:23 AM
![]() This tutorial is part of the Introduction to the ADF APS components and details how to manage custom stencils with Alfresco ADF. Now that we know how to create an ADF widget to override an existing APS stencil, let’s see how to face the development of a custom stencil and how the custom stencil can be managed into an ADF application. The reason why you should decide to create a custom stencil is easy: because the bundled stencils are not enough and you would require something more specific for your needs. As an example we could quote: a stencil for the digital signature, a stencil showing data from external systems like a ECM, a CRM an ERP, etc.
This tutorial is part of the Introduction to the ADF APS components and details how to manage custom stencils with Alfresco ADF. Now that we know how to create an ADF widget to override an existing APS stencil, let’s see how to face the development of a custom stencil and how the custom stencil can be managed into an ADF application. The reason why you should decide to create a custom stencil is easy: because the bundled stencils are not enough and you would require something more specific for your needs. As an example we could quote: a stencil for the digital signature, a stencil showing data from external systems like a ECM, a CRM an ERP, etc.
Of course in this example we won’t share a complex use case, but we would prefer to focus on some technical details, more interesting for the purpose of this tutorial. In practice we are going to create a new stencil, rendering a dynamic image with the URL specified by an input field. The idea is to develop a very simple viewer of images.
To prepare the environment, let’s save two images into the <my-adf>/public folder: one image named alfresco.png representing the Alfresco logo and one image named activiti.png representing the Activiti logo. Since then, both the images will be available at the URL http://localhost:3000/<image_name>.
Now that everything is ready for the custom stencil development, let’s split again the task in two parts, as listed below.
- Creating a custom stencil and updating the process model into APS. In this task we are going to act again on the APS side, to include the brand new stencil into the process model. Later on, we will create again a new process instance to be used into the
my-adfapplication.
- Extending the ADF application to manage the new stencil. In this task we are going to develop a custom widget and see it in action.
Below you can find a “step by step” description of each task. Please note that some of them are very similar (or identical) to the previous description about overriding and existing stencil. For a better description, every similarity and difference will be underlined and described.
Creating a custom stencil into Alfresco Process Services
Creating a custom stencil is very straightforward, even if you are not extremely familiar with APS. Below you can find a “step by step” description, completed by pictures, to show how to accomplish to this task. After the stencil creation, we are going to see also how to use the new stencil in a process model and how to create a new process instance, for future use.
As a summary, below are listed the tasks we are going to cover in the following paragraphs.
1. Creating your first stencil in Alfresco Process Services. In this task we are going to create a custom stencil, rendering a dynamic image with the URL specified by an input field.
2. Creating a form using the custom stencil. In this task we are going to create a form to be included into the updated process model.
3. Updating the user task in the process model. Here we will show how to connect the user task with the new form.
4. Publishing again the app. In this task we are going to (re)publish the process model in the existing APS app.
5. Creating a new process instance in Alfresco Process Services. Here we will start a new process instance to be used into the my-adf application.
Below you can find a paragraph for each step, for a more detailed description.
1. Creating your first stencil in Alfresco Process Services
Starting from the APS welcome page, click on the Kickstart App content to access to the administration dashboard. In this page you can create (and manage) all the APS models and definitions. On the top menu you have an item called Stencils. Click on it to access to the stencils view.
On the top right corner, you have a Create Stencil button. Press it and you will get a form as shown in the picture below. Fill the form as described, paying attention to select the Form editor item in the Editor type field.

Creating the my first stencil in APS.
Once the form is filled, press the Create new stencil button and you will land into a page showing all the bundled stencils. The page shows the stencil set, named my first stencil and it is ready to be changed and customized. To start customizing the stencil set, press on the Stencil Editor button on the top right corner. Once you pressed the button, click on the Add new item on the top right. Then, you’ll land in a page similar to the one shown below.

The my first stencil design in APS.
Now that a new custom stencil is created, start filling the fields in the it is described below.
- Fill
my first stencilin name.
- Fill the
Form runtimetemplate with:
<div>My first stencil</div>- Fill the
Form editortemplate with:
<div>My first stencil editor</div>All the other fields are optionals. Before going ahead, we would like to submit to your attention on relevant thing: the stencil’s identifier. If you take a look at the form, under the description there is a field named Internal identifier. This field cannot be edited and it is automatically filled, according with the stencil’s name (in this case my_first_stencil).
We highly recommend to pay a lot of attention on this field in particular, because this is the unique identifier of the stencil, we will use ahead in the tutorial to instruct the FormRenderingService to map the stencil to the custom ADF widget (exactly as we did for the override of the text stencil). If this is not clear enough at the moment, don’t worry and let’s go ahead with the definition of the custom stencil.
Once the form is filled, save the stencil pressing the disk icon on the top left. After completing this task, the my first stencil set will be correctly created and available.
2. Creating a form using the custom stencil
Now that the new stencil set is created (with our custom stencil included) let’s create a very simple form using the new stencil. The task is very straightforward, considering we already completed this task in a previous example.
To create the form, let’s click on the Forms item in the top menu of the APS page. Once you will be in the forms page, click on the Create Form button on the top right. To complete the task, fill in the form and click on the Create new Form button, as shown below. Please note that in this case, the Stencil field has to be pointed to the my first stencil set.

Creating the my second form in APS.
Once the form is created as empty, it’s time to design it, simply including the my first stencil field. To add the custom stencil to the form, drag the my first stencil item from the left panel and drag it into the right one. Now that the form is completed, the whole form should looks like the picture below.
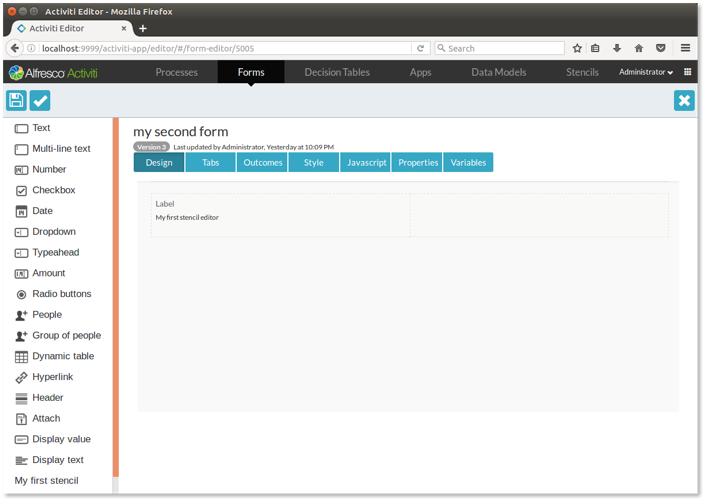
The my second form design in APS.
Save the form, pressing the disk icon on the top left and your second form is created.
3. Updating the user task in the process model
Now that the form is created, we have to go to the process model, to update the user task to point on the new form. Let’s click on the Processes item in the top menu of the APS page and then on the Visual Editor icon, directly into the my first process thumbnail. Once the editor is shown, click on the user task and click again on the Referenced form item in the bottom panel. In the picture below a screenshot of the visual editor, with highlighted the Referenced form item.
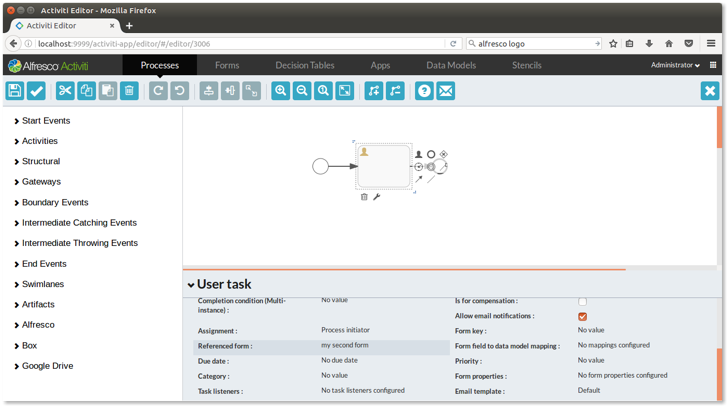
The my first process design with focus on the Referenced form item to point on the my second form.
Once the Referenced form item is selected, a modal window shows you the available forms. Select my second form and press the Save button. Now the form is referred from the user task and we can save again the process model, pressing the disk icon on the top left.
4. Publishing again the app
Now that the process model is updated with the new form in the user task, it’s time to publish the APS app again. To complete the task, click on the Apps item in the top menu of the APS page. Once you will be in the Apps page, select the my first app and edit it clicking on the lens. Once you will land in the app management, click on the Publish button on the top right.
5. Creating a process instance in Alfresco Process Services
Now that everything is properly defined and published, let’s create another process instance, exactly in the same way we saw above in the document. Clicking on the Alfresco Activiti icon on the top left of your page, you land in the APS welcome page where you can see the my first app in a content. Clicking on it, you will land into the page where processes and tasks can be managed. To create your first instance of process, click on the Start item on the top menu. Then click on the Start process button to launch the starting event. Now an existing instance of process is waiting for your management, in the user task event.
This is all you have to do on the APS side, to prepare the environment for the ADF application.
Extending the ADF application to manage the new stencil
Now that on the APS side everything is setup, let’s move on the my-adf application to show what to do to manage the new stencil. The approach to follow is very similar to the one explained for the bundled stencil. To correctly manage the new APS stencil with a custom widget, let’s list again the three steps to follow, this time with a focus on the differences with the override of the existing widget.
1. Developing a custom widget. According to what we saw on the widget overriding, in this task too we are going to develop a brand new class, inherited from the WidgetComponent with the requested behaviour.
2. Adding the widget to the application module (and all the modules that is imported). Also in this case, exactly in the same way we saw for the widget overriding, we are going to include the custom widget to be visible to the components.
3. Instructing the form renderer to use the custom widget when the custom stencil should be shown. Even if the approach is the same, in this task we are going to use the FormRenderingService class to match the custom stencil identifier, with the new custom widget defined above.
Below you can find a paragraph for each task, for a more detailed description.
1. Developing a custom widget
Exactly in the same way we saw for the widget override, the very first task is about the development of a custom widget. To complete this task, let’s add the declaration of the myCustomWidget to the myTextWidget.component.ts file stored in the <my-adf>/app/components/activiti/custom path.
As we said above in the tutorial, a single file containing several components and modules is not a best practice, but we use this approach as an example, to have a source code more compact and readable.
Let’s add into the myTextWidget.component.ts file, another component named myCustomWidget, as shown below.
// MyCustomWidget component.
@Component({
  selector: 'my-custom-widget',
  template: `<div class="mdl-textfield mdl-js-textfield">
    <input
     class="mdl-textfield__input"
     type="text"
     [attr.id]="field.id"
     [(ngModel)]="field.value" />
    <br/>
    <img src={{field.value}} />
  </div>`
})
export class MyCustomWidget extends WidgetComponent {}
To complete the development, let’s make the widget visible to the CustomWidgetsModule modifying the source code as described below.
// CustomWidgetsModule module.
@NgModule({
    declarations: [ MyTextWidget, MyCustomWidget ],
    exports: [ MyTextWidget, MyCustomWidget ],
    entryComponents: [ MyTextWidget, MyCustomWidget ]
    ...
})
export class CustomWidgetsModule {}
Looking at the behaviour of the class, when the widget will be rendered in a form, an HTML input field will be shown followed by an image. The rendered image will depend on the field value. Changing the field value, the image will change accordingly.
2. Adding the widget to the application module
Now that we have the MyCustomWidget component, the next step is to make it visible to the entire application. In this case in particular, nothing has to be done because the CustomWidgetsModule is the same module used for the previous example and it is already visible to the application. In general, if you have extended the ADF application with other modules, always remember to repeat this task for each module is using the APS forms.
3. Instructing the form renderer to use the custom widget
The last task to complete is about instructing the form rendering service to use the custom widget, every time the custom stencil is required in a form. As introduced above, all the magic happens using the FormRenderingService object in the activiti-demo component stored into the <my-adf>/app/components/activiti folder.
Below the changes to the source code.
// Change this import.
import { MyTextWidget, MyCustomWidget } from './custom/myTextWidget.component';

constructor(
  private elementRef: ElementRef,
  private route: ActivatedRoute,
  private apiService: AlfrescoApiService,
  private formRenderingService: FormRenderingService,
  private formService: FormService) {
    ...
    // Add this command.
   formRenderingService.setComponentTypeResolver('my_first_stencil', () => MyCustomWidget, true);
    ...
  }
Please note that we included the custom widget to be visible to the view component and then we instructed the activiti-demo component, where the FormRenderingService is injected directly in the constructor. Note again that the my_first_stencil identifier is used here as unique place in the source code, to match the stencil with the corresponding widget (in our case MyCustomWidget).
Now that everything is ready for our customized view of the APS stencil, let’s see in the screenshots below how the views look like. Remembering that we have two images available into the my-adf root folder called alfresco.png and activiti.png, let’s access to the task list and digit alfresco.png and then activiti.png in the text field.
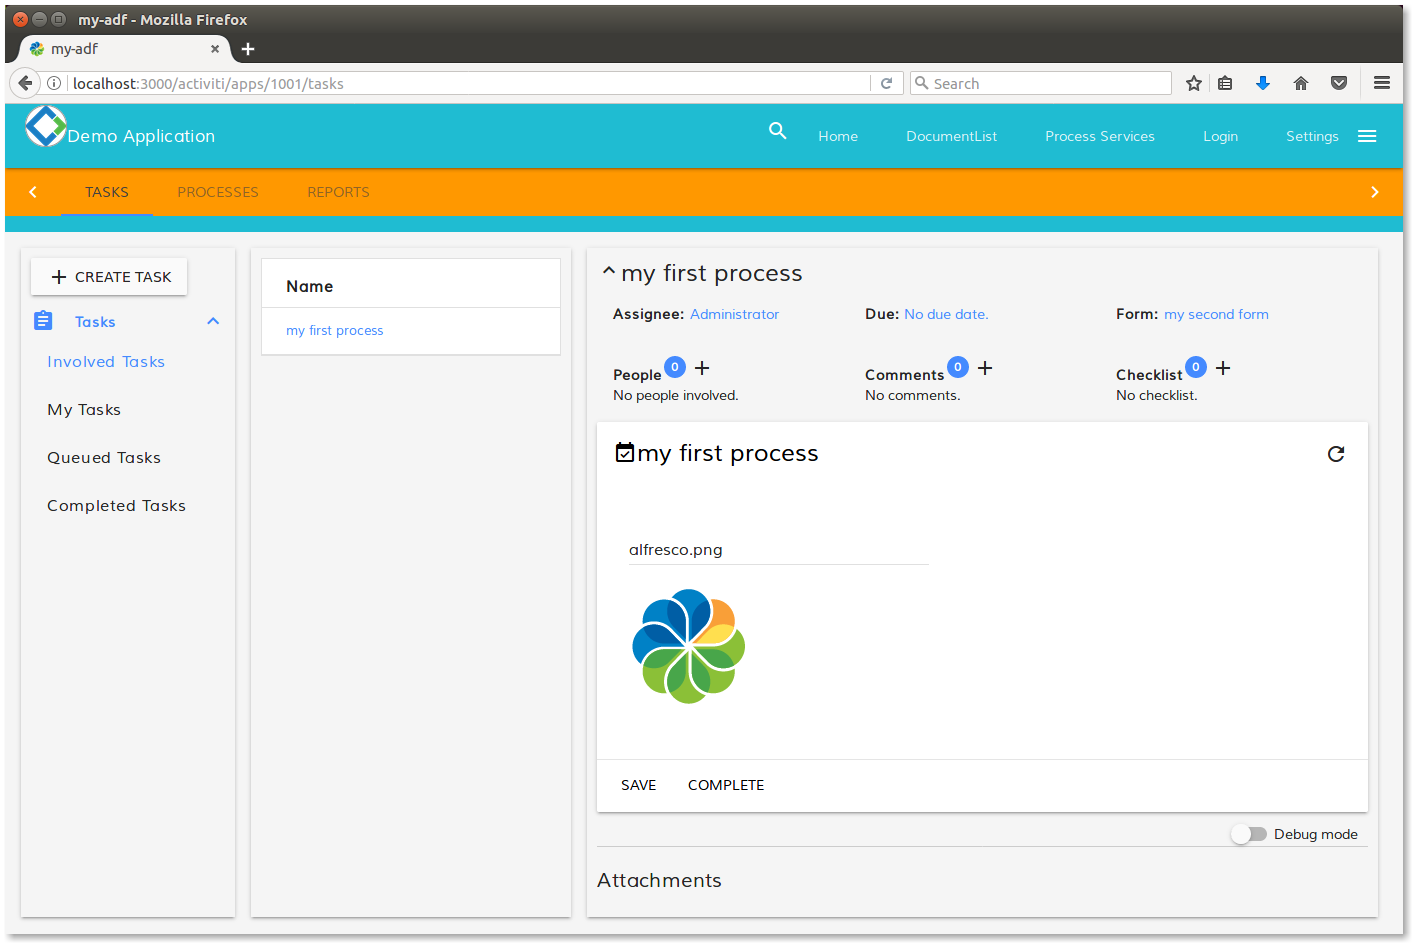
Rendering of the MyCustomWidget for the alfresco.png value in the text field.
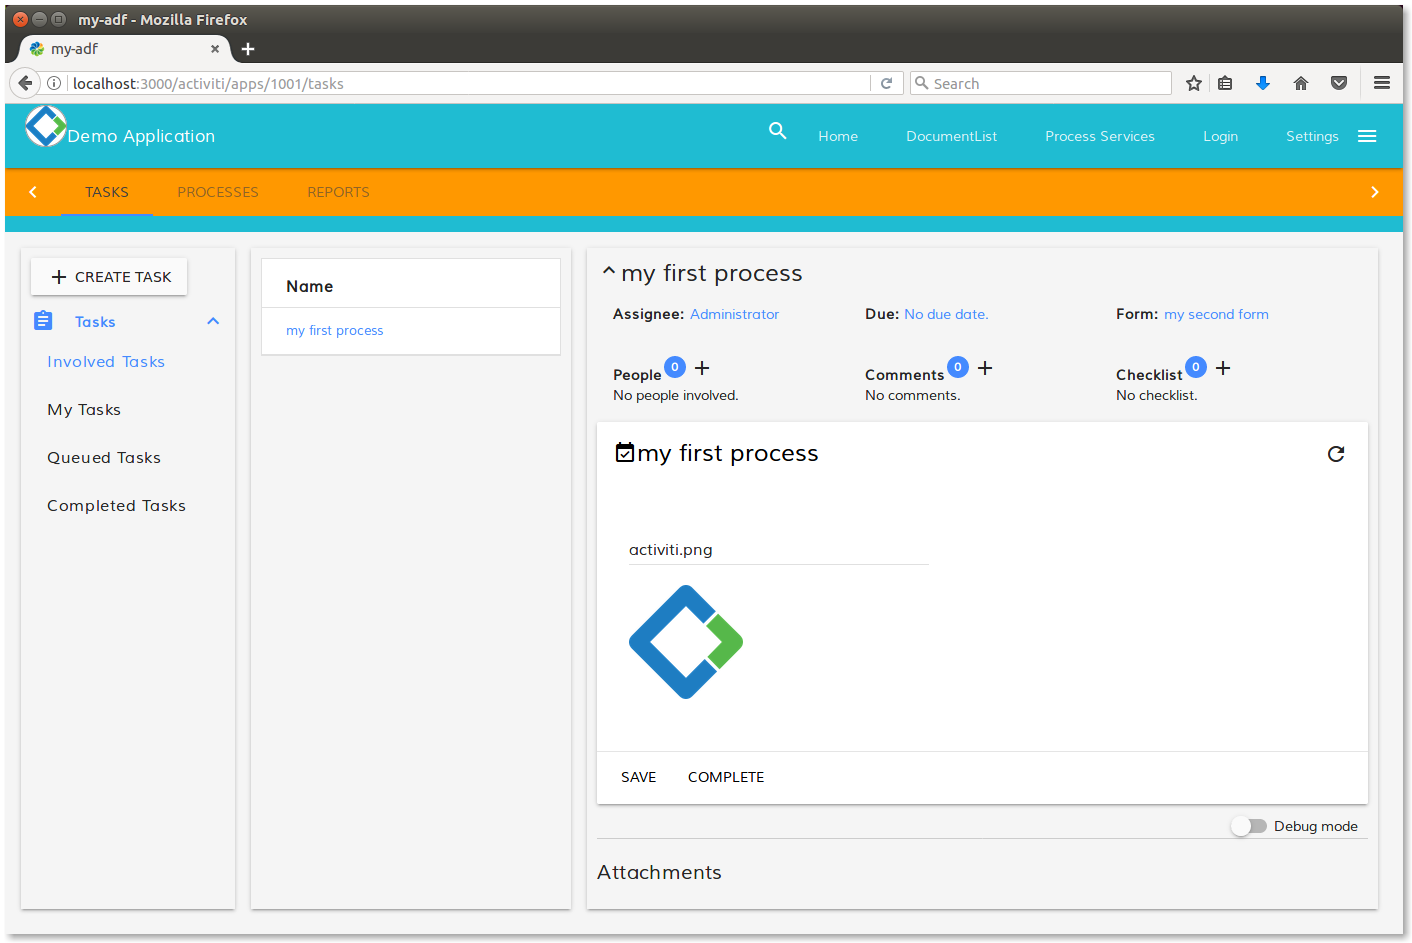
Rendering of the MyCustomWidget for the activiti.png value in the text field.
As you can see, the image changes according to the text field value. As mentioned above, this is a very basic example, useful to share the basis of the management of a custom stencil.
Labels
You must be a registered user to add a comment. If you've already registered, sign in. Otherwise, register and sign in.
Application Development Framework Blog
Blog posts and updates about Application Development Framework (ADF).
Latest Articles
- Extending the Alfresco Digital Workspace (ADW)
- Developing Take Ownership Extension for ACA 2.8.0
- Creating your first extension for Alfresco Content...
- ADF 4.0.0 is out!
- Hey Front-End Developer, what are your preferred o...
- We want to (thank and) reward our ADF contributors...
- How to update ADF from version 2.5.0 to 2.6.1
- Application Development Framework (ADF) 2.6.1 Rele...
- ADF 2.6.0 Release Note
- How to update ADF from version 2.4.0 to 2.5.0
- ADF 2.5.0 Release Note
- ADF 2.4.0 Release Note
- How to deploy an ADF APP
- How To Add The New Sidenav Layout Component In You...
- How to integrate ADF log service with Mixpanel an...
We use cookies on this site to enhance your user experience
By using this site, you are agreeing to allow us to collect and use cookies as outlined in Alfresco’s Cookie Statement and Terms of Use (and you have a legitimate interest in Alfresco and our products, authorizing us to contact you in such methods). If you are not ok with these terms, please do not use this website.