
Alfresco And SOLR
Turn on suggestions
Auto-suggest helps you quickly narrow down your search results by suggesting possible matches as you type.
Showing results for
- Alfresco Hub
- :
- ACS - Hub Docs
- :
- Alfresco And SOLR
Alfresco And SOLR
- Subscribe to RSS Feed
- Mark as New
- Mark as Read
- Bookmark
- Subscribe
- Printer Friendly Page
- Report Inappropriate Content
16 Jul 2015
11:57 PM
Obsolete Pages{{Obsolete}}
The official documentation is at: http://docs.alfresco.com
- Configuring Alfresco
- Configuring the Solr web app
- Setting up the Solr web app from the distribution
- The Solr distribution
- Installing Solr
- Generating new SSL certificates
- Setting Properties
- Setting up the Solr web app from the source
- To upgrade Solr
- Setting up Solr web app using the installer
- example solr/xml
- Security
- Repository SSL Keystores
- Solr SSL Keystores
- Manually Generating New SSL Keys Signed by a Certificate Authority
- Note regarding JDK 7
- Connecting to the SSL-Protected Solr Web Application
- Running Without SSL
- Migration
- Checking the status of the Solr index
- Direct URLs
- Summary Report
- Overal all status report
- Transaction specific reports
- ACL TX specific reports
- Node specific reports
- ACL specific reports
- Check the cache
- General fix
- Purge/remove from the index
- Reindex a transaction, acl transaction, node or acl
- Index a transaction, acl transaction, node or acl
- Try again to index any node that failed to index and was skipped
- Load Log4J Settings
- Common report options
- JMX
- Back up
- Restore
- Solr core properties in solrcore.properties
- Core Solr configuration
- Configuring what to track
- Encryption
- SSL
- Tracking
- HTTP Client
- Solr caching
- Other SOLR config
- FAQ
- Configuring query against additional stores
- Example: configuring search for the system://system store
- Create the new core
- Configuring the Solr search sub-system
Introduction
From Alfresco 4.0, Solr is available to support search within the Alfresco repository.
The existing embedded Lucene index will continue to be available in 4.x.
Choosing Solr for search support has many advantages but you will not be able to use them if you require:
- WCM based on AVM;
- Records Management prior to version 2.0 (RM module)
- as the query result with Solr are eventually consistent
- the Solr query does not yet enforce RM caveats (protected markings)
- the next release of the RM module will allow for (or fix) these limitations
- RM 2.0 and later will support Solr
- Multi-tenancy
- 'Early access' for this will first be available in 4.c
- you need in-transaction indexing and are not happy with eventually consistent results, or cannot resolve this requirement in another way. For example, taking advantage of changes to the NodeService and other Services.
Search has been moved into a sub-system with a 'solr' and 'lucene' implementation.
The Alfresco Solr Search sub-system supports the same query languages as the embedded Lucene sub-system. The same fields (ID , PARENT, properties) are also available. The only minor difference is that Solr only supports the opencmis based CMIS query language. This is more strict in its adherence to the CMIS specification - type and aspect names are case sensitive.
The Solr sub-system has the following improvements:
- 'standard' tokenisation, in addition to local specific tokenisation, to support better cross-language support and some pattern style matching
- uses the datetime analyser for d:datetime properties (variable resolution search e.g. cm:created:2010)
- a more performant PATH implementation
- evaluates READ access at query time (but does not yet apply RM caveats)
- evaluates tenant restrictions at query time.
- no in-transaction indexing
- cross-locale ordering for d:text and d:mltext properties
- full integration with the Alfresco data model including tracking compatible model changes supported by dynamic models
- support via the SearchService for simple field based faceting - faceting is after read access enforcement
- no need to duplicate indexes on every machine in a cluster
- search support can be scaled separately from the Alfresco Repository (for example 2 Solr master instances for a 4 cluster node)
- there is currently no slave replication support
- use the Solr built in admin http://localhost:8080/solr/alfresco/admin/ to check tokenisation behaviour, terms in the index etc
Configuring Alfresco
To configure alfresco to use Solr set the following properties
 index.subsystem.name=solr
 solr.host=localhost
 solr.port=8080
 solr.port.ssl=8443
These properties can also be set via JMX (MBeans - Alfresco - Configuration - Search) and the Share admin page if you are using Alfresco Enterprise. You can switch between Lucene and Solr - in JMX this is done by setting the manager sourceBeanName to 'solr' or 'lucene'. The subsystems make available their own related properties. The 'managed - solr' instance exposes solr.base.url. The Lucene sub-system exposes all the properties that had to be set at start up. These can now be configured live and the sub-system redeployed.
The search sub-systems can also be configured using the administration screens in the Enterprise product.
Configuring the Solr web app
Setting up the Solr web app from the distribution
The Solr distribution
The distribution will contain a zip file named something like
alfresco-community-solr-4.0.e.zip
This archive contains:
- a template Solr home directory, containing solr.xml etc as expected by Solr
- a template alf_data/keystore directory (new in 4.0e) containing default keys to secure communication with Alfresco
- the Solr war
- patched to alow an initial backup to made after start up
- patched to limit the number of back ups
- patched to support SSL
- an example context to wire up in tomcat
- instructions on how to set up the web app in HowToSetUpSolr.txt
- a lib directory with all the alfresco and other jars that are required
- two Solr core configurations, one to track the live SpacesStore and one to track items archived from the SpacesStore
- Note: tracking includes the SpacesStore for all tenants - separate cores are not required for each tenant
Installing Solr
In the following instructions
- <ALFRESCO_TOMCAT_HOME> refers to the tomcat directory where Alfresco is installed
- <SOLR_TOMCAT_HOME> refers to the tomcat directory where Solr is installed.
These may be the same or different directories, depending on whether you have chosen to install Solr on a standalone server or the same server as Alfresco.
- extract the archive to some location <SOLR-HOME>
- Copy solr-tomcat-context.xml to <SOLR_TOMCAT_HOME>/conf/Catalina/localhost/solr.xml (for set up on other app contains refer to the Solr wiki)
- edit docBase in solr.xml to point to <SOLR-HOME>/apache-solr-1.4.1.war
- edit solr/home in xml to point to <SOLR-HOME>
- For each core edit solrcore.properties e.g archive-SpacesStore/conf/solrcore.properties and workspace-SpacesStore/conf/solrcore.properties
- edit the 'data.dir.root' property to where the solr indexes will be stored - you can set the same value for the both cores and the cores will create the sub-directories)
- edit the url to point to Alfresco 'alfresco.url' - this could point to the load balancer in front of an alfresco cluster
- Create and populate a keystore directory for the Alfresco and Solr servers. By convention, this should be the <ALFRESCO_HOME>/alf_data/keystore directory. In 4.0e and onwards you can simply copy the supplied <SOLR_HOME>/alf_data/keystore directory to this location. In earlier releases, the directory could be extracted from WEB-INF/classes/alfresco/keystore in alfresco.war.
- Configure the Alfresco and Solr Tomcats to use the keystore and truststore for https requests, by editing the specification of the connector on port 8443 in <ALFRESCO_TOMCAT_HOME>/conf/server.xml and <SOLR_TOMCAT_HOME>/conf/server.xml as follows, remembering to replace <ALFRESCO_HOME>/alf_data/keystore with the full path to your keystore directory
- <ALFRESCO_HOME>/alf_data/keystore/ssl.keystore' keystorePass='kT9X6oe68t' keystoreType='JCEKS'
- secure='true' connectionTimeout='240000' truststoreFile='<ALFRESCO_HOME>/alf_data/keystore/ssl.truststore' truststorePass='kT9X6oe68t' truststoreType='JCEKS'
- clientAuth='false' sslProtocol='TLS' />
- <ALFRESCO_HOME>/alf_data/keystore/ssl.keystore' keystorePass='kT9X6oe68t' keystoreType='JCEKS'
- Configure Alfresco itself to use the keystore and truststore for client requests to Solr, by specifying dir.keystore in ALFRESCO_TOMCAT_HOME/shared/classes/alfresco-global.properties, remembering to replace <ALFRESCO_HOME>/alf_data/keystore with the full path to your keystore directory
- dir.keystore=<ALFRESCO_HOME>/alf_data/keystore
- Configure an identity for the Alfresco server. In <SOLR_TOMCAT_HOME>/conf/tomcat-users.xml, add the following. Note that you can choose a different username, such as the host name of the Alfresco server, but it must match the REPO_CERT_DNAME you will later specify in the keystore in #Generating new SSL certificates
- <user username='CN=Alfresco Repository, OU=Unknown, O=Alfresco Software Ltd., L=Maidenhead, ST=UK, C=GB' roles='repository' password='null'/>
- Configure an identity for the Solr server. In <ALFRESCO_TOMCAT_HOME>/conf/tomcat-users.xml, add the following. . Note that you can choose a different username but it must match the SOLR_CLIENT_CERT_DNAME you will later specify in the keystore in section 2.
- <user username='CN=Alfresco Repository Client, OU=Unknown, O=Alfresco Software Ltd., L=Maidenhead, ST=UK, C=GB' roles='repoclient' password='null'/>
- To complete the installation, it’s necessary to secure communications by generating your own keys. See #Generating new SSL certificates
Generating new SSL certificates
Use these instructions to replace or update the keys used to secure communications between Alfresco and Solr, using secure keys specific to your Alfresco installation.
The following instructions assume that Solr has been extracted and a keystore directory has already been created, either automatically by the Alfresco installer, or manually by following the instructions in #Installing Solr.
- If you haven't already, download the 4.0.e or a later Solr distribution.zip from Alfresco. Even if this isn't the version you are running, it has useful scripts you can use to generate new keystores. This will have a filename similar to alfresco-community-solr-4.0.e.zip.
- Extract the zip and locate the keystore generation script at alf_data/keystore/generate_keystores.sh (for Linux and Solaris) or alf_data\keystore\generate_keystores.bat (for Windows)
- Edit the environment variables at the beginning of the script to match your environment
- If you are updating an environment created by the Alfresco installer, you will only need to edit ALFRESCO_HOME to specify the correct installation directory
- For manual installations, carefully review ALFRESCO_KEYSTORE_HOME, SOLR_HOME, JAVA_HOME, REPO_CERT_DNAME and SOLR_CLIENT_CERT_DNAME and edit as appropriate
- Run the edited script.
- You should see the message “Certificate update complete” and another message reminding you what dir.keystore should be set to in alfresco-global.properties
Setting Properties
It is possible to set properties via the solr.xml file. To configure a property in solr.xml, remove it from the two core properties files and add it to solr.xml either as a common property or one that is core specific.
<solr persistent='true' sharedLib='lib' >
  <cores adminPath='/admin/cores' adminHandler='org.alfresco.solr.AlfrescoCoreAdminHandler'>
  <property name='data.dir.root' value='w:/woof' />
  <core name='alfresco' instanceDir='workspace-SpacesStore' />
  <core name='archive' instanceDir='archive-SpacesStore' >
    <property name='data.dir.root' value='w:/woof' />
  </core>
</cores></solr>
See http://wiki.apache.org/solr/SolrInstall for details on how to set up Solr in other containers.
Setting up the Solr web app from the source
Is very similar to the distribution.
The source contains a project ..\HEAD\root\projects\solr, and within that a directory with the basis of what the distribution contains, but with out the libraries. This is ..\HEAD\root\projects\solr\source\solr\instance. To build the libraries, change to the directory ..\HEAD\root and run the command 'ant deploy-solr'. The directory ..\HEAD\root\projects\solr\source\solr\instance should now match what you would extract from the distribution.
Then follow the steps above to complete the installation.
To upgrade Solr
Get the new Solr distribution and set it up as above.
Apply your recorded local changes to the new distribution (or diff the old and new configurations)
The release notes will indicate if a rebuild of the index is required and the old indexes should not be used.
Setting up Solr web app using the installer
The installer carries out the above steps to install Solr in the same tomcat container as Alfresco. The connection URL is unchanged from the default. The Solr home is in the Alfresco data dir, which also contains the Solr data files.
example solr/xml
<SOLR-ARCHIVE>\apache-solr-1.4.1.war' debug='0' crossContext='true'>
   <SOLR-ARCHIVE>' override='true'/>
</Context>
Security
Communications between the repository and Solr are protected by SSL with mutual authentication out of the box. Both the repository and Solr have their own public/private key pair, which are stored in their own respective keystores. These keystores are bundled with Alfresco; the customer SHOULD create their own (see 'Generating New SSL Keys' below), otherwise other Alfresco installations will potentially be able to read their Solr-Repository traffic (the http endpoints with which Alfresco Solr communicates are secured only by SSL and expose potentially sensitive data such as content).
Repository SSL Keystores
See also the wiki entry Data Encryption, section 'Alfresco Keystores'.
The repository has two keystores it uses for SSL:
- the 'ssl keystore' containing a public/private RSA key pair for the repository, and
- the 'ssl truststore' containing the trusted Alfresco Certificate Authority certificate (which has been used to sign both the repository and Solr certificates).
These key stores can be stored wherever the customer desires; the following properties need to be updated accordingly in alfresco-global.properties.
SSL Keystore
- Keystore location: encryption.ssl.keystore.location
- Keystore provider: encryption.ssl.keystore.provider
- Keystore type: encryption.ssl.keystore.type
- Keystore metadata file location: encryption.ssl.keystore.keyMetaData.location
SSL Truststore
- Keystore location: encryption.ssl.truststore.location
- Keystore provider: encryption.ssl.truststore.provider
- Keystore type: encryption.ssl.truststore.type
- Keystore metadata file location: encryption.ssl.truststore.keyMetaData.location
Solr SSL Keystores
Each Solr core similarly has two SSL keystores, the 'ssl.repo.client.keystore' containing a Solr public/private RSA key pair and the 'ssl.repo.client.truststore' containing the trusted Alfresco Certificate Authority certificate (which has been used to sign both the repository and Solr certificates).
Manually Generating New SSL Keys Signed by a Certificate Authority
Instructions for Generating Alfresco Repository SSL keystores
- Generate the Alfresco repository public/private key pair in a keystore:
- $ keytool -genkey -alias 'ssl.repo' -keyalg RSA -keystore ssl.keystore -storetype JCEKS -storepass <store password>
- Enter keystore password:
- Re-enter new password:
- What is your first and last name?
- [Unknown]: Alfresco Repository
- What is the name of your organizational unit?
- [Unknown]:
- What is the name of your organization?
- [Unknown]: Alfresco Software Ltd.
- What is the name of your City or Locality?
- [Unknown]: Maidenhead
- What is the name of your State or Province?
- [Unknown]: UK
- What is the two-letter country code for this unit?
- [Unknown]: GB
- Is CN=Alfresco Repository, OU=Unknown, O=Alfresco Software Ltd., L=Maidenhead, ST=UK, C=GB correct?
- [no]: yes
- Enter key password for <ssl.repo>
- (RETURN if same as keystore password):
- Note: if using Tomcat, the values for the above prompts must match those defined in the tomcat-users.xml file for the following entry (The spaces after the commas are required):
- <user username='CN=Alfresco Repository, OU=Unknown, O=Alfresco Software Ltd., L=Maidenhead, ST=UK, C=GB' roles='repository' password='null'/>
- Note: the <store password> must match that defined for the property 'keystore.password' in ${dir.keystore}/ssl-keystore-passwords.properties.
- Note: the key password must match that defined for the property 'ssl.repo.password' in ${dir.keystore}/ssl-keystore-passwords.properties.
- Generate a certificate request for the repository key
- $ keytool -keystore ssl.keystore -alias 'ssl.repo' -certreq -file repo.csr -storetype JCEKS -storepass <store password>
- Alfresco CA signs the certificate request, creating a certificate that is valid for 36500 days
- $ openssl x509 -CA ca.crt -CAkey ca.key -CAcreateserial -req -in repo.csr -out repo.crt -days 36500
- Signature ok
- subject=/C=GB/ST=UK/L=Maidenhead/O=Alfresco Software Ltd./OU=Unknown/CN=Alfresco Repository
- Getting CA Private Key
- Enter pass phrase for ca.key:
- Import the Alfresco CA key into the repository key store
- $ keytool -import -alias 'alfresco.ca' -file ca.crt -keystore ssl.keystore -storetype JCEKS -storepass <store password>
- Enter keystore password:
- Owner: CN=Alfresco CA, O=Alfresco Software Ltd., L=Maidenhead, ST=UK, C=GB
- Issuer: CN=Alfresco CA, O=Alfresco Software Ltd., L=Maidenhead, ST=UK, C=GB
- Serial number: 805ba6dc8f62f8b8
- Valid from: Fri Aug 12 13:28:58 BST 2011 until: Mon Aug 09 13:28:58 BST 2021
- Certificate fingerprints:
- MD5: 4B:45:94:2D:8E:98:E8:12:04:67:AD:AE:48:3C:F5:A0
- SHA1: 74:42:22
 0:52:AD:82:7A:FD:37:46:37:91:91:F4:77:89:3A:C9:A3
 - Signature algorithm name: SHA1withRSA
- Version: 3
- Extensions:
- 1: ObjectId: 2.5.29.14 Criticality=false
- SubjectKeyIdentifier [
- KeyIdentifier [
- 0000: 08 42 40 DC FE 4A 50 87 05 2B 38 4D 92 70 8E 51 .B@..JP..+8M.p.Q
- 0010: 4E 38 71 D6 N8q.
- ]
- ]
- 2: ObjectId: 2.5.29.19 Criticality=false
- BasicConstraints:[
- CA:true
- PathLen:2147483647
- ]
- 3: ObjectId: 2.5.29.35 Criticality=false
- AuthorityKeyIdentifier [
- KeyIdentifier [
- 0000: 08 42 40 DC FE 4A 50 87 05 2B 38 4D 92 70 8E 51 .B@..JP..+8M.p.Q
- 0010: 4E 38 71 D6 N8q.
- ]
- [CN=Alfresco CA, O=Alfresco Software Ltd., L=Maidenhead, ST=UK, C=GB]
- SerialNumber: [ 805ba6dc 8f62f8b8]
- ]
- Trust this certificate? [no]: yes
- Certificate was added to keystore
- Import the CA-signed repository certificate into the repository keystore
- $ keytool -import -alias 'ssl.repo' -file repo.crt -keystore ssl.keystore -storetype JCEKS -storepass <store password>
- Enter keystore password:
- Certificate reply was installed in keystore
- Convert the repository keystore to a pkcs12 keystore (for use in browsers such as Firefox). Give the pkcs12 key store the key store password 'alfresco'.
- keytool -importkeystore -srckeystore ssl.keystore -srcstorepass <keystore password> -srcstoretype JCEKS -srcalias 'ssl.repo' -srckeypass <key pass> -#;destkeystore browser.p12 -deststoretype pkcs12 -deststorepass alfresco -destalias repo -destkeypass alfresco
- Create a repository truststore containing the Alfresco CA certificate
- keytool -import -alias AlfrescoCA -file ca.crt -keystore ssl.truststore -storetype JCEKS -storepass <store password>
- Note: the <store password> must match that defined for the property 'keystore.password' in ${dir.keystore}/ssl-truststore-passwords.properties.
Instructions for Generating Alfresco Solr SSL keystores
- Generate solr public/private key pair in a keystore.
- $ keytool -genkey -alias 'ssl.repo.client' -keyalg RSA -keystore ssl.repo.client.keystore -storetype JCEKS -storepass <store password>
- Enter keystore password:
- Re-enter new password:
- What is your first and last name?
- [Unknown]: Alfresco Repository Client
- What is the name of your organizational unit?
- [Unknown]:
- What is the name of your organization?
- [Unknown]: Alfresco Software Ltd.
- What is the name of your City or Locality?
- [Unknown]: Maidenhead
- What is the name of your State or Province?
- [Unknown]: UK
- What is the two-letter country code for this unit?
- [Unknown]: GB
- Is CN=Alfresco Solr, OU=Unknown, O=Alfresco Software Ltd., L=Maidenhead, ST=UK, C=GB correct?
- [no]: yes
- Enter key password for <ssl.repo.client>
- (RETURN if same as keystore password):
- Note: if using Tomcat, the values for the above prompts must match those defined in the tomcat-users.xml file for the following entry (The spaces after the commas are required):
- <user username='CN=Alfresco Repository Client, OU=Unknown, O=Alfresco Software Ltd., L=Maidenhead, ST=UK, C=GB' roles='repoclient' password='null'/>
- Note: the <store password> must match that defined for the property 'keystore.password' in each Solr core's conf/ssl-keystore-passwords.properties
- file.
- Note: the key password must match that defined for the property 'ssl.repo.client.password' in each Solr core's conf/ssl-keystore-#;passwords.properties.
- Generate a certificate request for the solr key.
- $ keytool -keystore ssl.repo.client.keystore -alias 'ssl.repo.client' -certreq -file ssl.repo.client.csr -storetype JCEKS -storepass <store password>
- kT9X6oe68t
- Enter keystore password:
- Alfresco CA signs the certificate request, creating a certificate that is valid for 36500 days
- $ openssl x509 -CA ca.crt -CAkey ca.key -CAcreateserial -req -in ssl.repo.client.csr -out ssl.repo.client.crt -days 36500
- Signature ok
- subject=/C=GB/ST=UK/L=Maidenhead/O=Alfresco Software Ltd./OU=Unknown/CN=Alfresco Solr
- Getting CA Private Key
- Enter pass phrase for ca.key:
- Import the CA key into the solr keystore
- $ keytool -import -alias 'alfresco.ca' -file ca.crt -keystore ssl.repo.client.keystore -storetype JCEKS -storepass <store password>
- Enter keystore password:
- Owner: CN=Alfresco CA, O=Alfresco Software Ltd., L=Maidenhead, ST=UK, C=GB
- Issuer: CN=Alfresco CA, O=Alfresco Software Ltd., L=Maidenhead, ST=UK, C=GB
- Serial number: 805ba6dc8f62f8b8
- Valid from: Fri Aug 12 13:28:58 BST 2011 until: Mon Aug 09 13:28:58 BST 2021
- Certificate fingerprints:
- MD5: 4B:45:94:2D:8E:98:E8:12:04:67:AD:AE:48:3C:F5:A0
- SHA1: 74:42:220:52:AD:82:7A:FD:37:46:37:91:91:F4:77:89:3A:C9:A3
- Signature algorithm name: SHA1withRSA
- Version: 3
- Extensions:
- 1: ObjectId: 2.5.29.14 Criticality=false
- SubjectKeyIdentifier [
- KeyIdentifier [
- 0000: 08 42 40 DC FE 4A 50 87 05 2B 38 4D 92 70 8E 51 .B@..JP..+8M.p.Q
- 0010: 4E 38 71 D6 N8q.
- ]
- ]
- 2: ObjectId: 2.5.29.19 Criticality=false
- BasicConstraints:[
- CA:true
- PathLen:2147483647
- ]
- 3: ObjectId: 2.5.29.35 Criticality=false
- AuthorityKeyIdentifier [
- KeyIdentifier [
- 0000: 08 42 40 DC FE 4A 50 87 05 2B 38 4D 92 70 8E 51 .B@..JP..+8M.p.Q
- 0010: 4E 38 71 D6 N8q.
- ]
- [CN=Alfresco CA, O=Alfresco Software Ltd., L=Maidenhead, ST=UK, C=GB]
- SerialNumber: [ 805ba6dc 8f62f8b8]
- ]
- Trust this certificate? [no]: yes
- Certificate was added to keystore
- Import the CA-signed solr certificate into the solr keystore
- $ keytool -import -alias 'ssl.repo.client' -file ssl.repo.client.crt -keystore ssl.repo.client.keystore -storetype JCEKS -storepass <store password>
- Create a solr truststore containing the Alfresco CA certificate
- $ keytool -import -alias 'alfresco.ca' -file ca.crt -keystore ssl.repo.client.truststore -storetype JCEKS -storepass <store password>
- Enter keystore password:
- Re-enter new password:
- Owner: CN=Alfresco CA, O=Alfresco Software Ltd., L=Maidenhead, ST=UK, C=GB
- Issuer: CN=Alfresco CA, O=Alfresco Software Ltd., L=Maidenhead, ST=UK, C=GB
- Serial number: 805ba6dc8f62f8b8
- Valid from: Fri Aug 12 13:28:58 BST 2011 until: Mon Aug 09 13:28:58 BST 2021
- Certificate fingerprints:
- MD5: 4B:45:94:2D:8E:98:E8:12:04:67:AD:AE:48:3C:F5:A0
- SHA1: 74:42:220:52:AD:82:7A:FD:37:46:37:91:91:F4:77:89:3A:C9:A3
- Signature algorithm name: SHA1withRSA
- Version: 3
- Extensions:
- 1: ObjectId: 2.5.29.14 Criticality=false
- SubjectKeyIdentifier [
- KeyIdentifier [
- 0000: 08 42 40 DC FE 4A 50 87 05 2B 38 4D 92 70 8E 51 .B@..JP..+8M.p.Q
- 0010: 4E 38 71 D6 N8q.
- ]
- ]
- 2: ObjectId: 2.5.29.19 Criticality=false
- BasicConstraints:[
- CA:true
- PathLen:2147483647
- ]
- 3: ObjectId: 2.5.29.35 Criticality=false
- AuthorityKeyIdentifier [
- KeyIdentifier [
- 0000: 08 42 40 DC FE 4A 50 87 05 2B 38 4D 92 70 8E 51 .B@..JP..+8M.p.Q
- 0010: 4E 38 71 D6 N8q.
- ]
- [CN=Alfresco CA, O=Alfresco Software Ltd., L=Maidenhead, ST=UK, C=GB]
- SerialNumber: [ 805ba6dc 8f62f8b8]
- ]
- Trust this certificate? [no]: yes
- Certificate was added to keystore
- Note: the <store password> must match that defined for the property 'keystore.password' in each Solr core's conf/ssl-truststore-#;passwords.properties file.
Note regarding JDK 7
When using JDK 7 and the default keystores, you may see this exception in the startup log :
Caused by: sun.security.validator.ValidatorException: PKIX path validation failed: java.security.cert.CertPathValidatorException: Path does not chain with any of the trust anchors
It is not clear what exactly the issue is with the default keystores, see ALF-14311, but the issue does not occur if you generate you own private key / CA, and SSL keys / keystores, which you should be doing anyways if you plan to use SSL to secure the communication between the repository and the indexing server.
A sample shell script to automate the generation of these keys and certificates is available
here. SHA1SUM: 9195386ad7e68cca8c5e544be3c7ad1422e13b6f.
It defaults to using the default key aliases and passwords, though you may also want to change that. If you do, you'll have to reflect it in both the repo config (alfresco-global.properties), and each solr core config (solrcore.properties for each core, by default archive-SpacesStore and workspace-SpacesStore).
Connecting to the SSL-Protected Solr Web Application
All urls for the Solr web application bundled with Alfresco are protected by SSL. In order to use these from a browser you need to import a browser-compatible keystore to allow mutual authentication and decryption to work. Follow these steps to import the keystore into your browser (these relate to Firefox, other browsers will have a similar mechanism):
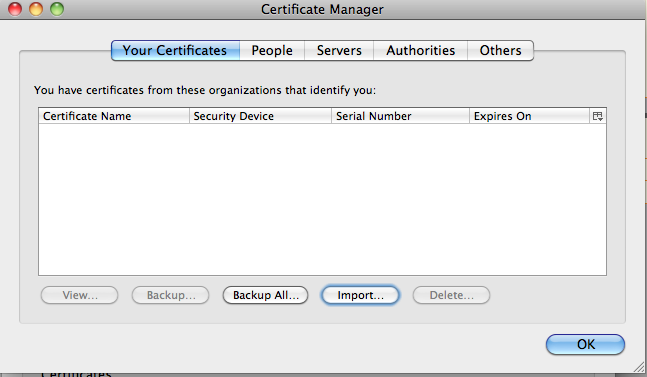
(i) Open the Firefox Certificate Manager
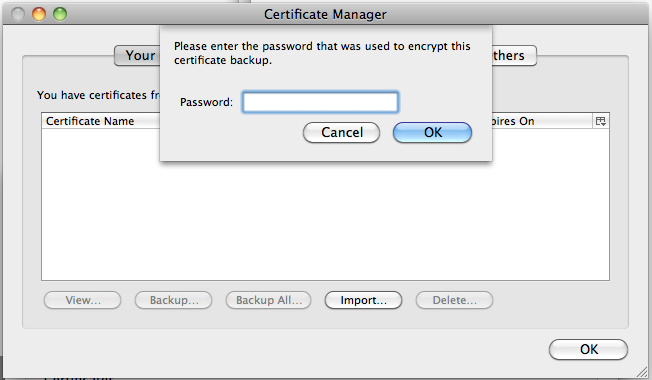
(ii) Import the browser keystore 'browser.p12' that is located in your WEB_INF/classes/alfresco/keystore directory.
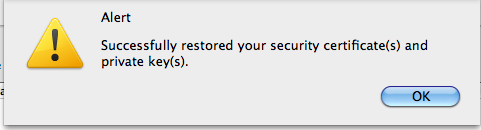
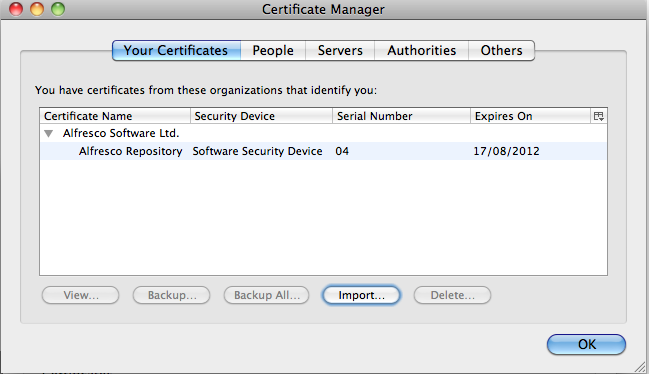
The password is 'alfresco'. This should result in a dialog indicating that the keystore has been imported successfully, as the following image shows.
'Your Certificates' should now contain the imported keystore with the Alfresco repository certificate.
SuccessfullyImportedBrowserKeystore.png
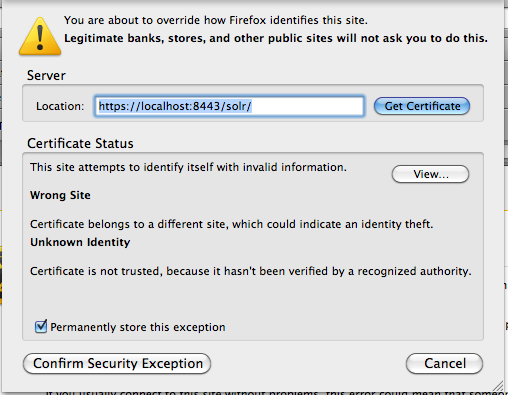
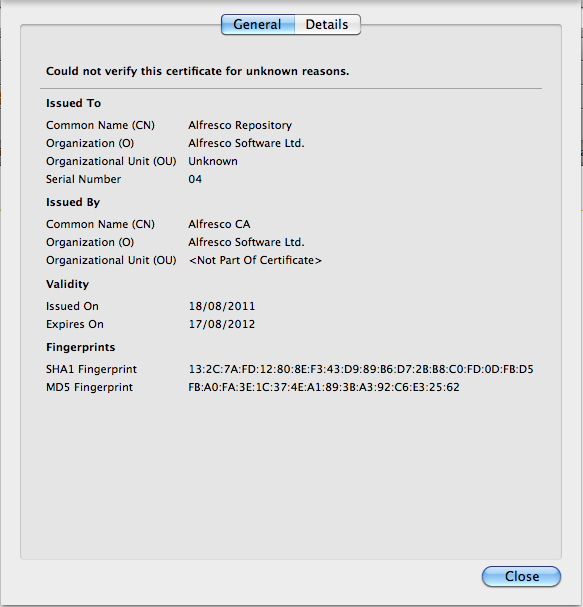
(iii) In your browser, navigate to a Solr url e.g. http://localhost:8080/solr. This will result in the browser displaying an error dialog of the form shown in the image.
This is probably a result of the fact that the Alfresco certificate presented to the browser is not tied to the server IP address. In this case, simply view the certificate and confirm that it is signed by the Alfresco CA, by expanding 'I Understand the Risks' and selecting 'Add Exception':
then click 'View' to view the certificate.
Confirm that the certificate was issued by 'Alfresco CA' and then confirm the Security Exception (you may also want to uncheck the 'Permanently store this exception' checkbox).
Access to Solr will be granted as shown in the image below.
Running Without SSL
In alfresco-global.properties, set the property 'solr.secureComms' to 'none' and ensure that the property 'solr.port' is set to the correct non-SSL port of the application server in which Solr is running. Similarly, in each solrcore.properties file, set the property 'alfresco.secureComms' to 'none' and ensure that the property 'alfresco.port' is set to the correct non-SSL port of the application server in which your repository is running.
In the repository web.xml, remove the following configuration:
   <security-constraint>
      <web-resource-collection>
         <url-pattern>/service/api/solr/*</url-pattern>
      </web-resource-collection>
      <auth-constraint>
         <role-name>repoclient</role-name>
      </auth-constraint>
      <user-data-constraint>
         <transport-guarantee>CONFIDENTIAL</transport-guarantee>
      </user-data-constraint>
   </security-constraint>
   <login-config>
      <auth-method>CLIENT-CERT</auth-method>
      <realm-name>Repository</realm-name>
   </login-config>
   <security-role>
     <role-name>repoclient</role-name>
   </security-role>
In the solr web.xml, remove the following configuration:
     <security-constraint>
         <web-resource-collection>
             <url-pattern>/*</url-pattern>
         </web-resource-collection>
         <auth-constraint>
             <role-name>repository</role-name>
         </auth-constraint>
         <user-data-constraint>
             <transport-guarantee>CONFIDENTIAL</transport-guarantee>
         </user-data-constraint>
     </security-constraint>
      <login-config>
         <auth-method>CLIENT-CERT</auth-method>
         <realm-name>Solr</realm-name>
     </login-config>
      <security-role>
        <role-name>repository</role-name>
     </security-role>
Migration
For community releases of 4.0, upgrade to Alfresco 4.0 - with the Lucene sub-system enabled. (Some patches may depend on search)
It is possible to upgrade to Enterprise versions of Alfresco 4.0 and later with Solr in place at upgrade time
Set up the Solr web app and then let it track the repository (you cna confirm this by tuning on debug described below)
You can use the Lucene search sub-system while this is going.
Configure the solr search subsystem properties (it does not have to be active to configure it via JMX or Share)
Check the Solr tracking status using the admin tools.
When you are up to date enough switch the search sub-system
You can always switch back - the Lucene index will rebuild from where it was as the sub-system starts.
Checking the status of the Solr index
Direct URLs
Summary Report
Quick summary report
http://localhost:8080/solr/admin/cores?action=SUMMARY&wt=xml
With multi-threaded tracking (available from 4.0.2) there are additional tracking details and tracking statistics
- detail=true
- provide statistics per tracking thread
- hist=true
- provides a histogram of the times take for tracking operations for each tracking thread
- reset=true
- resests all tracking statistics
- values=true
- reports (by default) the last 50 values recorded for each tracking operation for each thread
- Last Index Commit Time
- - the timestamp for the last transaction that was indexed
- Last Index Commit Date
- - the timestamp as a date for the last transaction taht was indexed
- - changes made after this time are not yet in the index
- Lag
- - the diffenerence in seconds between the the last transaction timestamp on the server and the timestamp for the last transaction that was indexed
- Duration
- - The lag as an XML duration so you do not have to do the Math
- Active
- - is the tracker for the core active
- Timestamp for last TX on server
- Date for last TX on server
- Id for last TX on server
- Id for last TX in index
- Approx transactions remaining
- - the approximate number of transactions to index to bring the index up-to-date
- - the last TX id on the server minus the last tx id indexed
- - the estimate will include missing and emtry transacations
- Approx indexing time remaining
- - 4.0
- - Based on 'Approx transactions remaining' and the average time to index a transaction how long the index will take to be up-to-date
- - 4.0.2 and later
- - Based on 'Approx transactions remaining', the average number of nodes per transaction and the average time to index a node - how long the index will take to be up-to-date
- - the estimate is in the most appopriate scale e.g. seconds, minutes, hours, days
- - if in hours then no minutes or seconds will be provided
- Model sync times (ms)
- - summary stats for the model sync time
- - &detail=true - adds per thread stats
- - &hist=true - adds per thread histogram of reposnse times
- - &value=true - adds recent response times
- Acl index time (ms) - 4.0.2 and later
- - summary stats for acl index time
- - supports additional info with &detail=true &hist=true &value=true
- Node index time (ms) - 4.0.2 and later
- - summary stats for node index times
- - supports additional info with &detail=true &hist=true &value=true
- Acl tx index time (ms) - 4.0 only (acl tx based stats removed in favour of per acl stats for multi-threaded tracking)
- - summary stats for ACL TX index time
- - supports additional info with &detail=true &hist=true &value=true
- Tx index time (ms) - 4.0 only (tx based stats removed in favour of per nodes stats for multi-threaded tracking)
- - summary stats for TX index time
- - used to estimate the time required to bring the index up-to-date
- Docs/Tx
- - summary stats for the number of docs per transaction
- - supports additional info with &detail=true &hist=true &value=true
- Doc Transformation time (ms)
- - summary stats for document transformation time
- - supports additional info with &detail=true &hist=true &value=true
Additional information in 4.1.3 and later
- Alfresco Nodes in Index
- The count of folders and files in the index.
- readerDir
- Configuration summary
- /queryResultCache
- statistics for the SOLR query result cache
- /alfrescoAuthorityCache
- statistics for the cache used to evaluate read access
- /alfresco
- Statistics for queries using the 'lucene' query language from Alfresco
- /alfrescoPathCache
- Statistics for the cache used in evaluating PATH queries and sub-queries.
- /afts
- Statistics for queries using the 'Alfresco FTS' query language from Alfresco
- /cmis
- Statistics for queries using the 'CMIS' query language from Alfresco
- /filterCache
- Statistics for the SOLR filter cache (this is used for tenant filtering and overall authority listing)
Overal all status report
General report - including the last TX indexed and the time
http://localhost:8080/solr/admin/cores?action=REPORT&wt=xml
- DB transaction count
- - the transaction count on the database
- DB acl transaction count
- - the acl transaction count on the database
- Count of acl transactions in the index but not the DB
- - should be zero (if not there is an issue with the index)
- - note empty acl transactions are not currently purged from the database
- Count of duplicate error docs in the index (since 4.1.3)
- - the number of duplicate error docs in the index
- - should be zero (if not there is an issue with the index)
- Count of duplicated transactions in the index
- - the number of transactions that appear more than once in the index
- - should be zero (if not there is an issue with the index)
- Count of duplicated acl transactions in the index
- - the number of ACL transactions that appear more than once in the index
- - should be zero (if not there is an issue with the index)
- Count of duplicated aux docs in the index (since 4.1.3)
- - the number of duplicate auxillary docs in the index
- - should be zero (if not there is an issue with the index)
- Count of duplicate unindexed docs in the index (since 4.1.3)
- - the number of duplicate unindexed docs in the index
- - should be zero (if not there is an issue with the index)
- Count of missing transactions from the Index
- - the number of transactions in the database but not in the index
- - should be zero when the index is up-to-date
- - this may just reflect the index still cathing up (this would then be 'how many transactions are threre still to index or missing?')
- Count of missing acl transactions from the Index
- - the number of acl transactions in the database but not in the index
- - should be zero when the index is up-to-date
- - this may just reflect the index still cathing up (this would then be 'how many acl transactions are threre still to index or missing?')
- Count of transactions in the index but not the database
- - should be zero (if not there MAY be an issue with the index)
- - this count can include now empty transactions that have been purged from the database
- Index aux count (since 4.1.3)
- - the count of the auxiliary docs (ID starts with 'AUX-'). Theses docs are created for nodes during index update.
- Index transaction count
- - the number of transactions in the index
- Index acl transaction count
- - the number of acl transactions in the index
- Index unindexed count (since 4.1.3)
- - the number of unindexed docs (ID starts with 'UNINDEXED-') in the index.
- - created for nodes that have PROP_IS_INDEXED property set to 'false' in metadata
- - This property is set to control indexing process, so it can be >0. For example, hidden and rendition nodes have this property set to FALSE
- Index unique transaction count
- - the number of unique transactions in the index
- Index unique acl transaction count
- - the number of unique acl transactions in the index
- Index leaf count
- - the number of docs and folders in the index
- Count of duplicate leaves in the index
- - the number of duplicate docs or folders in the index
- - should be zero (if not there is an issue with the index)
- Last index commit time
- - the timestamp for the last transaction added to the index
- - transactions after this timestamp have not yet been indexed
- Last Index commit date
- - the timestamp as date for the last transaction added to the index
- - transactions after this date have not yet been indexed
- Last TX id before holes
- - Solr tracking by default goes back an hour from the current time to check that no transactions have been missed
- - transactions after this id will be checked again to make sure they have not been missed.
- - this is computed from the index at start up time and is initially, by default, an hour after the last commit time found in the index
- First duplicate
- - optional
- - if there are duplicate transactions in the index the id of the first duplicate transaction
- - it returns the TXID of the first duplicate transaction. If it is present in report, then there is an issue with the index
- First duplicate acl tx
- - optional
- - if there are duplicate acl transactions in the index the id of the first duplicate acltransaction
- First transaction in the index but not the DB
- - optional
- - if the related count is > 0, the id of the first offender
- First acl transaction in the index but not the DB
- - optional
- - if the related count is > 0, the id of the first offender
- First transaction missing from the Index
- - optional
- - if the related count is > 0, the id of the first offender
- First acl transaction missing from the Index
- - optional
- - if the related count is > 0, the id of the first offender
- First duplicate leaf in the index
- - optional
- - if the related count is > 0, the id of the first offender
Transaction specific reports
TX specific report
http://localhost:8080/solr/admin/cores?action=TXREPORT&core=alfresco&wt=xml&txid=6
ACL TX specific reports
ACL TX specific report
http://localhost:8080/solr/admin/cores?action=ACLTXREPORT&core=alfresco&wt=xml&acltxid=6
Node specific reports
Node specific report
http://localhost:8080/solr/admin/cores?action=NODEREPORT&wt=xml&nodeid=10
ACL specific reports
ACL specific report
http://localhost:8080/solr/admin/cores?action=ACLREPORT&wt=xml&aclid=10
Check the cache
The next time the index commits the ceching used for PATH and ACL evaluation will be exhautively checked and
fixed up if in error.
http://localhost:8080/solr/admin/cores?action=CHECK
General fix
Fix any issues as reported by the REPORT option
http://localhost:8080/solr/admin/cores?action=FIX
Purge/remove from the index
Can be used to remove transactions, acl transactions, nodes and acls from the index
May be used to create holes for testing.
http://localhost:8080/solr/admin/cores?action=PURGE&txid=1&acltxid=2&nodeid=3&aclid=4
Reindex a transaction, acl transaction, node or acl
http://localhost:8080/solr/admin/cores?action=REINDEX&txid=1&acltxid=2&nodeid=3&aclid=4
Index a transaction, acl transaction, node or acl
This will create entries in the index. It will not delete the entry first so can be used to create duplicates
for testing.
http://localhost:8080/solr/admin/cores?action=INDEX&txid=1&acltxid=2&nodeid=3&aclid=4
Try again to index any node that failed to index and was skipped
http://localhost:8080/solr/admin/cores?action=RETRY
Load Log4J Settings
http://localhost:8080/solr/admin/cores?action=LOG4J
Read-read the default log4j configuration.
An optional resource parameter can be provided to specify a location on the classpath or file from which to load the log4j configuration.
As of 4.1.3 the packaged logging with SOLR has been replaced with log4j and can not be configured in the SOLR UI.
By default, SOLR specific logging configuration is in log4j-solr.properties anywhere on the classpath or in <SOLR_HOME>.
Common report options
To specify an option core for the report. If absent a report is produced for each core e.g.
&core=alfresco
&core=archive
&txid=1
&acltxid=1
&nodeid=1
&aclid=1
Solr index status (the normal Solr stuff)
http://localhost:8080/solr/admin/cores?action=STATUS&wt=xml
JMX
The status of the index can also be checked via JMX.
MBeans - Alfresco - solrIndexes - <store alias>
The default Solr core summary is the default vue.
The operations can run the same consistency checks available by URLs above.
You can also fix index issues, check the index cache and backup individual indexes via JMX.
Back up
Each core of the Solr index can be backed up in its own right by URL or using cluster aware cron jobs from Alfresco.
The location and cron expression for each core can be setup via Share admin or JMX.
Ad hoc index back up cna be done via JMX or direct to Solr.
Solr will create a time-stamped sub-directory for each index back up you make.
It will contain a full index back up.
The Enterprise product allows a limit on the number of backups to be set via JMX or share.
SOLR can also be backed up direct using
https://localhost:8443/solr/alfresco/replication?command=backup&location=<main_localtion>&numberToKeep=2
https://localhost:8443/solr/archive/replication?command=backup&location=<archive_location>&numberToKeep=2
Restore
Stop Solr.
Copy a backup index to the data directory for each core.
Restart Solr - it will start to track based on the state of the restored index.
Solr core properties in solrcore.properties
Comment out the properties in this file (for each solr core) if you wish to set them via solr.xml
Core Solr configuration
- data.dir.root=@@ALFRESCO_SOLR_DIR@@
- Base data dir for the solr indexes
- The most likely property you want to centralise
- data.dir.store=archive/SpacesStore
- The directory relative to data.dir.root where the data for this core is kept
- enable.alfresco.tracking=true
- Should Solr try and track the repository
- cache.alfresco.size=100
- The Alfresco cache size used internally for PATH looks up etc - leave this alone
- max.field.length=2147483647
- The max number of tokens to include for each field
- By default we add all tokens
Configuring what to track
- alfresco.host=localhost
- The Alfresco host to track
- alfresco.port=8080
- The Alfresco host port
- alfresco.port.ssl=8443
- The alfresco host SSL port
- alfresco.baseUrl=/alfresco
- the base url fragment (after the hostname and port) to identify the Alfresco webapp (4.1.3 and later)
- alfresco.cron=0/15 * * * * ? *
- How often to check if there is work to do
- alfresco.stores=archive://SpacesStore
- The store to track on the Alfresco host
- alfresco.index.transformContent=false
- If present and set to false the index tracker will not transform any content - only metadata will be indexed (4.1.3 and later)
- alfresco.lag=1000
- Each 'track' will run until the time when it starts - less this lag
- alfresco.hole.retention=3600000
- Each track will revisit all transactions from the timestamp of the last in the index, less this value, to fill in any transactions that may have been missed.
- alfresco.batch.count=1000
- When tracking docs will be commited in batches of this size, or for each large transaction, or at the end of the current tracking set.
Encryption
- alfresco.secureComms=https
- https or none
- Remember to fix up the configuration in web.xml for Alfresco and Solr and the Repository side property for query.
SSL
- alfresco.encryption.ssl.keystore.type=JCEKS
- alfresco.encryption.ssl.keystore.provider=
- alfresco.encryption.ssl.keystore.location=ssl.repo.client.keystore
- alfresco.encryption.ssl.keystore.passwordFileLocation=ssl-keystore-passwords.properties
- alfresco.encryption.ssl.truststore.type=JCEKS
- alfresco.encryption.ssl.truststore.provider=
- alfresco.encryption.ssl.truststore.location=ssl.repo.client.truststore
- alfresco.encryption.ssl.truststore.passwordFileLocation=ssl-truststore-passwords.properties
Tracking
Configuration for multi-threaded tracking - 4.0.2 and later
- alfresco.enableMultiThreadedTracking=false
- Enable/Disable multi-threaded tracking
- alfresco.corePoolSize=4
- Pool size for multi-threaded tracking - use for indexing nodes
- '1' means one thread indexing nodes and one tracking transactions
- '4' means four threads indexing nodes and one tracking transactions
- alfresco.maximumPoolSize=-1
- alfresco.keepAliveTime=120
- alfresco.threadPriority=5
- alfresco.threadDaemon=true
- alfresco.workQueueSize=-1
- The default queue size is unlimited
HTTP Client
HTTP Client configuration.
- alfresco.maxTotalConnections=40
- alfresco.maxHostConnections=40
- alfresco.socketTimeout=60000
- If Alfresco and SOLR are run in the same web app - it may take this amount of time for the SOLR tracker to notice if the Alfresco web app shuts down first.
Solr caching
The Solr cache confguration from solrconfig.xml exposed as properties.
Check the performance of these caches for each core using the Solr admin pages.
- solr.filterCache.size=512
- solr.filterCache.initialSize=512
- You may want to increase these if you have many users, groups, tenants
- solr.queryResultCache.size=512
- solr.queryResultCache.initialSize=512
- Increase these to cache more query results
- Note the query cache uses the query string, the users authorities, the locale and ordering to determine the cache key.
- User A will never use a query cached by user B.
- solr.documentCache.size=512
- solr.documentCache.initialSize=512
- solr.queryResultMaxDocsCached=200
- Makes sense to put this higher if you expect to page through most results
- solr.authorityCache.size=512
- solr.authorityCache.initialSize=512
- cache used in authority filter generation.
- solr.pathCache.size=512
- solr.pathCache.initialSize=512
- cache used for PATH query parts
Other SOLR config
- solr.maxBooleanClauses=10000
- limits wild card expansion (similar to related lucene option)
Batching
- alfresco.transactionDocsBatchSize=100
- alfresco.changeSetAclsBatchSize=100
- alfresco.aclBatchSize=10
Warming - set the number of cache entries to pre-build after each index update before the new index goes live.
The more warming you do the longer an index takes to become live - but the less time is spent as a result of cache misses.
These options require a bit of thought and tuning for individual use cases.
solr.filterCache.autowarmCount=128
solr.authorityCache.autowarmCount=0
solr.pathCache.autowarmCount=128
solr.queryResultWindowSize=200
You can disable permissoin checks of they are not required
alfresco.doPermissionChecks=true
FAQ
- When do I have to rebuild the index?
- If there are incompatible schema changes
- e.g. a property, type or aspect is renamed
- a property data type is changed
- Lucene/Solr upgrade requires it
- Advanced warning - this will be required for Solr 4.0
- There is some change to the analysis configuration
- e.g. change French analysis - change the tokenisation or remove the language specific configuration
- If there are incompatible schema changes
- How would I rebuild the index from scratch?
- Note: you could start a new Solr web app and switch to use this when the rebuild is done
- Note: the index.recovery.mode=FULL is not used by Solr - only Lucene
- Stop the Solr web app
- delete the index data directory for each core
- optionally, delete the models cached on the Solr side for each core (e.g. ...\archive-SpacesStore\alfrescoModels\*)
- restart the Solr web app
- I believe there is something wrong with my Solr index what do I do?
- Use the solr url's to check status of the index and perform fixes (as described in above section 'Checking Status of Solr Index')
- You can set up more than one Solr instance to track the same reposiroty
- You can rebuild a new Solr index while continuing to use the old (with whatever issues you have)
- There is no enforced down time at start up compared with using the Lucene index
- How do I change Solr logging (up to 4.1.2)
- SOLRHOST:8443:/solr/ (you may need to install client certificate if you haven’t already)
- Select the “Admin alfresco” link to work with the workspace store (or the archive one if you are checking the archive store)
- Select the “[LOGGING]” link
- For info about tracking set INFO level logging for:
- org.alfresco.solr.tracker.CoreTracker
- org.alfresco.solr.tracker.CoreTrackerJob
- org.alfresco.solr.tracker.CoreWatcherJob
- Use the “set” option at the bottom of the page to save the changes
- For query debug set FINE for:
- org.alfresco.solr.query.AbstractQParser
- org.alfresco.solr.query.AlfrescoFTSQParserPlugin
- org.alfresco.solr.query.AlfrescoLuceneQParserPlugin
- org.alfresco.solr.query.CmisQParserPlugin
- For response timing (query time and match reporting)
- org.apache.solr.core.SolrCore @INFO
- How do I change logging in V4.1.3 and later
- This uses log4j. There is standard configuration file loaded from the classpath. THis can be reloaded - see action=LOG4J above.
- What does the Solr tracking INFO mean ....
17-Nov-2011 11:22:45 org.alfresco.solr.tracker.CoreTracker trackRepository
INFO: .... from Transaction [id=374, commitTimeMs=1321528572425, updates=1, deletes=0]
17-Nov-2011 11:22:45 org.alfresco.solr.tracker.CoreTracker trackRepository
INFO: .... to Transaction [id=374, commitTimeMs=1321528572425, updates=1, deletes=0]
- Look at “from Transaction” to “to Transaction”
- If they are the same then the tracker does not have anything to do
- To check the last transaction ID in the repo you can query the DB:
- select max(id) from alf_transaction;
- The result will match the “from Transaction” value in the log if Solr is up to date
- To over-ride sub-system Spring beans, see Alfresco_Subsystems#Spring_Beans
Configuring query against additional stores
From Alfresco version 4.0.3, it is possible to dynamical add, remove and configure Solr cores to track any store in Alfresco. The Solr search sub-system can be configured via properties or JMX to support query for those cores.
Example: configuring search for the system://system store
Prerequisite: Alfresco 4.0.3 or greater, configured to use the Solr search sub-system.
Create the new core
https://localhost:8443/solr/admin/cores?action=newCore&storeRef=system://system&property.data.dir.store=carrot
Note you can set any property normally set in the solrcore.properties file on the url.
In the above example we have set data.dir.store=carrot which need to be prefixed by 'property.'.
You can update any property and cause the solr core to be reloaded using that setting using:
https://localhost:8443/solr/admin/cores?action=updateCore&storeRef=system://system&property.data.dir.store=banana
This can be used to set the data dir as above (which will cause a new copy of the index to be started)
You could use this method to adjust (and persist) a new value for the query cache size.
If you are done with the core or want to start again:
https://localhost:8443/solr/admin/cores?action=removeCore&storeRef=system://system
Configuring the Solr search sub-system
The Solr sub-system now supports a dynamic mapping of Alfresco stores to a Solr instance where the index for a store resides. Via properties this could be set as:
solr.store.mappings=solrMappingAlfresco,solrMappingArchive,solrMappingSystem
solr.store.mappings.value.solrMappingAlfresco.httpClientFactory=solrHttpClientFactory
solr.store.mappings.value.solrMappingAlfresco.baseUrl=/solr/alfresco
solr.store.mappings.value.solrMappingAlfresco.protocol=workspace
solr.store.mappings.value.solrMappingAlfresco.identifier=SpacesStore
solr.store.mappings.value.solrMappingArchive.httpClientFactory=solrHttpClientFactory
solr.store.mappings.value.solrMappingArchive.baseUrl=/solr/archive
solr.store.mappings.value.solrMappingArchive.protocol=archive
solr.store.mappings.value.solrMappingArchive.identifier=SpacesStore
solr.store.mappings.value.solrMappingSystem.httpClientFactory=solrHttpClientFactory
solr.store.mappings.value.solrMappingSystem.baseUrl=/solr/system-system
solr.store.mappings.value.solrMappingSystem.protocol=system
solr.store.mappings.value.solrMappingSystem.identifier=system
Notes
- You can now control the URL to the Solr instance
- You can add a new 'solrHttpClientFactory' bean to point to another Solr server
- newCore creates a core name named '<protocol>-<identifier>'. This is not yet configurable. Nor can you configure where the core configuration data is created - it will be in the Solr instance dir along side the solr.xml file (where the solr.war lives)
The same changes can be made via JMX. Add ',solrMappingSystem' to the solr.store.mappings attribute of the Solr search sub-subsystem. A new entry for this mapping will appear below the sub-system alongside the two existing mappings. The attributes of the mapping can then be configured.
You must be a registered user to add a comment. If you've already registered, sign in. Otherwise, register and sign in.
Alfresco Content Services Hub Docs
Ask for and offer help to other Alfresco Content Services Users and members of the Alfresco team.
Related links:
Latest Articles
- Alfresco Community Edition 201911 GA Release Notes
- Alfresco Community Edition 201910 EA Release Notes
- Deconstructing SOLR Indexes
- Alfresco Community Edition 201901 GA Release Notes
- Alfresco Community Edition 201808 EA file list
- php_upload.docx
- Alfresco Community Edition 201808 EA Release Notes
- Alfresco_6.0_docker deployment.pdf
- Alfresco Community Edition 201806 GA file list
- alfresco.log
- Alfresco Addons *Incomplete list*
- Alfresco Community Edition 201806 GA Release Notes
- AGS Benchmark Driver Documentation
- Default memory allocation issue in Alfresco CE 201...
- Alfresco Community Edition 201804 EA file list
We use cookies on this site to enhance your user experience
By using this site, you are agreeing to allow us to collect and use cookies as outlined in Alfresco’s Cookie Statement and Terms of Use (and you have a legitimate interest in Alfresco and our products, authorizing us to contact you in such methods). If you are not ok with these terms, please do not use this website.