
File System Deployment Target
Turn on suggestions
Auto-suggest helps you quickly narrow down your search results by suggesting possible matches as you type.
Showing results for
- Alfresco Hub
- :
- ACS - Hub Docs
- :
- File System Deployment Target
File System Deployment Target
- Subscribe to RSS Feed
- Mark as New
- Mark as Read
- Bookmark
- Subscribe
- Printer Friendly Page
- Report Inappropriate Content
6 Jun 2015
0:40 AM
Obsolete Pages{{Obsolete}}
The official documentation is at: http://docs.alfresco.com
The file system deployment target deploys WCM content to a local filesystem. By default there is a file system deployment target built into the standalone WCM_Deployment_Engine called 'default' and also once included in the web delivery runtime subsystem called 'filesystem'.
In source code the class inplementing ths file system deployment target is org.alfresco.deployment.impl.fsr.FileSystemDeploymentTarget.
Table of Contents
Configuration
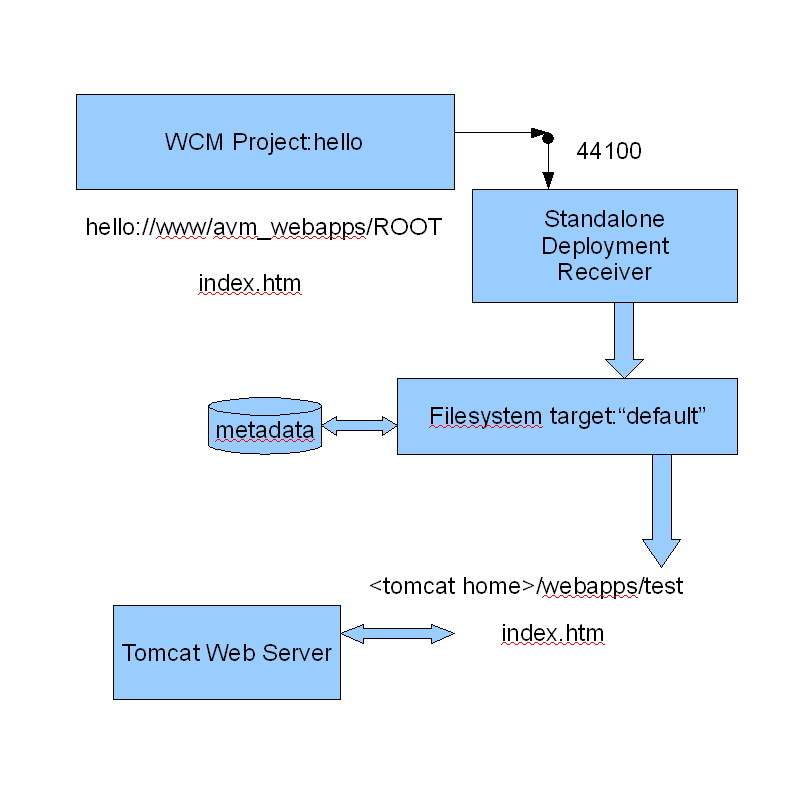
There are two 'roots' that are important, where you are deploying from and where you are deploying to.
The Alfresco WCM user interface stores content in an AVM store with a prefix of 'ProjectName://www/avm_webapps'
and by default this is followed by another folder which is called a 'webapp'. By default when you create a WCM web project there will be a single webapp called 'ROOT' so ROOT's path will be 'ProjectName:/www/avm_webapps/ROOT'. a file in ROOT will have a path like ProjectName:/www/avm_webapps/ROOT/index.htm. Whether you use a project with multiple webapps or multiple web projects is up to you.
The second root is where you want your files to go. For example if you are using a web server like tomcat then your files go into <TOMCAT_HOME>/webapps/<webappName>
You can then deploy all or part of this content to a filesystem location.
The following examples will illustrate how to configure a file system target.
Single WCM web project deployed to Tomcat
The first example deploys content to a separate instance of tomcat to receive your deployment. So the files to be deployed need to be placed in <tomcat home>/webapps/hello. This example installs a test server which can be used to receive the contents of your authoring sandbox. It also sets SourcePath to just deploy the contents of the ROOT folder into the 'hello' webapp and not the root folder itself.
The simplest web site in the world!
- Install a standalone deployment receiver on the machine with your instance of tomcat.
- Configure the file system deployment target that comes with the standalone deployment receiver.
Open the 'deployment.properties' file and
set 'deployment.filesystem.datadir' property to where you want your content to go, in this case c:/tomcat/webapps/hello
- Create a Web Project called 'hello' in Alfresco Explorer.
- Web Project Details screen
- name of 'hello'
- DNS Name 'hello',
- leave the default webapp as ROOT.
- name of 'hello'
- Configure Deployment Receivers screen
- Add Deployment Receiver
- Display Name, hello
- Display Group, demo
- Type, Test Server
- Host hostname or ip address of your standalone deployment receiver
- Port 44100
- Username, admin
- Password, admin
- Source Path, ROOT
- Target Name, default
- Add Deployment Receiver
- Web Project Details screen
- Add a file called index.htm containing 'hello world'
- Deploy your web project to your test server.
Now you should be able to open <your tomcat webserver>/hello and see 'hello world'.
Single WCM web project deployed to two tomcat webapps
Install a separate instance of tomcat to receive your deployment. So the files to be deployed need to be placed in <tomcat home>/webapps/red and <tomcat home>webapps/blue.
This example installs a test server which can be used to receive the contents of your authoring sandbox. It uses webapps.
The simplest web site in the world!
- Install a standalone deployment receiver on the machine with your instance of tomcat.
- Configure the file system deployment target that comes with the standalone deployment receiver.
Open the 'deployment.properties' file and
set 'deployment.filesystem.datadir' property to where you want your content to go, in this case c:/tomcat/webapps
- Create a Web Project called 'colours' in Alfresco Explorer.
- Web Project Details screen
- name of 'colours'
- DNS Name 'colours',
- create webapp 'red'
- create webapp 'blue
- change the default webapp to 'red'.
- name of 'colours'
- Configure Deployment Receivers screen
- Add Deployment Receiver
- Display Name, colours
- Display Group, demo
- Type, Test Server
- Host hostname or ip address of your standalone deployment receiver
- Port 44100
- Username, admin
- Password, admin
- Source Path, <leave blank>
- Target Name, default
- Add Deployment Receiver
- Web Project Details screen
- To the red webapp, Add a file called index.htm containing 'hello world red'
- To the blue webapp, Add a file called index.htm containing 'hello world blue'
- Deploy your web project to your test server.
Now you should be able to open <your tomcat webserver>/red and see 'hello world red'.
And you should be able to open <your tomcat webserver>/blue and see 'hello world blue'
Configurable Property Reference
The following properties are configurable on the file system deployment target:
| Property | Type | Description |
|---|---|---|
| name | String | This is the target name. To select this deployment target, the value of this property should be entered in the 'Target Name' box of the UI. |
| autoFix | boolean | (details) flag controlling the automatic repair of metadata |
| rootDirectory | String | The directory on the filesystem which will receive files deployed to this target. Note: this directory must be be unique to each target. At this time it is not possible to configure multiple targets that deploy to a single shared directory. |
| metaDataDirectory | String | The directory on the filesystem which stores information relating to the current contents of this target's rootDirectory. |
| fileSystemReceiverService | bean reference or declaration | Indicates the File System Receiver Service bean which is associated with this deployment target. |
| authenticator | bean reference or declaration | A link to an implementation of the DeploymentReceiverAuthenticator interface. May be either DeploymentReceiverAuthenticatorSimple (preconfigured username/password) or DeploymentReceiverAuthenticatorAuthenticationService (full Alfresco authentication.) |
File System Deployment Target Metadata
The File System Deployment Target has a simple repository of metadata to track which files, directories and versions are on the target file system. This data is maintained automatically by the File System Deployment Target. It reduces the amount of files that need to be deployed.
In order to force a full redeploy you can safely delete the contents of the metadata directory, but please ensure that a deployment is not already in progress!
The location of the metadata is configured for each target through the metaDataDirectory property.
If there are multiple file system targets on the same deployment engine the configurer should consider whether any of the targets share metadata or have one set of metadata per target. Perhaps the simplest configuration is to use a separate folder for each target's metadata with a folder structure like <receieverRoot>/<metadata>/<targetName>
File System Deployment Targets have functionality to validate that the metadata and the target deployment are consistent. Validation occurs after the deployment engine starts and after detecting an inconsistency. For example trying to delete a file that does not exist or overwriting a file that was outside the control of the File System Deployment Target.
autofix
The File System Deployment Target can either issue an error upon detecting a problem or automatically fix the problem. There is an autoFix parameter in the definition of the Target which controls whether the File System Deployment Target will attempt to fix the metadata itself or just issue a warning. Set the value to true to fix or false to not fix.
Configuration
Here is an example target definition for the standalone deployment engine.
 <bean
  class='org.alfresco.deployment.impl.server.DeploymentTargetRegistrationBean'
  init-method='register'>


  <property name='name'>
   <value>sampleTarget</value>
  </property>


  <property name='registry'>
   <ref bean='deploymentReceiverEngine' />
  </property>

  <property name='target'>


   <bean
    class='org.alfresco.deployment.impl.fsr.FileSystemDeploymentTarget'
    init-method='init'>


    <property name='rootDirectory'>
     <value>sampleTarget</value>
    </property>


          <property name='metaDataDirectory'>
              <value>${deployment.filesystem.metadatadir}/sampleTarget</value>
          </property>
    <property name='autoFix'>
     <value>${deployment.filesystem.autofix}</value>
    </property>
    <property name='postCommit'>
     <list>
      <bean class='org.alfresco.deployment.SampleRunnable' />
     </list>
    </property>
    <property name='fileSystemReceiverService'>
     <ref bean='fileSystemReceiverService' />
    </property>
    <property name='name'><value>sampleTarget</value></property>
    <property name='authenticator'>
     <bean
      class='org.alfresco.deployment.impl.server.DeploymentReceiverAuthenticatorSimple'>
      <property name='user'>
       <value>Giles</value>
      </property>
      <property name='password'>
       <value>Watcher</value>
      </property>
     </bean>
    </property>
   </bean>
  </property>
 </bean>
Extending the File System Deployment Target
prepare callback
The prepare callbacks (which are also implementations of the same FSDeploymentRunnable interface used in postCommit callbacks) are called by the File System Deployment Targets immediately after the complete set of deployment files have been transferred to the File System Deployment Targets's temporary storage areas.
If exceptions are thrown by the callbacks then the deployment will fail and be rolled back. The exception will be propagated to the system calling the File System Deployment Targets and the exception should be logged on both File System Deployment Targets and calling system.
The callbacks occur within the deployment transaction so should minimise the time they take to run since there are resources waiting for deployment to complete.
To register a prepare callback add your bean to the 'prepare' property of the target definition.
e.g.
<property name='prepare'>
     <list>
 <bean class='org.alfresco.deployment.SampleRunnable' />
     </list>
</property>
postCommit callback
There is a postCommit callback available which is called after each successful deployment. For example some users of alfresco use ftp to transfer files or send emails when deployment is complete.
If exceptions are thrown by the callbacks then the exceptions will be logged. But it is too late to do anything else.
There is a sample adapter that will call an operating system command, such as a batch script, or the callback can call a custom java class.
The callback(s) are configured in the 'target' properties of the deployment configuration. They are called in sequence.
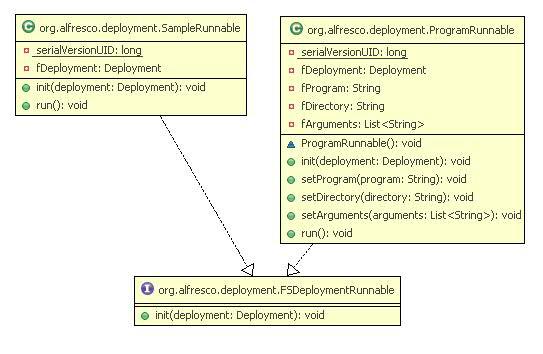
Diagram to show the FSDeploymentRunnable class
FSDeployment runnable class.jpg
Users need to implement the 'FSDeploymentRunnable' interface.
Two implementations are provided.
- SampleRunnable : an example java class that demonstrates how to use this feature
- ProgramRunnable : execute a operating system command after deployment
To register a postCommit callback add your bean to the 'postCommit' property of the target definition.
e.g.
<property name='postCommit'>
    <list>
        <bean class='org.alfresco.deployment.SampleRunnable'/>
    </list>
</property>
You must be a registered user to add a comment. If you've already registered, sign in. Otherwise, register and sign in.
Alfresco Content Services Hub Docs
Ask for and offer help to other Alfresco Content Services Users and members of the Alfresco team.
Related links:
Latest Articles
- Alfresco Community Edition 201911 GA Release Notes
- Alfresco Community Edition 201910 EA Release Notes
- Deconstructing SOLR Indexes
- Alfresco Community Edition 201901 GA Release Notes
- Alfresco Community Edition 201808 EA file list
- php_upload.docx
- Alfresco Community Edition 201808 EA Release Notes
- Alfresco_6.0_docker deployment.pdf
- Alfresco Community Edition 201806 GA file list
- alfresco.log
- Alfresco Addons *Incomplete list*
- Alfresco Community Edition 201806 GA Release Notes
- AGS Benchmark Driver Documentation
- Default memory allocation issue in Alfresco CE 201...
- Alfresco Community Edition 201804 EA file list
We use cookies on this site to enhance your user experience
By using this site, you are agreeing to allow us to collect and use cookies as outlined in Alfresco’s Cookie Statement and Terms of Use (and you have a legitimate interest in Alfresco and our products, authorizing us to contact you in such methods). If you are not ok with these terms, please do not use this website.